iputils manpages and docbook-sgml-utils dependency on gentoo

Can you man ping on gentoo ? If not it’s probably because of this: https://bugs.gentoo.org/show_bug.cgi?id=158660

I wanted to install iputils man pages:
# echo "net-misc/iputils doc" >> /etc/portage/package.use
# emerge -avt iputils
[ebuild R ] net-misc/iputils-20060512 USE="doc* -ipv6 -static" 0 kB
[ebuild N ] app-text/docbook-sgml-utils-0.6.14 USE="tetex" 123 kB
[ebuild N ] dev-perl/SGMLSpm-1.03-r5 92 kB

SGMLSpm installation went fine but docbook-sgml-utils-0.6.14 did not complete. Here is some of the last output-errors:
jade:/etc/sgml/sgml-docbook-4.3.cat:1:8:E: cannot open "/usr/share/sgml/docbook/sgml-dtd-4.3/catalog" (No such file or directory)
make[2]: *** [api.html] Error 1
make[2]: *** Waiting for unfinished jobs....
make[2]: *** [backend-spec.html] Error 1
make[2]: Leaving directory `/var/tmp/portage/app-text/docbook-sgml-utils-0.6.14/work/docbook-utils-0.6.14/doc/HTML'
make[1]: *** [all-recursive] Error 1
make[1]: Leaving directory `/var/tmp/portage/app-text/docbook-sgml-utils-0.6.14/work/docbook-utils-0.6.14/doc'
make: *** [all-recursive] Error 1

I issued an eix sgml:

...snip...
[I] app-text/docbook-sgml-dtd
Available versions:
(3.0) 3.0-r3
(3.1) 3.1-r3
(4.0) 4.0-r3
(4.1) 4.1-r3
(4.2) 4.2-r2
(4.3) 4.3-r2
(4.4) 4.4
Installed versions: 3.0-r3(3.0)(17:06:32 09/19/06) 3.1-r3(3.1)(17:06:38 09/19/06) 4.0-r3(4.0)(17:06:16 09/19/06) 4.1-r3(4.1)(17:06:10 09/19/06) 4.4(4.4)(23:51:33 09/18/06)
Homepage: http://www.docbook.org/sgml/
Description: Docbook SGML DTD 4.4
...snip...
...snip...
* app-text/docbook-sgml-utils
Available versions: 0.6.14
Homepage: http://sources.redhat.com/docbook-tools/
Description: Shell scripts to manage DocBook documents
...snip...

I had no docbook-sgml-dtd 4.3 version installed, so what I did was:
# emerge -avt =app-text/docbook-sgml-dtd-4.3-r2

and then:
# emerge -avt iputils
[ebuild R ] net-misc/iputils-20060512 USE="doc* -ipv6 -static" 0 kB
[ebuild N ] app-text/docbook-sgml-utils-0.6.14 USE="tetex" 0 kB

I can now man ping 🙂

useless tip of the day – clockdiff

How much time difference does your box and another host on the net have ?

~# clockdiff www.gentoo-wiki.com
...................................................
host=www.gentoo-wiki.com rtt=215(0)ms/206ms delta=508000ms/508000ms Thu Jun 28 16:25:31 2007
~# clockdiff www.ntua.gr
..................................................
host=achilles.noc.ntua.gr rtt=54(1)ms/49ms delta=-77ms/-76ms Thu Jun 28 16:25:47 2007

clockdiff is inside iputils package (at least on gentoo) and can only by executed as root.

P.S. exams suck bigtime….

gnomad2 – usb_set_configuration: operation not permitted – fix

Gnomad2 is a GTK+ music manager and swiss army knife for the Creative Labs NOMAD and Zen range plus the Dell DJ devices using the Portable Digital Entertainment (PDE) protocol.

Creative does not support these devices under Microsoft Windows Vista, there are no vista compatible drivers for those devices “yet”…so the only hope for owners of Creative Zen devices who wish to use what they have bought under a recent operating system is to use them with Linux (or go back to Windows XP if they wish something not so current). That means that users using Vista cannot upload mp3s to Zen and cannot even charge the device. Unless you have working drivers the device charges very very slowly.

Installation in Linux is distro dependent and should not be a problem. Just find the gnomad/gnomad2 package on the package manager of your distro and install it. On gentoo/sabayon an emerge -avt gnomad should be enough.

For people that will face the “usb_set_configuration: operation not permitted” error on gnomad startup there is a simple fix. Add the following to a file named 99-gnomad.rules and save it under /etc/udev/rules.d/ (You MUST be root to do that).

SUBSYSTEM!="usb_device", ACTION!="add", GOTO="libnjb_rules_end"
# Creative Nomad Jukebox
SYSFS{idVendor}=="0471", SYSFS{idProduct}=="0222", GROUP="plugdev", MODE="0660"
# Creative Nomad Jukebox 2
SYSFS{idVendor}=="041e", SYSFS{idProduct}=="4100", GROUP="plugdev", MODE="0660"
# Creative Nomad Jukebox 3
SYSFS{idVendor}=="041e", SYSFS{idProduct}=="4101", GROUP="plugdev", MODE="0660"
# Creative Nomad Jukebox Zen
SYSFS{idVendor}=="041e", SYSFS{idProduct}=="4108", GROUP="plugdev", MODE="0660"
# Creative Nomad Jukebox Zen NX
SYSFS{idVendor}=="041e", SYSFS{idProduct}=="4109", GROUP="plugdev", MODE="0660"
# Creative Nomad Jukebox Zen USB 2.0
SYSFS{idVendor}=="041e", SYSFS{idProduct}=="410b", GROUP="plugdev", MODE="0660"
# Creative Nomad Jukebox Zen Xtra
SYSFS{idVendor}=="041e", SYSFS{idProduct}=="4110", GROUP="plugdev", MODE="0660"
# Dell Digital Jukebox
SYSFS{idVendor}=="041e", SYSFS{idProduct}=="4111", GROUP="plugdev", MODE="0660"
# Creative Nomad Jukebox Zen Touch
SYSFS{idVendor}=="041e", SYSFS{idProduct}=="411b", GROUP="plugdev", MODE="0660"
# Creative Zen (Zen Micro variant)
SYSFS{idVendor}=="041e", SYSFS{idProduct}=="411d", GROUP="plugdev", MODE="0660"
# Creative Nomad Jukebox Zen Micro
SYSFS{idVendor}=="041e", SYSFS{idProduct}=="411e", GROUP="plugdev", MODE="0660"
# Second Generation Dell Digital Jukebox
SYSFS{idVendor}=="041e", SYSFS{idProduct}=="4126", GROUP="plugdev", MODE="0660"
# Dell Pocket DJ
SYSFS{idVendor}=="041e", SYSFS{idProduct}=="4127", GROUP="plugdev", MODE="0660"
# Third Generation Dell Digital Jukebox
SYSFS{idVendor}=="041e", SYSFS{idProduct}=="412F", GROUP="plugdev", MODE="0660"
# Creative Zen Sleek
SYSFS{idVendor}=="041e", SYSFS{idProduct}=="4136", GROUP="plugdev", MODE="0660"
LABEL="libnjb_rules_end"

Then restart udev (or reboot your computer if you don’t know how to restart udev), start gnomad2 and your zen should work flawlessly under Linux.

If you still get errors check that your current user belongs to the group plugdev using the command: groups username . If plugdev does not appear add it using gpasswd:
gpasswd -a username plugdev
replacing username with your username on the box.

References: http://bugs.gentoo.org/show_bug.cgi?id=137728

Πρωτοσέλιδο η εκδήλωση της ILUG

Το πόσο επιτυχημένη ήταν η εκδήλωση της ILUG που έγινε στις 9 Ιουνίου δύσκολα περιγράφεται. Θα προσπαθήσω να γράψω ένα ξεχωριστό post γι αυτό στις επόμενες μέρες. Προς το παρόν ένα πρωτοσέλιδο απο μία εκ των 2 μεγαλύτερων τοπικών εφημερίδων:

ILUG στον Ηπειρωτικό Αγώνα

Και το άρθρο: “Το Linux είναι και… Γιαννιώτικο. Μια πολύ καλή ημερίδα από την ομάδα χρηστών linux Ιωαννίνων“.

Αναφορές της εκδήλωσης υπάρχουν και σε άλλες τοπικές εφημερίδες.

Hands-on OLPC

Today I was woken up by a courier who brought me a very interesting box. The box had an OLPC and some CDs inside.
The package was kindly sent to me by Mr. Karounos in order to present it in our local LUG event on the 9th of June in Ioannina. (Visit the website for more information).

First thought when I took it out of the bag…”it’s very small but it’s kinda pretty in a way too”. I put it on my desk and tried to open it. Well, it took me more than 1 minute to find out how to open it. I plugged it to the current and pushed the power button. I was greeted by Openboot bios and after 3 seconds it started to boot. It takes more than 1 minute from the time you press the power button until the sugar interface comes up.

When the interface had finished starting up I was a bit puzzled. I didn’t know what exactly to do. If you have used any kind of computer before, sugar will certainly stun you, for good or for bad. I started checking out the applications it comes with. The “Paint” application is really nice kids and so is “BlockParty” which is a tetris clone. Next was the “Camera”, I really liked the camera’s resolution, I didn’t expect it to be that good. “Calculator”..is another calculator with scientific functions as well, if you enable them. “Write” is an abiword clone, it’s very easy to use and you can import pictures taken with the camera and put them inside the document you are writing. What I didn’t like though was that the default “save as” format was “Microsoft Word .doc”. Why ? Anyway, continuing with the applications, next came the “News Reader” which looks like a minimal version of liferea but since I didn’t have any networking yet I could not test it any more. “Web” is a web browser that when you open it it takes you directly to your local Library of e-books. Very very usefull. At that time I couldn’t do any more testing of web sites due to lack of network connectivity. “Read” is a stripped down version of evince for reading various documents. Absolutely necessary for the kind of job this laptop must do. “TamTam” is a music creation tool for kids. And finally Etoys. Etoys is something that needs a lot of studying. It’s a creativity suite for kids. I won’t go into this any deeper for now.

Then was the time to connect OLPC to my access point at home. I tried various stuff from the interface but nothing made the “Web” connect to any sites. I couldn’t resist any more…I had to find access to the linux console somehow. I tried ctrl+alt+ various keys until one got me to the console. There are no F-keys on the OLPC keyboard so it wasn’t so straightforward as one might think. I was very lucky because when you give the root login no password is asked. You are immediately given a shell. I tried the usual iwlist, iwconfig, dhclient commands and …tada! they worked! ifconfig showed that I was given an IP by the Access Point. Back to the sugar interface with another ctrl+alt+another key and the “Web” was finally working. The browsing experience was quite good I can say. Four buttons (up, down,left,right) next to the OLPC’s monitor make the browsing a bit easier because OLPC keys on the keyboard are small. NO, they are not just smaller than a normal keyboard…they are so small that only a five year old kid can press them with ease.

I have been playing for more than 7 hours today with OLPC and did various interesting (at least for me) stuff on it. Even this post is written through OLPC’s “Web” browser (and believe me it’s very very difficult to type, but hey…this laptop is not for me, it’s for kids 🙂 )but I feel that I need to spend a lot more to fully understand the “sugar interface”. I will try to write more about stuff I’ll be doing on the OLPC in the next few days.

Feelings ? Mixed, both good and bad. There were some things I liked a lot, for example the monitor, and some things that I didn’t, for example in sugar’s network manager there’s no “interaction” when you choose/click between mess networking and normal access point (more on how, where, etc on a another post), so there were times that I couldn’t really figure out what was going on, whether it’s trying to connect to my access point or not.

That’s all for today. I hope I can write a bit more about OLPC in the next few days but I have to finish my presantation for ILUG’s event on time too.

I have some pictures from the OLPC on my flickr.

Thanks again to Mr. Karounos for being so helpfull.

P.S. If someone wants to type with greek characters you need to edit /etc/X11/xorg.conf and add these 2 lines inside Section “InputDevice” where Identifier is “ATKbd”:

Option "XkbLayout" "us,el"
Option "XkbOptions" "grp:alt_shift_toggle"

then you can change to greek with alt+shift. e.g. “Ένα Λάπτοπ για Κάθε παιδί”

apt-get install sucks so much sometimes

I was given an old debian machine to do some stuff. I had some networking problems so I thought I could install tcpdump to see what’s happening. Take a _good_ look at the result…

# apt-get update
Get:1 http://security.debian.org stable/updates/main Packages [62.2kB]
Get:2 ftp://ftp.ntua.gr stable/main Packages [5638kB]
Get:3 http://security.debian.org stable/updates/main Release [97B]
Get:4 ftp://ftp.ntua.gr stable/main Release [95B]
Get:5 ftp://ftp.ntua.gr stable/main Sources [1653kB]
Get:6 ftp://ftp.ntua.gr stable/main Release [97B]
Fetched 7353kB in 38s (191kB/s)
Reading Package Lists... Done
# apt-get install tcpdump
Reading Package Lists... Done
Building Dependency Tree... Done
The following extra packages will be installed:
libc6 libc6-dev libpcap0.8 libssl0.9.8 locales tzdata
Suggested packages:
glibc-doc
The following packages will be REMOVED:
base-config initrd-tools kernel-image-2.4.27-2-386
The following NEW packages will be installed:
libpcap0.8 libssl0.9.8 tcpdump tzdata
The following packages will be upgraded:
libc6 libc6-dev locales
3 upgraded, 4 newly installed, 3 to remove and 266 not upgraded.
Need to get 14.9MB of archives.
After unpacking 21.5MB disk space will be freed.
Do you want to continue? [Y/n] n

# uname -a
Linux XXXXXX 2.4.27-2-386 #1 Wed Aug 17 09:33:35 UTC 2005 i686 GNU/Linux

Does it want to remove the kernel I am using??? Why ?

D0h!

Yet another ati-drivers+xorg problem

The ati-drivers saga will never ever end 🙁

The gentoo fellas updated the stable xorg server to version 7.2, so I decided to give it a shot. The process was smooth, no errors.
Upon reboot though, the problems started. No 3D acceleration! I re-emerged the drivers, I used eselect opengl set ati, no result. Damn! I am still using kernel version 2.6.18 and my ati drivers were version 8.32.5.
My first thought was to update ati drivers to the latest available, 8.35.5. The 50Mb download took more than 30minutes on my 1mbit super-duper-extra fast adsl!

<Yet Another Rant>
During the last couple of weeks I can’t even get more than 50kb/sec during the night. During the morning there are times that I can hardly browse through websites with reasonable speed. Real-time streaming videos from youtube is out of the question of course.
</Yet Another Rant>

The drivers compiled fine but I lost my 1280×1024 mode! Out of sync errors and no image displayed on my tft. I couln’t even make it work with a Modeline…The highest mode that worked was 1024×768. I’ve even tried removing the ddc module out of xorg modules directory without any luck though. I am not willing to go back to 1024×768 so I had to download some other, older, ati-drivers version.
This time I chose version 8.33.6. Another 50Mb of download and another 30minutes of wait. The emerge was smooth, no errors. X windows started…but my fonts were trully messed up! Something had made them very very small on menus and input boxes. ARGHHHHHHHHH!! Grepping through the Xorg.0.log I found out that DPI was set to 75×75. Another easy way to check on that is through the
% xdpyinfo | grep resolution

command. Something had went wrong. Then I remembered that I had removed the ddc module, I put it back in and I got:
% xdpyinfo | grep resolution
resolution: 81x86 dots per inch

A bit better but certainly not very good. I had to change the DPI somehow…but how ?

I googled and googled …and I found out that I could put something like this:
Option "DPI" "96 x 96
inside my xorg.conf in the Screen section. But that didn’t to the trick. That used to work on Xorg 7.1 but not on 7.2. Tough luck.

I kept googling until I found out that I could start another X server like this:
% startx -- :1 -dpi 96

get the screen dimensions like this:
% xdpyinfo | grep dimensions
dimensions: 1280x1024 pixels (XXXxYYY millimeters)

and then paste the output of the previous command inside the Monitor section of the xorg.conf file like this:
DisplaySize XXX YYY

That did the trick. I can now enjoy 96×96 DPI fonts.

During the googling I found out that I can also have something like this inside the .Xdefaults file:
Xft.dpi: 96

Now, after more than 2 hours of messing around with ati-drivers and xorg.conf I am able to enjoy my beautiful desktop…pfffff.

Reminder to myself: Dont’ ever ever ever ever buy an ati card again.

P.S. I really hope that the 8.35.5 drivers are somehow fixed in the future so that I can use 1280×1024 if I ever need to update to that version.

99€ for Magenta’s DesktopOS ?

Just go to Magenta‘s DesktopOS e-shop and take a look at the price. 99€ for a greek linux distro ?

I know that there is proprietary software included in that distro, but I still find the price outrageous for what’s included. Here’s the pricelist of what’s not open source/free and is included on the distro according to Magenta’s Pricelist:

a) GOLDEN VERSION 2006 English-Greek & Greek-English electronic TRANSLATION dictionary for computers running Linux OS.
Price: 35€

b) Unicode Fonts No 1,2,3,4,5.
Price: 5x 34.63€ = 173.15€

c) Font Pack of “Greek Font Society“.
All fonts come with an openfont license. Price: 0€

d) Font pack of “Cannibal Fonts
Unspecified number/names of fonts…Unspecified Price. There are fontpacks on that site costing more than 1000€.

I can’t find any word on the website about “support”, helpdesk, etc. If I buy it…who provides support ? Magenta or the Ubuntu Community ? This is something crucial for potential buyers and it should have been clearly noted on the site. If there’s no official support by Magenta, included in the pricetag of 99€, then all the money a buyer pays goes for Magenta’s proprietary software and fonts included in the distro. If someone excludes the 35€ that the dictionary costs, then there’s another 64€ for fonts only!

I have never ever used Magenta’s or Cannibal’s fonts on any of the distros I use. I find that the free fonts that exist are already more than enough for me. So, if I ever bought Magenta’s DesktopOS, it would only be for the dictionary included, and that just costs 35€. For someone who does not need Magenta’s or Cannibal’s fonts, the extra 64€ these seem to cost is outrageous (at least to me).

If you are like me and have never used Magenta’s fonts nor do you need them, I wouldn’t recommend buying that distro. Maybe a version without those fonts and with better(?) support for a price of 20-40€ would be more appealing.

P.S. Not even a single screenshot ? why ?

P.S.2. I really hope that the 99€ pricetag is an “error” of some kind. Even RHEL Desktop is cheaper, and I am sure that Redhat’s support is far more valuable than any dictionary or font included in Magenta’s DestktopOS.

P.S.3 I loved the greek spelling of “e-shop” on their site -> “η-Κατάστημα”…hillarious

iloog-7.04

Μετά από πολλή δουλειά και πολλές δοκιμές η έκδοση 7.04 του iloog είναι επιτέλους έτοιμη. Συνολικά περιέχονται 900 πακέτα σε αυτή την έκδοση!

Πολύτιμη βοήθεια, όχι πάντα με τη θέλησή τους :), σε αυτή την έκδοση προσέφεραν κυρίως οι Fuzz (με τεράστια διαφορά από τους υπόλοιπους :)), Nlord, Rad. Η βοήθεια ήταν είτε απεριόριστος χρόνος για beta testing ή ακόμα και δανεισμός του hardware τους για τη δοκιμή των 17 περίπου beta εκδόσεων που μεσολάβησαν από την έκδοση 7.02 μέχρι την 7.04. Πολλές νέες ιδέες μελών του ILUG, και όχι μόνο, ενσωματώθηκαν στη νέα έκδοση αυτού του liveCD.

Οι αλλαγές από την έκδοση 7.02 είναι πολλές. Εκτός από το αναμενόμενο update πάρα πολλών πακέτων (με πιο σημαντικά τα kernel-2.6.19.5, glibc-2.5, gcc-4.1.1,dbus-1.0.2 , udev-104,κτλ ), η νέα έκδοση έχει διορθώσει πολλά μικρά ή μεγάλα bugs που παρουσιαζόταν κατά τη χρήση του liveCD. Στην έκδοση αυτή έχει δωθεί πολύ μεγαλύτερη προσοχή από κάθε άλλη στην ομαλότερη λειτουργία κατά χρήση των προγραμμάτων.

Λόγω της αλλαγής kernel βελτιώθηκε ακόμα περισσότερο η καλή υποστήριξη υλικού, και σε συνδυασμό με την παρουσία και νέων firmwares μέσα στο CD κάνει πολύ πιο άνετη τη χρήση ασύρματων καρτών (ipw3945) και aDSL modems (sagem 800/840, crypto F200). Για τους χρήστες με WIDE οθόνες υπάρχει ειδικό section στο /etc/X11/xorg.conf και απαιτείται μόνο η αλλαγή ενός ονόματος στην 2η γραμμή αυτού του αρχείου. Μόνο οι χρήστες με τα νεώτερα intel chipsets ίσως χρειαστεί να τρέξουν πρώτα το 915resolution(περιέχεται στο liveCD) πρωτού κάνουν την αλλαγή στο /etc/X11/xorg.conf.

Διορθώθηκαν επίσης κάποια προβλήματα που είχε το config του isolinux με κάποια boot options. Επίσης προστέθηκαν καινούργια options όπως το cpusched και το restore.Το cpusched δίνει τη δυνατότητα επιλογής cpu scheduler κατά το boot, πχ cpusched=ondemand και το restore μπορεί να επαναφέρει από backup το home directory του χρήστη iloog, πχ restore=sda1.

Αισθητή είναι η βελτίωση στο boot time κατά 10-15% λόγω της βελτιστοποίησης τοποθέτησης των αρχείων πάνω στο CD image.

Προσοχή δώθηκε στην δημιουργία μικρών scripts για την διευκόλυνση των χρηστών σε μερικές απλές διαδικασίες. Τα scripts αυτά έχουν όλα το πρόθεμα “iloog-” οπότε μπορεί κανείς να τα εντοπίσει από command line γράφοντας iloog[tab][tab]. Μέσω ενός script είναι επίσης δυνατή η εγκατάσταση της database των πακέτων (/var/pkg/db) που χρησιμοποιήθηκαν για τη δημιουργία του iloog, ώστε να μπορεί κάποιος να προσθέσει και ένα δικό του πακέτο αν θέλει. Το script αυτό ίσως φανεί πιο χρήσιμο σε όσους θα ήθελαν να αντιγράψουν manually το iloog στο δίσκο τους (δεν προσφέρεται έτοιμο εργαλείο γι αυτό) και θέλουν να μπορούν να προσθέτουν και να αφαιρούν πακέτα μέσω του emerge σαν ένα κανονικό gentoo distro.

Περισσότερα στο changelog που περιέχεται στο liveCD (/etc/iloog/changelog)

To link για το iso καθώς και το νέο delta θα το βρείτε στo: http://ilug.void.gr/iloog/

Παρατηρήσεις και σχόλια στο forum του ILUG

searching the scrollback buffer of mrxvt

As mrxvt tips page says, there is a way to search the scrollback buffer. The uses of this are infinite…

The code on the page though was a bit problematic (at least for me), so I slightly modified it to work:

Mrxvt.macro.Primary+Ctrl+Shift+question: PrintScreen -ps perl -e '$_=join("",<STDIN>); s/\n+$/\n/g; print' > /tmp/scrollback
Mrxvt.macro.Primary+Add+Ctrl+Shift+question: NewTab "(Search)" !less -ifLR +G /tmp/scrollback; rm -f /tmp/scrollback
Mrxvt.macro.Primary+Ctrl+slash: PrintScreen -s perl -e '$_=join("",<STDIN>); s/\n+$/\n/g; print' > /tmp/scrollback
Mrxvt.macro.Primary+Add+Ctrl+slash: NewTab "(Search)" !view +"syn off|set nospell notitle |normal G" /tmp/scrollback; rm -f /tmp/scrollback

What I’ve changed is that I replaced the old “/bin/sh -c” with a simple “!”. The manpage of mrxvt has more info about “!” (line 434). I’ve also added a “-f” flag to the rm command at the end.

socks5 over ssh

Scenario: A client behind a firewall that allows ssh and http outgoing traffic but blocks everything else (eg. the wireless network of cs.uoi.gr). A non-firewalled server running sshd somewhere on planet earth.

How:
a) download/install dante on the server.
b) edit /etc/socks/sockd.conf
internal: 127.0.0.1 port = SOCKS.LISTENING.PORT
external: REAL.SERVER.IP
clientmethod: none
method: none
client pass { from: 127.0.0.0/8 port 1-65535 to: 0.0.0.0/0 }
pass { from: 127.0.0.0/8 to: 0.0.0.0/0 protocol: tcp udp }
user.privileged: SOCKS-USER
user.notprivileged: SOCKS-USER
user.libwrap: SOCKS-USER

c) start dante

d) from the client machine:
ssh USERNAME@REAL.SERVER.IP -L:SOCKS.LISTENING.PORT:127.0.0.1:SOCKS.LISTENING.PORT
more on ssh port forwarding

e) Use socks5 proxy:
host 127.0.0.1
port SOCKS.LISTENING.PORT

with your favorite program.

Notes:
REAL.SERVER.IP = I really hope I don’t need to explain this.
SOCKS.LISTENING.PORT = the port that the socks server will listen. Try a non-priviledged port like 33333.
SOCKS-USER = the username that the socks server will run under (on gentoo this is: sockd). Don’t use root. Just don’t.

Tip: You don’t need to use the same listening port for the socks server and for the local redirection port. It’s just for ease of use.

Results: Internet access though socks5 proxy over an ssh (encrypted!) connection. The socks server is not accessible to the world since it only listens for connections on the local loopback interface of the server.

Ubuntu .pool directory

Ubuntu uses a “hidden” .pool directory to store it’s iso files on the mirrors. This dir is named “.pool”.
To enter that dir just replace the version, eg edgy, with .pool

http://ftp.ntua.gr/pub/linux/ubuntu-releases/edgy/ ---> http://ftp.ntua.gr/pub/linux/ubuntu-releases/.pool/
ftp://ftp.free.fr/mirrors/ftp.ubuntu.com/releases/edgy/ ---> ftp://ftp.free.fr/mirrors/ftp.ubuntu.com/releases/.pool/

Feisty is already being uploaded to the mirrors. Use the .pool directory to get it a bit earlier if you wish 🙂

Round Trip and Packet Loss stats with rrdtool

To get some nice graphs showing your round trip time and your packet loss, like the following image, follow the steps below:
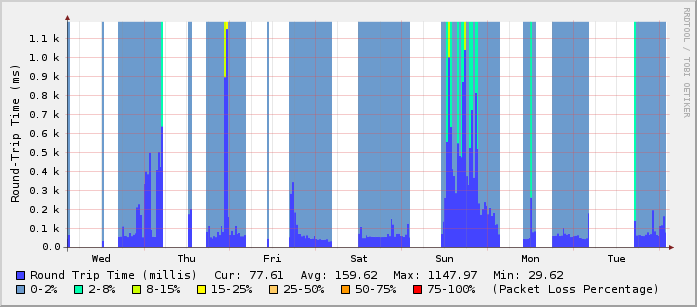
What you need before you start: rrdtool and a cron server (vixie-cron is fine).

a) Execute the following

/usr/bin/rrdtool create /var/rrds/ping/ping_wan.rrd \
--step 300 \
DS:pl:GAUGE:600:0:100 \
DS:rtt:GAUGE:600:0:10000000 \
RRA:AVERAGE:0.5:1:800 \
RRA:AVERAGE:0.5:6:800 \
RRA:AVERAGE:0.5:24:800 \
RRA:AVERAGE:0.5:288:800 \
RRA:MAX:0.5:1:800 \
RRA:MAX:0.5:6:800 \
RRA:MAX:0.5:24:800 \
RRA:MAX:0.5:288:800

You can change /var/rrds/ping/ping_wan.rrd to the path/file.rrd you wish.

b) Save the following to the file ping.sh

#!/bin/bash
PING=/bin/ping
COUNT=4
DEADLINE=10
ping_host() {
local output=$($PING -q -n -c $COUNT -w $DEADLINE $1 2>&1)
# notice $output is quoted to preserve newlines
local temp=$(echo "$output"| awk '
BEGIN {pl=100; rtt=0.1}
/packets transmitted/ {
match($0, /([0-9]+)% packet loss/, matchstr)
pl=matchstr[1]
}
/^rtt/ {
# looking for something like 0.562/0.566/0.571/0.024
match($4, /(.*)\/(.*)\/(.*)\/(.*)/, a)
rtt=a[2]
}
/unknown host/ {
# no output at all means network is probably down
pl=100
rtt=0.1
}
END {print pl ":" rtt}
')
RETURN_VALUE=$temp
}
# ping a host on the local lan
ping_host www.ntua.gr
/usr/bin/rrdtool update \
/var/rrds/ping/ping_wan.rrd \
--template \
pl:rtt \
N:$RETURN_VALUE

ping.sh.gz
Change the ping_host www.ntua.gr to the one of your choice. Make the script executable, chmod +x ping.sh.

If you have changed the /var/rrds/ping/ping_wan.rrd on step (a) you have to change it here too.

c) Save the following to ping-graph.sh and make it executable.

#!/bin/sh
cd /var/rrds/ping/
echo "
<HTML>
<HEAD><TITLE>Round-Trip and Packet Loss Stats</TITLE></HEAD>
<BODY>
<H3>Hourly Round-Trip & Packetloss Stats(1min average)</H3>
" > index.html
rrdtool graph ping_wan_hour.png -h 225 -w 600 -a PNG \
--imginfo '<IMG SRC=/stats/%s WIDTH=%lu HEIGHT=%lu >' \
--start -3600 --end -60 --x-grid MINUTE:10:HOUR:1:MINUTE:30:0:%R \
-v "Round-Trip Time (ms)" \
--rigid \
--lower-limit 0 \
DEF:roundtrip=ping_wan.rrd:rtt:AVERAGE \
DEF:packetloss=ping_wan.rrd:pl:AVERAGE \
CDEF:PLNone=packetloss,0,2,LIMIT,UN,UNKN,INF,IF \
CDEF:PL2=packetloss,2,8,LIMIT,UN,UNKN,INF,IF \
CDEF:PL15=packetloss,8,15,LIMIT,UN,UNKN,INF,IF \
CDEF:PL25=packetloss,15,25,LIMIT,UN,UNKN,INF,IF \
CDEF:PL50=packetloss,25,50,LIMIT,UN,UNKN,INF,IF \
CDEF:PL75=packetloss,50,75,LIMIT,UN,UNKN,INF,IF \
CDEF:PL100=packetloss,75,100,LIMIT,UN,UNKN,INF,IF \
AREA:roundtrip#4444ff:"Round Trip Time (millis)" \
GPRINT:roundtrip:LAST:"Cur\: %5.2lf" \
GPRINT:roundtrip:AVERAGE:"Avg\: %5.2lf" \
GPRINT:roundtrip:MAX:"Max\: %5.2lf" \
GPRINT:roundtrip:MIN:"Min\: %5.2lf\n" \
AREA:PLNone#6c9bcd:"0-2%":STACK \
AREA:PL2#00ffae:"2-8%":STACK \
AREA:PL15#ccff00:"8-15%":STACK \
AREA:PL25#ffff00:"15-25%":STACK \
AREA:PL50#ffcc66:"25-50%":STACK \
AREA:PL75#ff9900:"50-75%":STACK \
AREA:PL100#ff0000:"75-100%":STACK \
COMMENT:"(Packet Loss Percentage)"
echo "
<img src="ping_wan_hour.png"><br>
<br>
<H3>Daily Round-Trip & Packetloss Stats(1min average)</H3>
" >> index.html
rrdtool graph ping_wan_day.png -h 225 -w 600 -a PNG \
--imginfo '<IMG SRC=/stats/%s WIDTH=%lu HEIGHT=%lu >' \
--lazy --start -86400 --end -60 --x-grid MINUTE:30:HOUR:1:HOUR:2:0:%H \
-v "Round-Trip Time (ms)" \
--rigid \
--lower-limit 0 \
DEF:roundtrip=ping_wan.rrd:rtt:AVERAGE \
DEF:packetloss=ping_wan.rrd:pl:AVERAGE \
CDEF:PLNone=packetloss,0,2,LIMIT,UN,UNKN,INF,IF \
CDEF:PL2=packetloss,2,8,LIMIT,UN,UNKN,INF,IF \
CDEF:PL15=packetloss,8,15,LIMIT,UN,UNKN,INF,IF \
CDEF:PL25=packetloss,15,25,LIMIT,UN,UNKN,INF,IF \
CDEF:PL50=packetloss,25,50,LIMIT,UN,UNKN,INF,IF \
CDEF:PL75=packetloss,50,75,LIMIT,UN,UNKN,INF,IF \
CDEF:PL100=packetloss,75,100,LIMIT,UN,UNKN,INF,IF \
AREA:roundtrip#4444ff:"Round Trip Time (millis)" \
GPRINT:roundtrip:LAST:"Cur\: %5.2lf" \
GPRINT:roundtrip:AVERAGE:"Avg\: %5.2lf" \
GPRINT:roundtrip:MAX:"Max\: %5.2lf" \
GPRINT:roundtrip:MIN:"Min\: %5.2lf\n" \
AREA:PLNone#6c9bcd:"0-2%":STACK \
AREA:PL2#00ffae:"2-8%":STACK \
AREA:PL15#ccff00:"8-15%":STACK \
AREA:PL25#ffff00:"15-25%":STACK \
AREA:PL50#ffcc66:"25-50%":STACK \
AREA:PL75#ff9900:"50-75%":STACK \
AREA:PL100#ff0000:"75-100%":STACK \
COMMENT:"(Packet Loss Percentage)"
echo "
<img src="ping_wan_day.png"><br>
<br>
<H3>Weekly Round-Trip & Packetloss Stats(1min average)</H3>
" >> index.html
rrdtool graph ping_wan_week.png -h 225 -w 600 -a PNG \
--imginfo '<IMG SRC=/stats/%s WIDTH=%lu HEIGHT=%lu >' \
--lazy --start -604800 --end -1800 \
-v "Round-Trip Time (ms)" \
--rigid \
--lower-limit 0 \
DEF:roundtrip=ping_wan.rrd:rtt:AVERAGE \
DEF:packetloss=ping_wan.rrd:pl:AVERAGE \
CDEF:PLNone=packetloss,0,2,LIMIT,UN,UNKN,INF,IF \
CDEF:PL2=packetloss,2,8,LIMIT,UN,UNKN,INF,IF \
CDEF:PL15=packetloss,8,15,LIMIT,UN,UNKN,INF,IF \
CDEF:PL25=packetloss,15,25,LIMIT,UN,UNKN,INF,IF \
CDEF:PL50=packetloss,25,50,LIMIT,UN,UNKN,INF,IF \
CDEF:PL75=packetloss,50,75,LIMIT,UN,UNKN,INF,IF \
CDEF:PL100=packetloss,75,100,LIMIT,UN,UNKN,INF,IF \
AREA:roundtrip#4444ff:"Round Trip Time (millis)" \
GPRINT:roundtrip:LAST:"Cur\: %5.2lf" \
GPRINT:roundtrip:AVERAGE:"Avg\: %5.2lf" \
GPRINT:roundtrip:MAX:"Max\: %5.2lf" \
GPRINT:roundtrip:MIN:"Min\: %5.2lf\n" \
AREA:PLNone#6c9bcd:"0-2%":STACK \
AREA:PL2#00ffae:"2-8%":STACK \
AREA:PL15#ccff00:"8-15%":STACK \
AREA:PL25#ffff00:"15-25%":STACK \
AREA:PL50#ffcc66:"25-50%":STACK \
AREA:PL75#ff9900:"50-75%":STACK \
AREA:PL100#ff0000:"75-100%":STACK \
COMMENT:"(Packet Loss Percentage)"
echo "
<img src="ping_wan_week.png"><br>
<br>
<H3>Monthly Round-Trip & Packetloss Stats(1min average)</H3>
" >> index.html
rrdtool graph ping_wan_month.png -h 225 -w 600 -a PNG \
--imginfo '<IMG SRC=/stats/%s WIDTH=%lu HEIGHT=%lu >' \
--lazy --start -2592000 --end -7200 \
-v "Round-Trip Time (ms)" \
--rigid \
--lower-limit 0 \
DEF:roundtrip=ping_wan.rrd:rtt:AVERAGE \
DEF:packetloss=ping_wan.rrd:pl:AVERAGE \
CDEF:PLNone=packetloss,0,2,LIMIT,UN,UNKN,INF,IF \
CDEF:PL2=packetloss,2,8,LIMIT,UN,UNKN,INF,IF \
CDEF:PL15=packetloss,8,15,LIMIT,UN,UNKN,INF,IF \
CDEF:PL25=packetloss,15,25,LIMIT,UN,UNKN,INF,IF \
CDEF:PL50=packetloss,25,50,LIMIT,UN,UNKN,INF,IF \
CDEF:PL75=packetloss,50,75,LIMIT,UN,UNKN,INF,IF \
CDEF:PL100=packetloss,75,100,LIMIT,UN,UNKN,INF,IF \
AREA:roundtrip#4444ff:"Round Trip Time (millis)" \
GPRINT:roundtrip:LAST:"Cur\: %5.2lf" \
GPRINT:roundtrip:AVERAGE:"Avg\: %5.2lf" \
GPRINT:roundtrip:MAX:"Max\: %5.2lf" \
GPRINT:roundtrip:MIN:"Min\: %5.2lf\n" \
AREA:PLNone#6c9bcd:"0-2%":STACK \
AREA:PL2#00ffae:"2-8%":STACK \
AREA:PL15#ccff00:"8-15%":STACK \
AREA:PL25#ffff00:"15-25%":STACK \
AREA:PL50#ffcc66:"25-50%":STACK \
AREA:PL75#ff9900:"50-75%":STACK \
AREA:PL100#ff0000:"75-100%":STACK \
COMMENT:"(Packet Loss Percentage)"
echo "
<img src="ping_wan_month.png"><br>
<br>
<H3>Yearly Round-Trip & Packetloss Stats(1min average)</H3>
" >> index.html
rrdtool graph ping_wan_year.png \
--imginfo '<IMG SRC=/stats/%s WIDTH=%lu HEIGHT=%lu >' \
--lazy --start -31536000 --end -86400 -h 225 -w 600 -a PNG \
-v "Round-Trip Time (ms)" \
--rigid \
--lower-limit 0 \
DEF:roundtrip=ping_wan.rrd:rtt:AVERAGE \
DEF:packetloss=ping_wan.rrd:pl:AVERAGE \
CDEF:PLNone=packetloss,0,2,LIMIT,UN,UNKN,INF,IF \
CDEF:PL2=packetloss,2,8,LIMIT,UN,UNKN,INF,IF \
CDEF:PL15=packetloss,8,15,LIMIT,UN,UNKN,INF,IF \
CDEF:PL25=packetloss,15,25,LIMIT,UN,UNKN,INF,IF \
CDEF:PL50=packetloss,25,50,LIMIT,UN,UNKN,INF,IF \
CDEF:PL75=packetloss,50,75,LIMIT,UN,UNKN,INF,IF \
CDEF:PL100=packetloss,75,100,LIMIT,UN,UNKN,INF,IF \
AREA:roundtrip#4444ff:"Round Trip Time (millis)" \
GPRINT:roundtrip:LAST:"Cur\: %5.2lf" \
GPRINT:roundtrip:AVERAGE:"Avg\: %5.2lf" \
GPRINT:roundtrip:MAX:"Max\: %5.2lf" \
GPRINT:roundtrip:MIN:"Min\: %5.2lf\n" \
AREA:PLNone#6c9bcd:"0-2%":STACK \
AREA:PL2#00ffae:"2-8%":STACK \
AREA:PL15#ccff00:"8-15%":STACK \
AREA:PL25#ffff00:"15-25%":STACK \
AREA:PL50#ffcc66:"25-50%":STACK \
AREA:PL75#ff9900:"50-75%":STACK \
AREA:PL100#ff0000:"75-100%":STACK \
COMMENT:"(Packet Loss Percentage)"
echo "
<img src="ping_wan_year.png"><br>
<br>
</BODY>
</HTML>
" >> index.html

If you have changed /var/rrds/ping on step (a) you need to change it here in the beggining of the script too.

The above script creates a very simple index.html file inside /var/rrds/ping (unless you’ve changed it) with 5 graphs: hourly, daily, weekly, monthly and yearly

d) Add the following entries to your crontab:

*/5 * * * * /etc/mrtg/ping.sh
1,6,11,16,21,26,31,36,41,46,51,56 * * * * /path/to/ping-graph.sh

For better accuracy, you can change “–step 300” to “–step 60” in the rrd database creation script and then change the crontab entry for ping.sh from:
*/5 * * * * /etc/mrtg/ping.sh
to
* * * * * /etc/mrtg/ping.sh

Original ping script and rrd config for the graphs from http://haroon.sis.utoronto.ca/rrd/scripts/

Enjoy your graphs.

A(nother) Windows vs Linux rant

Today I had to format a PC and install Windows XP on a new disk for a guy I know. The PC was pretty old but I would never guess what I would find out inside it.
Check these two pics:

Yeap…there are peanuts inside!

Anyway, I installed the new hard disk inside, inserted the Windows XP installation disc (SP2 included) and my torture began. The PC specs were P4 1.6GHz with 256Mb RAM. The installation process took around 70 minutes including the 20 minute NTFS format of the new hard disk. I thought it was wiser not to quick format it and select the normal format method. Why is NTFS so slow when it comes to formatting ? 20 minutes for an 80Gb hard disk is an overkill….I formatted a new 800Gb ext3 (software) raid partition on linux, one month ago, in less than 10 minutes…

After those boring 70 minutes the installation was finally over. I rebooted the PC and faced a crawling machine. Responsiveness came back only after I disabled all visual enhancements and made it look like win2k. Still I had a huge problem though … drivers. I didn’t know the model name of the motherboard and the soundcard was onboard. Since the machine will be put someplace in order to only play some MP3s, I had to at least make the soundcard work. I took another look at the pictures (posted above) and I saw the motherboard model number sticker. I googled it and found some AGP and sound drivers and I was finally able to make it play some music.

My first question/rant is this…In Linux I have the lspci command that comes in every (as far as I know) installation and shows you the output of your PCs’ contents, what would I do in a default Windows installation if I hadn’t opened the PC and checked on the motherboards’ model number ? Is there a way to find out what’s inside the PC (with a default install) ? Oh well…in Linux I don’t even need to know my soundcard’s name because the linux kernel autodetects the proper module (aka driver for the windows readers of this post) and loads it. That simple.

And the second question/rant that comes to my mind… I read in many forums that people are really “mad” at Linux not being able to play their DVDs on the default installation. I wasn’t even able to make Windows see the onboard soundcard on the default installation and I had to download drivers from another pc (no network), would it play DVDs ? I guess not. So either most people use pirated Windows installation CDs/DVDs with programs like powerdvd pre-installed or they are just lying.

I hope Vista does not need to download drivers just to recognize an onboard soundcard…

How is a windows user benefited by the fact that Windows can (illegally) play MP3s while Linux needs to legally download the codecs, when Windows cannot even recognize the soundcard and play _any_ sound at all ?

iloog-7.02

Ύστερα από 2 μήνες δοκιμών και αλλαγών με την βοήθεια των agorf, cdimakop, Charmed[], Fuzz, mikeg, Rad, tasosos που είτε έκαναν beta testing είτε δάνεισαν εξοπλισμό, το νέο iloog LiveCD 7.02 είναι έτοιμο με πάρα πολλές αλλαγές σε σχέση με την παλαιότερη version 6.12.1.

Εκτός από τις καθιερωμένες ανανεώσεις πακέτων υπάρχουν πάνω από 80 καινούργια πακέτα σε σχέση με την έκδοση 6.12.1. Πολύ προσοχή δώθηκε στην καλύτερη υποστήριξη laptops με έμφαση στο power management. Πλέον o kernel υποστηρίζει ρυθμίσεις για cpu frequency και υπάρχουν μέσα utilities για την διευκόλυνση αυτών των ρυθμίσεων (cpufreq-set,κτλ). Προστέθηκαν επίσης αρκετά firmware για wireless κάρτες (Intel,broadcom,atmel,κτλ), modems (Sagem Fast 800) ώστε να μην χρειάζεται να τα κατεβάζετε από τις εταιρίες. Ο kernel υποστηρίζει πια πολύ περισσότερο hardware σε σχέση με προηγούμενες εκδόσεις.

Επίσης στο menu του fluxbox έχει προστεθέι μια μικρή περιγραφή για το κάθε πρόγραμμα, ώστε ακόμα και κάποιος που δεν ξέρει τις ονομασίες από τα προγράμματα να μπορεί να βρει αυτό που θέλει.

Για όσους διαθέτουν 16:9 οθόνες μπορούν ανοίγωντας το /etc/X11/xorg.conf να κάνουν μια μικρή αλλαγή στην 3η γραμμή και να υποστηρίζονται καλύτερα οι οθόνες τους (η αλλαγή περιγράφεται στα σχόλια της 3ης γραμμής του /etx/X11/xorg.conf). Για όσους αντιμετωπίζουν δυσκολίες με τον X server, και δεν ξέρουν πως να πειράξουν το /etc/X11/xorg.conf μπορούν να γράψουν: “vesachange.sh” και να αλλάξει ο driver αυτόματα σε “vesa”.

Μικρές αλλαγές υπάρχουν επίσης και στο backup/restore script (filetool.sh) το οποίο πλέον σώζει μόνο τις αλλαγές που γίνονται στο home directory, και δεν το σώζει ολόκληρο όπως παλιά, ώστε το backup να καταλαμβάνει λιγότερο χώρο.

Περισσότερες αλλαγές περιγράφονται στο αρχείο /etc/iloog/changelog μέσα στο LiveCD

Το νέο iso μπορείτε να το κατεβάσετε από την διεύθυνση http://ilug.void.gr/iloog/ . Στην ίδια σελίδα θα βρείτε και ένα μικρότερο delta αρχείο με το οποίο μπορείτε να μεταβείτε από την παλιότερη έκδοση 6.12.1 στην τελευταία 7.02.

Screenshots υπάρχουν στη σελίδα του iloog καθώς και στο flickr: http://www.flickr.com/photos/tags/iloog/

Δοκιμάστε το και πείτε μας την γνώμη σας στο forum του Ioannina Linux User Group 🙂