05/10/2012
Bypassing censorship devices by obfuscating your traffic using obfsproxy
*WARNING* 14/01/2014 This post is quite deprecated. For example obfsproxy has been completely rewritten in python and there is a newer and more secure replacement of obfs2, named obfs3. Please read this obfsproxy-debian-instructions for any updates.
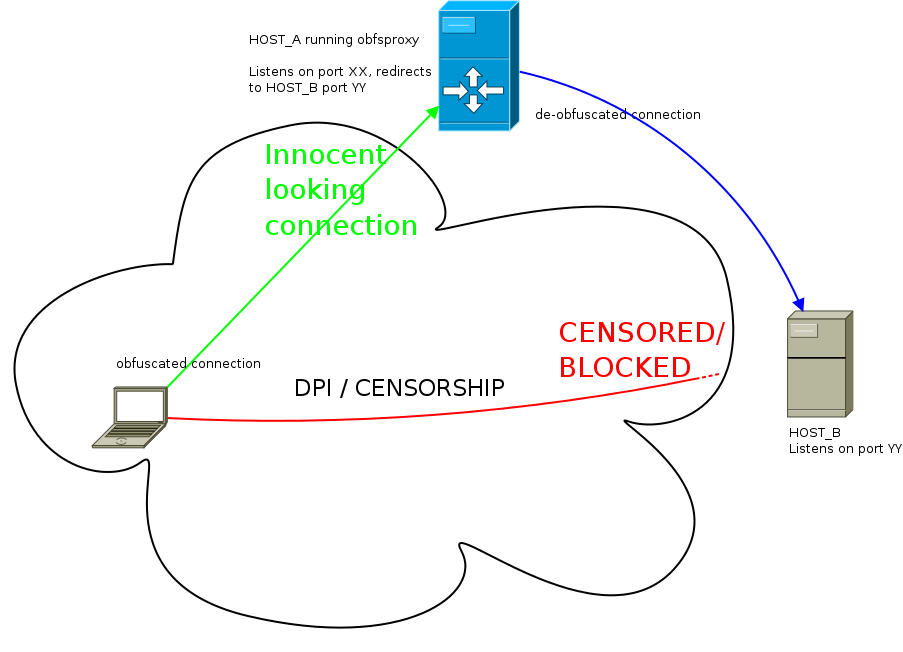
Some countries like China, Iran, Ethiopia, Kazakhstan and others, like installing some nasty little boxes at the edges of their country’s “internet feed” to monitor and filter traffic. These little boxes are called DPI (Deep Packet Inspection) boxes and what they do, is sniff out every little packet flowing through them to find specific patterns and then they provide their administrator with the option to block traffic that matches these patterns. These boxes are very sophisticated and they don’t just filter traffic by src, dst or port, they filter traffic by the content (payload) the packets carry.
Unfortunately, it’s not just these countries that deploy DPI technologies, but some private companies also use such devices in order to monitor their employees.
The 10 thousand feet view
Tor is a nice way to avoid basic censorship technologies, but sometimes DPI technology is so good that it can fingerprint Tor traffic, which is already encrypted, and block it. In response to that, Tor people devised a technology called Pluggable Transports whose job is to obfuscate traffic in various ways so that it looks like something different than it actually is. For example it can make Tor traffic look like a skype call using SkypeMorph or one can use Obfsproxy to obfuscate traffic to look like…nothing, or at least nothing easily recognizable. What’s cool about obfsproxy though is that one can even use it separately from Tor, to obfuscate any connection he needs to.
A warning
Even though obfsproxy encrypts traffic and makes it look completely random, it’s not a fool proof solution for everything. It’s basic job is to defend against DPI that can recognize/fingerprint TLS connections. If someone has the resources he could potentially train his DPI box to “speak” the obfsproxy protocol and eventually decrypt the obfuscated traffic. What this means is that obfsproxy should not be used as a single means of protection and it should just be used as a wrapper _around_ already encrypted SSL traffic.
If you’re still in doubt about what can obfsproxy protect you from and from what it can’t, please read the Obfsproxy Threat Model document.
Two use cases
Obfuscate an SSH and an OpenVPN connection.
Obviously one needs a server outside the censorship perimeter that he or someone else will run the obfsproxy server part. Instructions on installing obfsproxy on Debian/Ubuntu are given in my previous blog post setting up tor + obfsproxy + brdgrd to fight censhorship. Installing netcat, the openbsd version; package name is netcat-openbsd on Debian/Ubuntu, is also needed for the SSH example.
What both examples do is obfuscate a TLS connection through an obfsproxy server so that it looks innocent. Assuming that the most innocent looking traffic is HTTP, try running the obfsproxy server part on port 80.
SSH connection
Scenario:
USER: running ssh client
HOST_A (obfsproxy): running obfsproxy on port 80 and redirecting to HOST_B port 22
HOST_B (dst): Running SSH server on port 22
What one needs to do is setup the following “tunneling”:
ssh client —> [NC SOCKS PROXY] —> obfsproxy client (USER)—> obfsproxy server (HOST_A) —> ssh server (HOST_B)
Steps:
1. on HOST_A setup obfsproxy server to listen for connection and redirect to HOST_B:
# screen obfsproxy --log-min-severity=info obfs2 --dest=HOST_B:22 server 0.0.0.0:80
2. on USER’s box, then configure obfsproxy client to setup a local socks proxy that will obfuscate all traffic passing through it:
$ screen obfsproxy --log-min-severity=info obfs2 socks 127.0.0.1:9999
Then instead of SSH-ing directly to HOST_B, the user has to ssh to HOST_A port 80 (where obfsproxy server is listening).
3. on USER’s box again, edit ~/.ssh/config and add something along the following lines:
Host HOST_A
    ProxyCommand /bin/nc.openbsd -x 127.0.0.1:9999 %h %p
This will force all SSH connections to HOST_A to pass through the local (obfsproxy) socks server listening on 127.0.0.1:9999
4. Finally run the ssh command:
$ ssh -p 80 username@HOST_A
That’s it. The connection will now pass get obfuscated locally, pass through obfsproxy server at HOST_A and then finally reach it’s destination at HOST_B.
OpenVPN connection
Scenario:
USER: running OpenVPN client
HOST_A (obfsproxy): running obfsproxy on port 80 and redirecting to HOST_B TCP port 443
HOST_B (dst): Running OpenVPN server on port 443
What one needs to do is setup the following “tunneling”:
openvpn client —> obfsproxy client (USER)—> obfsproxy server (HOST_A) —> OpenVPN server (HOST_B)
Steps:
1. on HOST_A setup obfsproxy server to listen for connection and redirect to HOST_B:
# screen obfsproxy --log-min-severity=info obfs2 --dest=HOST_B:443 server 0.0.0.0:80
2. on USER’s box, then configure obfsproxy client to setup a local socks proxy that will obfuscate all traffic passing through it:
$ screen obfsproxy --log-min-severity=info obfs2 socks 127.0.0.1:9999
Then instead of connecting the OpenVPN client directly to HOST_B, the user has edit OpenVPN config file to connect to HOST_A port 80 (where obfsproxy server is listening).
3. on USER’s box again, edit your openvpn config file, change the ‘port’ and ‘remote’ lines and add a ‘socks-proxy’ one:
port 80
remote HOST_A
socks-proxy 127.0.0.1 9999
This will instruct the OpenVPN client to connect to HOST_A passing through the local (obfsproxy) socks server listening on 127.0.0.1:9999
4. Finally run the openvpn client command:
$ openvpn client.config
That’s it.
Security Enhancement
You can “enhance” obfproxy’s security by adding a shared secret parameter to command line, so anyone who doesn’t have this secret key won’t be able to use the obfsproxy server, decryption of packets will fail:
# screen obfsproxy --log-min-severity=info obfs2 --shared-secret="foobarfoo" --dest=HOST_B:443 server 0.0.0.0:80
$ screen obfsproxy --log-min-severity=info obfs2 --shared-secret="foobarfoo" socks 127.0.0.1:9999
Documentation
Or at least…some documentation.
Your best chance to understand the internals of obfsproxy is to read the protocol specification
For more info about obfsproxy client part, read the documentation here: obfsproxy client external
For more info about obfsproxy server part, read the documentation here: obfsproxy server external
Screenshots
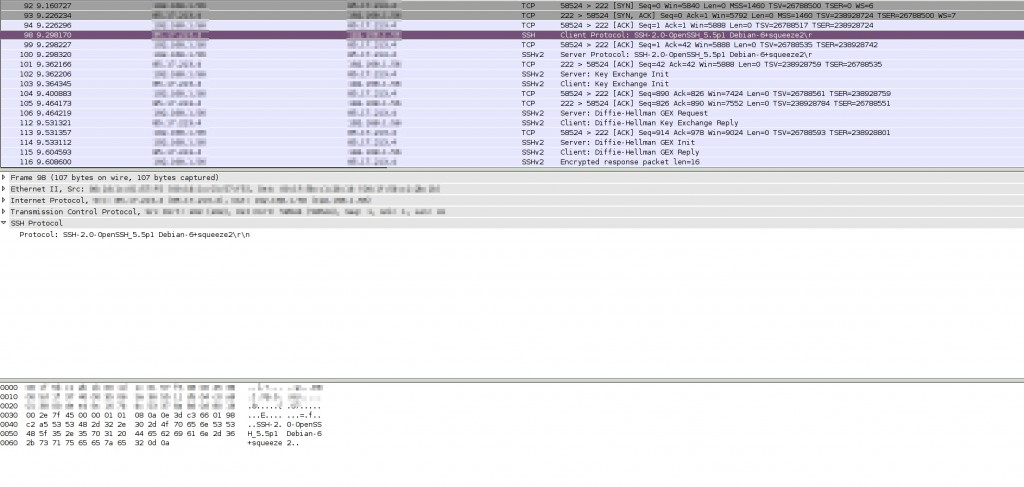
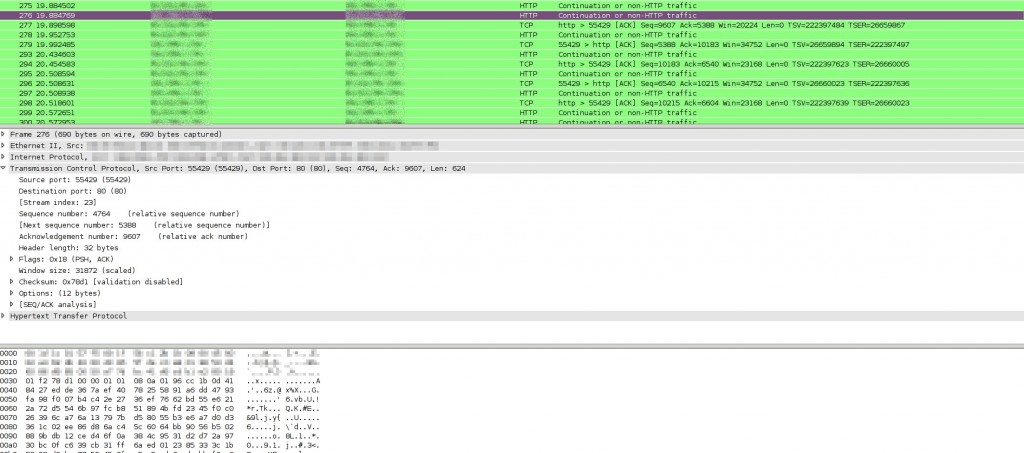
For those who like meaningless screenshots, here’s what wireshark (which is certainly NOT a DPI) can tell about a connection without and with obfsproxy:
*Update*
one can find openvpn configuration files for use with obfsproxy here:
Linux Client
Windows Client
 Filed by kargig at 01:54 under Encryption,Internet,Linux,Networking,Privacy
Tags: censorship, china, debian, Encryption, firewall, gfw, Linux, Networking, obfsproxy, openvpn, Privacy, security, ssh, tls, tor, vpn
 5 Comments | 71,807 views


