Linux network troubleshooting a la Dr. House

Intro

The following story is inspired by a recent case I had to troubleshoot at work. I think it is a nice example of troubleshooting Linux networking issues, so I’ve modified/simplified the setup a bit to be able to reproduce it on a VM. I’ll go through the troubleshooting steps in almost the same way we handled the actual case. Service names, IPs, ports, etc are all different that the real case as the focus should not be the example itself but the process.

It all started a few days ago when I was asked to help on an “unusual” case. Docker containers on every single host of an installation could not establish connections towards services that listen on the “main” IP of the host they run on, nor can they ping that IP, but the containers have full access to the internet and can connect to the service ports on other hosts in the LAN. As everyone who has done even a tiny bit of support, asking whether something changed recently in the setup is always replied back with a single global truth: “nothing has recently changed, it just stopped working”.
Challenge accepted!

Reproduction setup

For reproduction purposes I’ve used a VM with one ethernet interface, and a docker bridge. In this VM I have injected the same problem as with the real case. Even though the real case case was a bit more complicated, to make following the post somewhat easier, I’ve used only one service listening on the host, an Elasticsearch process, and only one Kibana docker container that needs to communicate with Elasticsearch on the host.

Troubleshooting process

Host interfaces:

2: ens5: <BROADCAST,MULTICAST,UP,LOWER_UP> mtu 9001 qdisc mq state UP group default qlen 1000
    link/ether 06:ce:3b:94:fe:ac brd ff:ff:ff:ff:ff:ff
    inet 172.31.45.100/20 brd 172.31.47.255 scope global dynamic ens5
       valid_lft 3572sec preferred_lft 3572sec
    inet6 fe80::4ce:3bff:fe94:feac/64 scope link 
       valid_lft forever preferred_lft forever
3: docker0: <BROADCAST,MULTICAST,UP,LOWER_UP> mtu 1500 qdisc noqueue state UP group default 
    link/ether 02:42:e9:38:3d:a8 brd ff:ff:ff:ff:ff:ff
    inet 172.17.0.1/16 scope global docker0
       valid_lft forever preferred_lft forever
    inet6 fe80::42:e9ff:fe38:3da8/64 scope link 
       valid_lft forever preferred_lft forever

Kibana’s config has the following ENV variable set ELASTICSEARCH_HOSTS=http://172.31.45.100:9200, and for simplification purposes let’s assume that this IP could not be changed.

As originally described, curl from the container towards the service IP:port does not work

(container) bash-4.2$ curl -v 172.31.45.100:9200
* About to connect() to 172.31.45.100 port 9200 (#0)
*   Trying 172.31.45.100...

it just hangs there without error. There’s no DNS resolution involved here, straight curl towards the IP:port

Let’s check if the service is actually listening on the host

[root@ip-172-31-45-100 ~]# ss -ltnp | grep 9200
LISTEN      0      128                             [::]:9200                                  [::]:*                   users:(("java",pid=17892,fd=257))

The service listens on 9200. Since the service listens on all interfaces, let’s curl from the container towards the service IP:port on the docker0 interface.

bash-4.2$ curl -v 172.17.0.1:9200
* About to connect() to 172.17.0.1 port 9200 (#0)
*   Trying 172.17.0.1...
* Connected to 172.17.0.1 (172.17.0.1) port 9200 (#0)
> GET / HTTP/1.1
> User-Agent: curl/7.29.0
> Host: 172.17.0.1:9200
> Accept: */*
> 
< HTTP/1.1 200 OK
< content-type: application/json; charset=UTF-8
< content-length: 524
< 
{
  "name" : "node1",
  "cluster_name" : "centos7",
  "cluster_uuid" : "d6fBSua6Q9OvSu534roTpA",
  "version" : {
    "number" : "7.7.0",
    "build_flavor" : "default",
    "build_type" : "rpm",
    "build_hash" : "81a1e9eda8e6183f5237786246f6dced26a10eaf",
    "build_date" : "2020-05-12T02:01:37.602180Z",
    "build_snapshot" : false,
    "lucene_version" : "8.5.1",
    "minimum_wire_compatibility_version" : "6.8.0",
    "minimum_index_compatibility_version" : "6.0.0-beta1"
  },
  "tagline" : "You Know, for Search"
}

that works, so the service is running properly. Curl-ing the service from the host using the host’s IP also works

[root@ip-172-31-45-100 ~]# curl http://172.31.45.100:9200
{
  "name" : "node1",
  "cluster_name" : "centos7",
  "cluster_uuid" : "d6fBSua6Q9OvSu534roTpA",
  "version" : {
    "number" : "7.7.0",
    "build_flavor" : "default",
    "build_type" : "rpm",
    "build_hash" : "81a1e9eda8e6183f5237786246f6dced26a10eaf",
    "build_date" : "2020-05-12T02:01:37.602180Z",
    "build_snapshot" : false,
    "lucene_version" : "8.5.1",
    "minimum_wire_compatibility_version" : "6.8.0",
    "minimum_index_compatibility_version" : "6.0.0-beta1"
  },
  "tagline" : "You Know, for Search"
}

Let’s check for internet connectivity from the container

bash-4.2$ curl -v 1.1.1.1
* About to connect() to 1.1.1.1 port 80 (#0)
*   Trying 1.1.1.1...
* Connected to 1.1.1.1 (1.1.1.1) port 80 (#0)
> GET / HTTP/1.1
> User-Agent: curl/7.29.0
> Host: 1.1.1.1
> Accept: */*
> 
< HTTP/1.1 301 Moved Permanently
< Date: Sun, 31 May 2020 10:10:27 GMT
< Content-Type: text/html
< Transfer-Encoding: chunked
< Connection: keep-alive
< Location: https://1.1.1.1/
< Served-In-Seconds: 0.000
< CF-Cache-Status: HIT
< Age: 5334
< Expires: Sun, 31 May 2020 14:10:27 GMT
< Cache-Control: public, max-age=14400
< cf-request-id: 030bcf27a3000018e57f0f5200000001
< Server: cloudflare
< CF-RAY: 59bfe7b90b7518e5-FRA
< 
<html>
<head><title>301 Moved Permanently</title></head>
<body bgcolor="white">
<center><h1>301 Moved Permanently</h1></center>
<hr><center>cloudflare-lb</center>
</body>
</html>

internet connectivity for the container works just fine. Let’s curl to another host in the same LAN on the same service port.

bash-4.2$ curl -v 172.31.45.101:9200
* About to connect() to 172.31.45.101 port 9200 (#0)
*   Trying 172.31.45.101...
* Connected to 172.31.45.101 (172.31.45.101) port 9200 (#0)
> GET / HTTP/1.1
> User-Agent: curl/7.29.0
> Host: 172.31.45.101:9200
> Accept: */*
> 
< HTTP/1.1 200 OK
< content-type: application/json; charset=UTF-8
< content-length: 524
< 
{
  "name" : "node2",
  "cluster_name" : "centos7",
  "cluster_uuid" : "d6fBSua6Q9OvSu534roTpA",
  "version" : {
    "number" : "7.7.0",
    "build_flavor" : "default",
    "build_type" : "rpm",
    "build_hash" : "81a1e9eda8e6183f5237786246f6dced26a10eaf",
    "build_date" : "2020-05-12T02:01:37.602180Z",
    "build_snapshot" : false,
    "lucene_version" : "8.5.1",
    "minimum_wire_compatibility_version" : "6.8.0",
    "minimum_index_compatibility_version" : "6.0.0-beta1"
  },
  "tagline" : "You Know, for Search"
}

That also works. Time to use the swiss army knife of network troubleshooting, tcpdump. If you want to find which veth interface a container uses you can either use dockerveth or use the following commands to figure it out manually.
Get the iflink of container’s eth0:

[root@ip-172-31-45-100 ~]# docker exec -it <container-name> bash -c 'cat /sys/class/net/eth0/iflink'

In this case that would be:

# docker exec -it kibana bash -c 'cat /sys/class/net/eth0/iflink'
41

then find the file name of the ifindex that contains that link number in `/sys/class/net/veth*/ifindex` of the host

[root@ip-172-31-45-100 ~]# grep -lw 41 /sys/class/net/veth*/ifindex
/sys/class/net/veth0006ca6/ifindex

`veth0006ca6` is what we need to use. Let’s run tcpdump on it

[root@ip-172-31-45-100 ~]# tcpdump -nni veth0006ca6
10:06:16.745143 IP 172.17.0.2.47166 > 172.31.45.100.9200: Flags [S], seq 1062649548, win 29200, options [mss 1460,sackOK,TS val 1781316 ecr 0,nop,wscale 7], length 0
10:06:16.749126 IP 172.17.0.2.47168 > 172.31.45.100.9200: Flags [S], seq 4174345004, win 29200, options [mss 1460,sackOK,TS val 1781320 ecr 0,nop,wscale 7], length 0
10:06:16.749131 IP 172.17.0.2.47170 > 172.31.45.100.9200: Flags [S], seq 1386880792, win 29200, options [mss 1460,sackOK,TS val 1781320 ecr 0,nop,wscale 7], length 0

the syn packet is seen going out of the container’s veth interface. So let’s tcpdump on docker0

[root@ip-172-31-45-100 ~]# tcpdump -nni docker0
10:07:07.813153 IP 172.17.0.2.47148 > 172.31.45.100.9200: Flags [S], seq 4114480937, win 29200, options [mss 1460,sackOK,TS val 1396384 ecr 0,nop,wscale 7], length 0
10:07:07.845141 IP 172.17.0.2.47144 > 172.31.45.100.9200: Flags [S], seq 3273546229, win 29200, options [mss 1460,sackOK,TS val 1412416 ecr 0,nop,wscale 7], length 0
10:07:07.845147 IP 172.17.0.2.47146 > 172.31.45.100.9200: Flags [S], seq 2062214864, win 29200, options [mss 1460,sackOK,TS val 1412416 ecr 0,nop,wscale 7], length 0

the syn packet can also be seen on the docker0 bridge. The syn packet cannot be seen on the interface (ens5) that has the service IP (172.31.45.100) on it, since it doesn’t traverse that link to go outside the host.

[root@ip-172-31-45-100 ~]# tcpdump -nni ens5 port 9200 or icmp
tcpdump: verbose output suppressed, use -v or -vv for full protocol decode
listening on ens5, link-type EN10MB (Ethernet), capture size 262144 bytes

Let’s check routing entries.

[root@ip-172-31-45-100 ~]# ip route ls
default via 172.31.32.1 dev ens5 
172.17.0.0/16 dev docker0 proto kernel scope link src 172.17.0.1 
172.31.32.0/20 dev ens5 proto kernel scope link src 172.31.45.100 

Nothing interesting here at all. Time to check iptables.

[root@ip-172-31-45-100 ~]# iptables -nxvL
Chain INPUT (policy ACCEPT 169 packets, 27524 bytes)
    pkts      bytes target     prot opt in     out     source               destination         

Chain FORWARD (policy DROP 0 packets, 0 bytes)
    pkts      bytes target     prot opt in     out     source               destination         
     368    27870 DOCKER-ISOLATION  all  --  *      *       0.0.0.0/0            0.0.0.0/0           
     184    14254 DOCKER     all  --  *      docker0  0.0.0.0/0            0.0.0.0/0           
     184    14254 ACCEPT     all  --  *      docker0  0.0.0.0/0            0.0.0.0/0            ctstate RELATED,ESTABLISHED
     184    13616 ACCEPT     all  --  docker0 !docker0  0.0.0.0/0            0.0.0.0/0           
       0        0 ACCEPT     all  --  docker0 docker0  0.0.0.0/0            0.0.0.0/0           

Chain OUTPUT (policy ACCEPT 109 packets, 10788 bytes)
    pkts      bytes target     prot opt in     out     source               destination         

Chain DOCKER (1 references)
    pkts      bytes target     prot opt in     out     source               destination         

Chain DOCKER-ISOLATION (1 references)
    pkts      bytes target     prot opt in     out     source               destination         
     368    27870 RETURN     all  --  *      *       0.0.0.0/0            0.0.0.0/0      

[root@ip-172-31-45-100 ~]# iptables -nxvL -t nat
Chain PREROUTING (policy ACCEPT 0 packets, 0 bytes)
    pkts      bytes target     prot opt in     out     source               destination         
     204    12200 DOCKER     all  --  *      *       0.0.0.0/0            0.0.0.0/0            ADDRTYPE match dst-type LOCAL

Chain INPUT (policy ACCEPT 0 packets, 0 bytes)
    pkts      bytes target     prot opt in     out     source               destination         

Chain OUTPUT (policy ACCEPT 6 packets, 456 bytes)
    pkts      bytes target     prot opt in     out     source               destination         
       0        0 DOCKER     all  --  *      *       0.0.0.0/0           !127.0.0.0/8          ADDRTYPE match dst-type LOCAL

Chain POSTROUTING (policy ACCEPT 6 packets, 456 bytes)
    pkts      bytes target     prot opt in     out     source               destination         
      92     6808 MASQUERADE  all  --  *      !docker0  172.17.0.0/16        0.0.0.0/0           

Chain DOCKER (2 references)
    pkts      bytes target     prot opt in     out     source               destination         
     191    11460 RETURN     all  --  docker0 *       0.0.0.0/0            0.0.0.0/0  

[root@ip-172-31-45-100 ~]# iptables -nxvL -t mangle
Chain PREROUTING (policy ACCEPT 0 packets, 0 bytes)
    pkts      bytes target     prot opt in     out     source               destination         

Chain INPUT (policy ACCEPT 0 packets, 0 bytes)
    pkts      bytes target     prot opt in     out     source               destination         

Chain FORWARD (policy ACCEPT 0 packets, 0 bytes)
    pkts      bytes target     prot opt in     out     source               destination         

Chain OUTPUT (policy ACCEPT 0 packets, 0 bytes)
    pkts      bytes target     prot opt in     out     source               destination         

Chain POSTROUTING (policy ACCEPT 0 packets, 0 bytes)
    pkts      bytes target     prot opt in     out     source               destination  

There’s not even a DROP rule at all and all the policies are set to ACCEPT. iptables is definitely not dropping the connection. Even if there was a DROP rule, we would see the packet on tcpdump…so where’s the packet going ?

Let’s add an extra rule for both FORWARD and INPUT chains just to see if iptables can match these rules as the packets are passing by.

[root@ip-172-31-45-100 ~]# iptables -I INPUT -p tcp --dport 9200
[root@ip-172-31-45-100 ~]# iptables -I FORWARD -p tcp --dport 9200

wait for a while and then check the statistics of those 2 rules:

[root@ip-172-31-45-100 ~]# iptables -nxvL | grep 9200
       0        0            tcp  --  *      *       0.0.0.0/0            0.0.0.0/0            tcp dpt:9200
       0        0            tcp  --  *      *       0.0.0.0/0            0.0.0.0/0            tcp dpt:9200

no packets match these 2 rules at all! Time to inspect the container and the docker bridge network.

[root@ip-172-31-45-100 ~]# docker network inspect bridge
[
    {
        "Name": "bridge",
        "Id": "a6290df54ea24d14faa8d003d17802b3f8a4967680bc0c82c1211ab75d1815e2",
        "Created": "2020-05-31T09:40:19.81958733Z",
        "Scope": "local",
        "Driver": "bridge",
        "EnableIPv6": false,
        "IPAM": {
            "Driver": "default",
            "Options": null,
            "Config": [
                {
                    "Subnet": "172.17.0.0/16"
                }
            ]
        },
        "Internal": false,
        "Attachable": false,
        "Containers": {},
        "Options": {
            "com.docker.network.bridge.default_bridge": "true",
            "com.docker.network.bridge.enable_icc": "true",
            "com.docker.network.bridge.enable_ip_masquerade": "true",
            "com.docker.network.bridge.host_binding_ipv4": "0.0.0.0",
            "com.docker.network.bridge.name": "docker0",
            "com.docker.network.driver.mtu": "1500"
        },
        "Labels": {}
    }
]

pretty standard options for the bridge network, even `enable_icc` is set to `true`. What about the container though ?

[root@ip-172-31-45-100 ~]# docker inspect kibana
[
    {
        "Id": "2f08cc190b760361d9aa2951b4c9c407561fe35b8dbdc003f3f535719456f460",
        "Created": "2020-05-31T10:24:11.942315341Z",
        "Path": "/usr/local/bin/dumb-init",
        "Args": [
            "--",
            "/usr/local/bin/kibana-docker"
        ],
        "State": {
            "Status": "running",
            "Running": true,
            "Paused": false,
            "Restarting": false,
            "OOMKilled": false,
            "Dead": false,
            "Pid": 3735,
            "ExitCode": 0,
            "Error": "",
            "StartedAt": "2020-05-31T10:24:12.329214827Z",
            "FinishedAt": "0001-01-01T00:00:00Z"
        },
        "Image": "sha256:eadc7b3d59dd47b1b56f280732f38d16a4b31947cbc758516adbe1df5472b407",
        "ResolvConfPath": "/var/lib/docker/containers/2f08cc190b760361d9aa2951b4c9c407561fe35b8dbdc003f3f535719456f460/resolv.conf",
        "HostnamePath": "/var/lib/docker/containers/2f08cc190b760361d9aa2951b4c9c407561fe35b8dbdc003f3f535719456f460/hostname",
        "HostsPath": "/var/lib/docker/containers/2f08cc190b760361d9aa2951b4c9c407561fe35b8dbdc003f3f535719456f460/hosts",
        "LogPath": "",
        "Name": "/kibana",
        "RestartCount": 0,
        "Driver": "overlay2",
        "MountLabel": "system_u:object_r:svirt_sandbox_file_t:s0:c434,c792",
        "ProcessLabel": "system_u:system_r:svirt_lxc_net_t:s0:c434,c792",
        "AppArmorProfile": "",
        "ExecIDs": null,
        "HostConfig": {
            "Binds": null,
            "ContainerIDFile": "",
            "LogConfig": {
                "Type": "journald",
                "Config": {}
            },
            "NetworkMode": "bridge",
            "PortBindings": {
                "5601/tcp": [
                    {
                        "HostIp": "",
                        "HostPort": "5601"
                    }
                ]
            },
            "RestartPolicy": {
                "Name": "no",
                "MaximumRetryCount": 0
            },
            "AutoRemove": true,
            "VolumeDriver": "",
            "VolumesFrom": null,
            "CapAdd": null,
            "CapDrop": null,
            "Dns": [],
            "DnsOptions": [],
            "DnsSearch": [],
            "ExtraHosts": null,
            "GroupAdd": null,
            "IpcMode": "",
            "Cgroup": "",
            "Links": null,
            "OomScoreAdj": 0,
            "PidMode": "",
            "Privileged": false,
            "PublishAllPorts": false,
            "ReadonlyRootfs": false,
            "SecurityOpt": null,
            "UTSMode": "",
            "UsernsMode": "",
            "ShmSize": 67108864,
            "Runtime": "docker-runc",
            "ConsoleSize": [
                0,
                0
            ],
            "Isolation": "",
            "CpuShares": 0,
            "Memory": 0,
            "NanoCpus": 0,
            "CgroupParent": "",
            "BlkioWeight": 0,
            "BlkioWeightDevice": null,
            "BlkioDeviceReadBps": null,
            "BlkioDeviceWriteBps": null,
            "BlkioDeviceReadIOps": null,
            "BlkioDeviceWriteIOps": null,
            "CpuPeriod": 0,
            "CpuQuota": 0,
            "CpuRealtimePeriod": 0,
            "CpuRealtimeRuntime": 0,
            "CpusetCpus": "",
            "CpusetMems": "",
            "Devices": [],
            "DiskQuota": 0,
            "KernelMemory": 0,
            "MemoryReservation": 0,
            "MemorySwap": 0,
            "MemorySwappiness": -1,
            "OomKillDisable": false,
            "PidsLimit": 0,
            "Ulimits": null,
            "CpuCount": 0,
            "CpuPercent": 0,
            "IOMaximumIOps": 0,
            "IOMaximumBandwidth": 0
        },
        "GraphDriver": {
            "Name": "overlay2",
            "Data": {
                "LowerDir": "/var/lib/docker/overlay2/84217deb518fa6b50fb38aab03aa6a819150e0a248cf233bda8091b136c4825a-init/diff:/var/lib/docker/overlay2/bfda0aa2ec51f7047b5694e5daf89735f3021691e6154bc370827c168c4572f0/diff:/var/lib/docker/overlay2/5d32d74a3bb95b8e3377b1c115622f12a817a591936c4ae2da4512bc2e281e4b/diff:/var/lib/docker/overlay2/6482e711a89a90bebd61834aa8bd3463f567684dd3cdbbf2698179b752fdad7b/diff:/var/lib/docker/overlay2/4ae81e6a07956c974d985674c35e113ad3fbd9f4fdde43f4752c0e36a1153e69/diff:/var/lib/docker/overlay2/8330cdd839ec316133d659805f2839d1e65b16fbf7035324f419c2aa8d097925/diff:/var/lib/docker/overlay2/cd377c8c6fb23d050771d55ca15253cc9fa5043c7e49f41a2f73acd25f8e7ca9/diff:/var/lib/docker/overlay2/408c72d7e496be76503bbb01d5248c25be98e2290d71cae83d8d5d09d714f81d/diff:/var/lib/docker/overlay2/20068d51c4dd214db7b2b9d30fe13feb2e8ab35de646c9b652fea255476d396b/diff:/var/lib/docker/overlay2/0fdedfd6dbb551d32a9e826188a74936d0cec56e97c1b917fdd04b0e49a59a70/diff:/var/lib/docker/overlay2/0238ff31fbd60fdeaee1e162c92a1aa46735ec7b17df3b11455c09f18657c30f/diff:/var/lib/docker/overlay2/99a7a64a569e5e524e4139f9cf95bd929744c85c1633bcd8173c9172756c3233/diff",
                "MergedDir": "/var/lib/docker/overlay2/84217deb518fa6b50fb38aab03aa6a819150e0a248cf233bda8091b136c4825a/merged",
                "UpperDir": "/var/lib/docker/overlay2/84217deb518fa6b50fb38aab03aa6a819150e0a248cf233bda8091b136c4825a/diff",
                "WorkDir": "/var/lib/docker/overlay2/84217deb518fa6b50fb38aab03aa6a819150e0a248cf233bda8091b136c4825a/work"
            }
        },
        "Mounts": [],
        "Config": {
            "Hostname": "2f08cc190b76",
            "Domainname": "",
            "User": "kibana",
            "AttachStdin": false,
            "AttachStdout": true,
            "AttachStderr": true,
            "ExposedPorts": {
                "5601/tcp": {}
            },
            "Tty": false,
            "OpenStdin": false,
            "StdinOnce": false,
            "Env": [
                "ELASTICSEARCH_HOSTS=http://172.31.45.100:9200",
                "PATH=/usr/share/kibana/bin:/usr/local/sbin:/usr/local/bin:/usr/sbin:/usr/bin:/sbin:/bin",
                "ELASTIC_CONTAINER=true"
            ],
            "Cmd": [
                "/usr/local/bin/kibana-docker"
            ],
            "Image": "docker.elastic.co/kibana/kibana:7.7.0",
            "Volumes": null,
            "WorkingDir": "/usr/share/kibana",
            "Entrypoint": [
                "/usr/local/bin/dumb-init",
                "--"
            ],
            "OnBuild": null,
            "Labels": {
                "license": "Elastic License",
                "org.label-schema.build-date": "2020-05-12T03:25:49.654Z",
                "org.label-schema.license": "Elastic License",
                "org.label-schema.name": "kibana",
                "org.label-schema.schema-version": "1.0",
                "org.label-schema.url": "https://www.elastic.co/products/kibana",
                "org.label-schema.usage": "https://www.elastic.co/guide/en/kibana/index.html",
                "org.label-schema.vcs-url": "https://github.com/elastic/kibana",
                "org.label-schema.vendor": "Elastic",
                "org.label-schema.version": "7.7.0",
                "org.opencontainers.image.created": "2020-05-04 00:00:00+01:00",
                "org.opencontainers.image.licenses": "GPL-2.0-only",
                "org.opencontainers.image.title": "CentOS Base Image",
                "org.opencontainers.image.vendor": "CentOS"
            }
        },
        "NetworkSettings": {
            "Bridge": "",
            "SandboxID": "258a4a11f55f7425b837c7d5c0420dd344add081be79da7e33c146501dd8f0ec",
            "HairpinMode": false,
            "LinkLocalIPv6Address": "",
            "LinkLocalIPv6PrefixLen": 0,
            "Ports": {
                "5601/tcp": [
                    {
                        "HostIp": "0.0.0.0",
                        "HostPort": "5601"
                    }
                ]
            },
            "SandboxKey": "/var/run/docker/netns/258a4a11f55f",
            "SecondaryIPAddresses": null,
            "SecondaryIPv6Addresses": null,
            "EndpointID": "7126885dddf9ff031f2ff8c3b2cbd14708391dae619020bdb40efe7a849a01c7",
            "Gateway": "172.17.0.1",
            "GlobalIPv6Address": "",
            "GlobalIPv6PrefixLen": 0,
            "IPAddress": "172.17.0.2",
            "IPPrefixLen": 16,
            "IPv6Gateway": "",
            "MacAddress": "02:42:ac:11:00:02",
            "Networks": {
                "bridge": {
                    "IPAMConfig": null,
                    "Links": null,
                    "Aliases": null,
                    "NetworkID": "a6290df54ea24d14faa8d003d17802b3f8a4967680bc0c82c1211ab75d1815e2",
                    "EndpointID": "7126885dddf9ff031f2ff8c3b2cbd14708391dae619020bdb40efe7a849a01c7",
                    "Gateway": "172.17.0.1",
                    "IPAddress": "172.17.0.2",
                    "IPPrefixLen": 16,
                    "IPv6Gateway": "",
                    "GlobalIPv6Address": "",
                    "GlobalIPv6PrefixLen": 0,
                    "MacAddress": "02:42:ac:11:00:02"
                }
            }
        }
    }
]

all looks very normal regarding the docker container. Let’s check sysctl settings in /etc

[root@ip-172-31-45-100 ~]# ls -Fla /etc/sysctl.d/
total 12
drwxr-xr-x.  2 root root   28 May 31 09:34 ./
drwxr-xr-x. 84 root root 8192 May 31 10:15 ../
lrwxrwxrwx.  1 root root   14 May 31 09:34 99-sysctl.conf -> ../sysctl.conf

[root@ip-172-31-45-100 ~]# cat /etc/sysctl.d/99-sysctl.conf 

# sysctl settings are defined through files in
# /usr/lib/sysctl.d/, /run/sysctl.d/, and /etc/sysctl.d/.
#
# Vendors settings live in /usr/lib/sysctl.d/.
# To override a whole file, create a new file with the same in
# /etc/sysctl.d/ and put new settings there. To override
# only specific settings, add a file with a lexically later
# name in /etc/sysctl.d/ and put new settings there.
#
# For more information, see sysctl.conf(5) and sysctl.d(5).

nothing interesting here as well. What if someone has messed up ip forwarding via other means though ?

[root@ip-172-31-45-100 ~]# sysctl -a 2>/dev/null| grep forward | grep -v ipv6
net.ipv4.conf.all.forwarding = 1
net.ipv4.conf.all.mc_forwarding = 0
net.ipv4.conf.default.forwarding = 1
net.ipv4.conf.default.mc_forwarding = 0
net.ipv4.conf.docker0.forwarding = 1
net.ipv4.conf.docker0.mc_forwarding = 0
net.ipv4.conf.ens5.forwarding = 1
net.ipv4.conf.ens5.mc_forwarding = 0
net.ipv4.conf.lo.forwarding = 1
net.ipv4.conf.lo.mc_forwarding = 0
net.ipv4.ip_forward = 1
net.ipv4.ip_forward_use_pmtu = 0

all looks fine here too. Let’s check some more sysctl settings regarding bridge + iptables

[root@ip-172-31-45-100 ~]# sysctl -a 2>/dev/null| grep bridge
net.bridge.bridge-nf-call-arptables = 1
net.bridge.bridge-nf-call-ip6tables = 1
net.bridge.bridge-nf-call-iptables = 1
net.bridge.bridge-nf-filter-pppoe-tagged = 0
net.bridge.bridge-nf-filter-vlan-tagged = 0
net.bridge.bridge-nf-pass-vlan-input-dev = 0

everything still looks fine in these configuration settings, but the packets from the container still can’t reach the host.
Next step is to setup a netcat listening service on the host on a different port and try to connect to it via the container. That still doesn’t work, no packets to be seen on ens5.
Could it be ebtables ? No..no way..but what if…

[root@ip-172-31-45-100 ~]# ebtables -L
Bridge table: filter
Bridge chain: INPUT, entries: 0, policy: ACCEPT
Bridge chain: FORWARD, entries: 0, policy: ACCEPT
Bridge chain: OUTPUT, entries: 0, policy: ACCEPT

still nothing interesting. Could it be a kernel bug ? is this some custom kernel ?

[root@ip-172-31-45-100 ~]# uname -a
Linux ip-172-31-45-100.eu-central-1.compute.internal 3.10.0-1062.12.1.el7.x86_64 #1 SMP Tue Feb 4 23:02:59 UTC 2020 x86_64 x86_64 x86_64 GNU/Linux

nope…that’s a vanilla centos7 kernel. Could it be nftables ? On 3.10 kernel and centos7 ?

[root@ip-172-31-45-100 ~]# nft list tables
-bash: nft: command not found

Nobody uses nftables yet, right ? Another wild thought, are there any ip rules defined ?

[root@ip-172-31-45-100 ~]# ip rule ls
0:    from all lookup local 
100:    from 172.31.45.100 lookup 1 
32766:    from all lookup main 
32767:    from all lookup default 

bingo, there’s a rule with priority 100 that matches the host’s IP address! What is this ip rule doing there ? Let’s check routing table 1 that the lookup of rule 100 points to

[root@ip-172-31-45-100 ~]# ip route ls table 1
default via 172.31.32.1 dev ens5 
172.31.32.0/20 dev ens5 scope link 

at last, here’s the answer!

There’s an IP rule entry that says that packets with a source IP of the ens5 interface should lookup routing entries only in routing table 1, which is not the main routing table. That routing table knows nothing about the docker network (172.17.0.0/16). Let’s delete the rule from the host

[root@ip-172-31-45-100 ~]# ip rule del from 172.31.45.100/32 tab 1 priority 100

and check if the container can contact the service now

(container) bash-4.2$ curl 172.31.45.100:9200
{
  "name" : "node1",
  "cluster_name" : "centos7",
  "cluster_uuid" : "d6fBSua6Q9OvSu534roTpA",
  "version" : {
    "number" : "7.7.0",
    "build_flavor" : "default",
    "build_type" : "rpm",
    "build_hash" : "81a1e9eda8e6183f5237786246f6dced26a10eaf",
    "build_date" : "2020-05-12T02:01:37.602180Z",
    "build_snapshot" : false,
    "lucene_version" : "8.5.1",
    "minimum_wire_compatibility_version" : "6.8.0",
    "minimum_index_compatibility_version" : "6.0.0-beta1"
  },
  "tagline" : "You Know, for Search"
}

Success!

Where’s the SYN+ACK ?

Does the SYN packet reach the listening service ? No…and the reason is rp_filter. Centos7 sets net.ipv4.conf.default.rp_filter=1, so when docker0 interface gets created it is set to net.ipv4.conf.docker0.rp_filter=1.

Here’s what rp_filter values mean according to kernel documentation:

  • 0 – No source validation.
  • 1 – Strict mode as defined in RFC3704 Strict Reverse Path Each incoming packet is tested against the FIB and if the interface is not the best reverse path the packet check will fail. By default failed packets are discarded.
  • 2 – Loose mode as defined in RFC3704 Loose Reverse Path Each incoming packet’s source address is also tested against the FIB and if the source address is not reachable via any interface the packet check will fail.

After reverting the deleted ip rule via ip rule add from 172.31.45.100/32 tab 1 priority 100 and setting sysctl -w net.ipv4.conf.docker0.rp_filter=0 we can see the SYN+ACK packet going out of ens5 interface towards the default gateway.

[root@ip-172-31-45-100 ~]# tcpdump -enni ens5 port 9200
tcpdump: verbose output suppressed, use -v or -vv for full protocol decode
listening on ens5, link-type EN10MB (Ethernet), capture size 262144 bytes
15:44:19.028353 06:ce:3b:94:fe:ac > 06:1b:e5:19:30:12, ethertype IPv4 (0x0800), length 74: 172.31.45.100.9200 > 172.17.0.2.47460: Flags [S.], seq 1431574088, ack 1879007024, win 26847, options [mss 8961,sackOK,TS val 22063599 ecr 22063599,nop,wscale 7], length 0
15:44:20.029163 06:ce:3b:94:fe:ac > 06:1b:e5:19:30:12, ethertype IPv4 (0x0800), length 74: 172.31.45.100.9200 > 172.17.0.2.47460: Flags [S.], seq 1431574088, ack 1879007024, win 26847, options [mss 8961,sackOK,TS val 22064600 ecr 22063599,nop,wscale 7], length 0
15:44:21.229126 06:ce:3b:94:fe:ac > 06:1b:e5:19:30:12, ethertype IPv4 (0x0800), length 74: 172.31.45.100.9200 > 172.17.0.2.47460: Flags [S.], seq 1431574088, ack 1879007024, win 26847, options [mss 8961,sackOK,TS val 22065800 ecr 22063599,nop,wscale 7], length 0

Finding such discarded packets, called martians, in the logs can be done by enabling log_martians via sysctl -w net.ipv4.conf.all.log_martians=1. Example syslog message:

May 31 16:01:08 ip-172-31-45-100 kernel: IPv4: martian source 172.31.45.100 from 172.17.0.2, on dev docker018
May 31 16:01:08 ip-172-31-45-100 kernel: ll header: 00000000: 02 42 e9 38 3d a8 02 42 ac 11 00 02 08 00 .B.8=..B......

But why ?

Why was the rule there in the original case ? Multihoming was tried, it didn’t work as expected and not all the configs were removed. Grep-ing /etc for the host’s IP found the following file:

/etc/sysconfig/network-scripts/rule-ens5:from 172.31.45.100/32 tab 1 priority 100

In multihoming it’s common that packets reaching a host on interface X should also be replied back from interface X. Part of a method to achieve this is to assign each interface its own routing table.

So when asked to troubleshoot networking issues act like Dr. House would, assume the worst.

P.S. thanks to Markos for the comments on improving the blogpost

Tormap – World map of Tor nodes – 5 years later

5 years ago I forked Moritz’s tormap project, updated it a bit and wrote about it. Tormap kept running for years until some changes in googlemaps broke it, not all KMLs were loading as they should. I later on figured out that googlemaps didn’t like that some of the KML files were larger than 3Mb. I didn’t have much time to play with it until recently, so a few days ago I decided to make it work again. I used newer googlemaps v3 API calls and compressed KML (KMZ) files to make it work. Then @iainlearmonth and @nusenu_ suggested making even more changes…

Their first suggestion was to use onionoo instead of parsing consensus on my own and running geoip on it, onionoo already provides that in a nice json output. Their other suggestion was to switch tormap to use OpenStretMap instead of googlemaps mostly because googlemaps block some Tor exit nodes and the tiles didn’t appear on the map when visiting over Tor. Both of these issues are fixed now.

I used leaflet.js and a couple of plugins like leaflet-plugins (for KML parsing) and leaflet-color-markers for the switch to OpenStreetMap. I will admit that using googlemaps APIs was far more convenient for someone without any javascript knowledge like me.

Maybe in the next 5 years I will have time again to implement their other suggestion, creating maps of nodes based on custom searches for relay attributes. Unless someone else wants to implement that, feel free to fork it!

Firejail with Tor HOWTO

A few years ago I created a set of scripts to start applications inside a linux namespace and automatically “Tor-ify” their network traffic. The main reason behind this effort was to provide some isolation and Tor support for applications that don’t have socks5 support, for example claws-mail. While this worked it was hard to keep adding sandboxing features like the ones firejail already provided. So I decided to take a look at how I could automatically send/receive traffic from a firejail-ed application through Tor.

This blog post is NOT meant to be used as copy/paste commands but to explain why each step is needed and how to overcome the problems found in the path.
If you have reasons to proxy all your traffic through Tor as securely as possible use Tails on a different machine, this guide is NOT for you.

A dedicated bridge
First of all create a Linux bridge and assign an IP address to it. Use this bridge to attach the veth interfaces that firejail creates when using the ‘net’ option. This option creates a new network namespace for each sandboxed application.

# brctl addbr tornet
# ip link set dev tornet up
# ip addr add 10.100.100.1/24 dev tornet

NAT
Then enable NAT from/to your “external” interface (eno1 in my case) for tcp connections and udp port 53 (DNS) and enable IP(v4) forwarding, if you don’t already use it. Some rules about sane default policy for FORWARD chain are added here well, modify to your needs.

# sysctl -w net.ipv4.conf.all.forwarding=1
# iptables -P FORWARD DROP
# iptables -A INPUT -m state --state INVALID -j DROP
# iptables -A INPUT -m state --state RELATED,ESTABLISHED -j ACCEPT
# iptables -A FORWARD -i tornet -o eno1 -p tcp -j ACCEPT
# iptables -A FORWARD -i tornet -o eno1 -p udp --dport=53 -j ACCEPT
# iptables -t nat -A POSTROUTING -s 10.100.100.0/24 -o eno1 -j MASQUERADE

This configuration is enough to start a sandboxed application that will have it’s traffic NAT-ed from the Linux host.

$ firejail --net=tornet /bin/bash
Parent pid 26730, child pid 26731

Interface        MAC                IP               Mask             Status
lo                                  127.0.0.1        255.0.0.0        UP    
eth0             72:cc:f6:d8:6a:09  10.100.100.29    255.255.255.0    UP    
Default gateway 10.100.100.1

$ host www.debian.org
www.debian.org has address 5.153.231.4
Host www.debian.org not found: 3(NXDOMAIN)
Host www.debian.org not found: 4(NOTIMP)
$ host whoami.akamai.net
whoami.akamai.net has address 83.235.72.202
$ curl wtfismyip.com/text
3.4.5.6

(where 3.4.5.6 is your real IP and 83.235.72.202 should be the IP address of the final DNS recursive resolver requesting information from whois.akamai.net)

So NAT works and the shell is sandboxed.

“Tor-ify” traffic
Edit /etc/tor/torrc and enable TransPort and VirtualAddrNetwork Tor features to transparently proxy to the Tor network connections landing on Tor daemon’s port 9040. DNSPort is used to resolve DNS queries through the Tor network. You don’t have to use IsolateDestAddr for your setup, but I like it.

TransPort 9040
VirtualAddrNetwork 172.30.0.0/16
DNSPort 5353 IsolateDestAddr

Then use iptables to redirect traffic from tornet bridge to TransPort and DNSPort specified in torrc. You also need to ACCEPT that traffic in your INPUT chain if your policy is DROP (it is right ?)

# iptables -t nat -A PREROUTING -i tornet -p udp -m udp --dport 53 -j DNAT --to-destination 127.0.0.1:5353
# iptables -t nat -A PREROUTING -i tornet -p tcp -j DNAT --to-destination 127.0.0.1:9040
# iptables -A INPUT -i tornet -p tcp --dport 9040 -j ACCEPT
# iptables -A INPUT -i tornet -p udp --dport 5353 -j ACCEPT

Run your sandbox again and try to access the same website:

$ firejail --net=tornet /bin/bash
$ curl wtfismyip.com/text
curl: (7) Failed to connect to wtfismyip.com port 80: Connection timed out

aaaand nothing happens. The problem is that you have tried to route traffic from a “normal” interface to loopback which is considered a “martian” and is not allowed by default by the Linux kernel.

sysctl magic
To enable loopback to be used for routing the route_localnet sysctl setting must be set.
# sysctl -w net.ipv4.conf.tornet.route_localnet=1

Try again:

$ firejail --net=tornet /bin/bash
$ host whoami.akamai.net
whoami.akamai.net has address 74.125.181.10
Host whoami.akamai.net not found: 3(NXDOMAIN)
Host whoami.akamai.net not found: 4(NOTIMP)
$ curl wtfismyip.com/text
176.10.104.243
$ host 176.10.104.243
243.104.10.176.in-addr.arpa domain name pointer tor2e1.digitale-gesellschaft.ch.

it works!

You can actually run any program you want like that:
$ firejail --net=tornet google-chrome

Accessing onion services
There’s one problem left though, accessing onion services.
If you try and access www.debian.org onion service from your firejail+tor setup you will get an error.

$ firejail --net=tornet /bin/bash
$ curl http://sejnfjrq6szgca7v.onion/
curl: (6) Could not resolve host: sejnfjrq6szgca7v.onion

To fix that you need to modify /etc/tor/torrc again and add AutomapHostsOnResolve option.
AutomapHostsOnResolve 1

$ firejail --net=tornet /bin/bash
$ curl -I http://sejnfjrq6szgca7v.onion/
HTTP/1.1 200 OK
Date: Fri, 09 Dec 2016 12:05:56 GMT
Server: Apache
Content-Location: index.en.html
Vary: negotiate,accept-language,Accept-Encoding
TCN: choice
Last-Modified: Thu, 08 Dec 2016 15:42:34 GMT
ETag: "3a40-543277c74dd5b"
Accept-Ranges: bytes
Content-Length: 14912
Cache-Control: max-age=86400
Expires: Sat, 10 Dec 2016 12:05:56 GMT
X-Clacks-Overhead: GNU Terry Pratchett
Content-Type: text/html
Content-Language: en

Accessing onion services works as well now.

Applications supporting socks5
If you already have some of your applications proxying connections to tor using 127.0.0.1:9050 then you need to add another iptables rule to redirect the socks traffic from inside firejail’s namespace to Tor SocksPort.
# iptables -t nat -A PREROUTING -i tornet -p tcp -m tcp --dport 9050 -j DNAT --to-destination 127.0.0.1:9050

Update on the state of STARTTLS support of Greek email providers

2 months ago I wrote a blog post describing the really bad state of STARTTLS support of Greek email providers. Things have slightly gotten better since then.

Updates on STARTTLS support per provider
The following is current as of 2016/03/26 and are only the updates since the previous blog post.
FORTHNET: Supports TLS 1.2 (at least since 2016/02/03)
VODAFONE: Supports TLS 1.2 for vodafone.gr but NOT for vodafone.com.gr (at least since 2016/03/10)

Updates on Certificate status per provider (that have STARTTLS support)
FORTHNET: uses a valid certificate (a wildcard *.forthnet.gr)
VODAFONE: uses a valid certificate (a wildcard *.megamailservers.eu)
MAILBOX: uses a valid signed certificate (for spamexperts.eu) (at least since 2016/03/26)

No other changes have been observed.

These updates indicate that 3 out of 5 commercial Greek ISPs currently use STARTTLS on their mail servers, OTE/COSMOTE, Forthnet and Vodafone. Way better than 1 out 5 which was the case 2 months ago. That means that the only ones left behind are Wind and Cyta, Since HOL has merged with Vodafone.

P.S. Thanks fly to @stsimb for notifying me of Forthnet updates with a comment on my blog

The sorry state of STARTTLS support of Greek email providers

I started looking into the STARTTLS support of Greek email providers completely by accident when one email of mine wasn’t being delivered for some reason to a friend who has an email address at a traditional Greek ISP. I started looking into the delivery issues by running swaks against the email server of the ISP and I just couldn’t believe it that the ISP’s mail server response did not include STARTTLS support. That made me wonder about the rest of the ISPs, so I created a very simple script that takes domains, finds their MX addresses and performs very simple TLS lookups using openssl. Yeah I know that there are websites that track the STARTTLS support of mail servers, but they usually don’t save the previous results and you can’t grep and compare.

What I’ve looked into is how emails are sent between servers (SMTP), not if users can read emails from the mail servers (POP3/IMAP) using encrypted connections.

TL;DR
The situation is BAD, REALLY BAD. Only 1,5 (yes, this is one and a half) commercial ISPs supports STARTTLS. OTE/COSMOTE has “proper” STARTTLS support while Wind has STARTTLS support only for windtools.gr domain, but not for their wind.gr.

I couldn’t believe the situation was SO, SO BAD before looking at the results. It seems that I had a lot more faith in those providers than I should have. Yeah I was wrong once again.

wtf is STARTTLS?
(please don’t read the next sentence if you know what TLS is)
If you have no idea about TLS and STARTTLS, then consider STARTTLS a way for servers to communicate and exchange data in encrypted form instead of cleartext. If mail servers don’t support STARTTLS then other servers can’t send them emails in encrypted form and everyone between those 2 servers can read the emails. It’s the equivalent of “https://” for mail servers. (There, I said it…).

TLS support per provider
The following is current as of 2016/01/23

Commercial Providers
OTE/COSMOTE: Some servers support TLS version 1.0 and some others 1.2 (more on that later)
WIND: Supports TLS version 1.0 on windtools.gr but does NOT support TLS on wind.gr (different mail servers)
CYTA: Does NOT support TLS on their mail servers
FORTHNET: Does NOT support TLS on their mail servers
HOL: Does NOT support TLS on their mail servers
VODAFONE: Does NOT support TLS on their mail servers

non-Commercial Providers
GRNET: Supports TLS 1.2
SCH: Supports TLS 1.0
TEE: Does NOT support TLS on their mail servers
MIL: Supports TLS 1.0

Universities
AUTH: Supports TLS 1.2
NTUA: Some servers support TLS 1.0 and one supports TLS 1.2
UPATRAS: Supports TLS 1.0

Free Providers
IN: Does NOT support TLS on their mail servers
FREEMAIL: Does NOT support TLS on their mail servers
MAILBOX: Supports TLS 1.2

Radical Providers
ESPIV: Supports TLS 1.2

Certificate status per provider (that have STARTTLS support)
OTE/COSMOTE: *.otenet.gr mail servers, which are the ones that support TLS 1.0, use a certificate that is valid for mailgate.otenet.gr, *.ote.gr mail servers have their own certificates, but all mail*.dt-one.com mail servers, which are the ones that use TLS 1.2, use the same self-signed certificate.
WIND: mx2.windtools.gr uses a valid certificate
GRNET: uses a valid certificate
SCH: uses a self-signed certificate (which has expired 5 years ago) signed by their own CA (which has expired 4 years ago)
MIL: uses a self-signed certificate (which has expired 1 year ago) signed by their own CA
AUTH: uses a certificate signed by their own CA called HARICA, whose certificate is now included in modern OSes, so I will consider this a valid certificate.
NTUA: all mail servers use a certificate that is valid for mail.ntua.gr
UPATRAS: uses a valid certificate
MAILBOX: uses a self-signed certificate (by plesk)
ESPIV: uses a valid certificate (a wildcard *.espiv.net)

Why does it matter
It makes a huge difference for users’ privacy. If a mail server does not support STARTTLS then anyone with the ability to look into packets traveling on the net from a source mail server to the destination mail server can read the emails in pure plaintext, as you read them on your mail client. Support of STARTTLS for a mail server forces an adversary that previously just passively monitored traffic to have to start a MITM (Man in the middle) attack in order to read those same emails. This converts the adversary from a passive to an active attacker. And this is both expensive and dangerous for the adversary, it can get caught in the act.

Security and privacy-minded people might start bashing me on my next proposal, but considering the current situation I think it’s OK for most of the users of those providers that don’t support TLS at all.
Dear providers, please install a certificate, even a self-signed one, and add support for STARTTLS on your mail servers today.

Even a self-signed certificate improves this situation. And it costs absolutely nothing. There’s really no excuse to not even have a self-signed certificate for your email server.

Self-signed vs CA-Signed
Truth is that it 99.9999% of email servers on the Internet do not verify the remote end’s certificate upon communication. That means that it makes absolutely no difference in most cases whether the certificate is CA-signed or self-signed. Most modern email servers support fingerprint verification for remote servers’ certificates but this can’t obviously scale on the Internet. If a user fears that some entity could MITM their email provider just to read their email, they already have bigger problems and certificate verification would not be able to help them a lot anyway. They either need to protect the contents of their email (gpg?) or start using alternate means of messaging/communication (pond?)

script
The script I used is on github: gr-mx. Feel free to make changes and send pull requests.
I plan to run the script once a week just to keep an archive of the results and be able to track and compare. Let’s see if something changes…

Various weirdness
* windtools.gr has 2 MX records, mx1.windtools.gr and mx2.windtools.gr. mx1.windtools.gr has been unreachable since I started running the script on 2016/01/08.
* mail{5,6,7,8}.dt-one.com mailservers used by OTE/COSMOTE did not have the self-signed certificate on 2016/01/08 while mail{1,2,3,4}.dt-one.com had it. The certificate was added at some point between 2016/01/11 and 2016/01/17

Linux kernel handling of IPv6 temporary addresses – CVE-2013-0343

I reported this bug on November 2012 but as of February 2013 it still hasn’t been fixed.

My initial report on oss-security and kernel netdev mailing lists reported it as an ‘information disclosure’ problem but then I found out that the issue is more severe and it can lead to the complete corruption of Linux kernel’s IPv6 stack until reboot. My second report wasn’t public, I thought it would be better not to make any public disclosure until the kernel people had enough time to respond, and was only sent to a number of kernel developers but I’m making it public now since the CVE is already out.

If someone wants to read all the publicly exchanged emails the best resource is probably this: http://marc.info/?t=135291265200001&r=1&w=2

Here’s the initial description of the problem:

Due to the way the Linux kernel handles the creation of IPv6 temporary addresses a malicious LAN user can remotely disable them altogether which may lead to privacy violations and information disclosure.

By default the Linux kernel uses the ‘ipv6.max_addresses’ option to specify how many IPv6 addresses an interface may have. The ‘ipv6.regen_max_retry’ option specifies how many times the kernel will try to create a new address.

Currently, in net/ipv6/addrconf.c,lines 898-910, there is no distinction between the events of reaching max_addresses for an interface and failing to generate a new address. Upon reaching any of the above conditions the following error is emitted by the kernel times ‘regen_max_retry’ (default value 3):

[183.793393] ipv6_create_tempaddr(): retry temporary address regeneration
[183.793405] ipv6_create_tempaddr(): retry temporary address regeneration
[183.793411] ipv6_create_tempaddr(): retry temporary address regeneration

After ‘regen_max_retry’ is reached the kernel completely disables temporary address generation for that interface.

[183.793413] ipv6_create_tempaddr(): regeneration time exceeded - disabled temporary address support

RFC4941 3.3.7 specifies that disabling temp_addresses MUST happen upon failure to create non-unique addresses which is not the above case. Addresses would have been created if the kernel had a higher
‘ipv6.max_addresses’ limit.

A malicious LAN user can send a limited amount of RA prefixes and thus disable IPv6 temporary address creation for any Linux host. Recent distributions which enable the IPv6 Privacy extensions by default, like Ubuntu 12.04 and 12.10, are vulnerable to such attacks.

Due to the kernel’s default values for valid (604800) and preferred (86400) lifetimes, this scenario may even occur under normal usage when a Router sends both a public and a ULA prefix, which is not an uncommon
scenario for IPv6. 16 addresses are not enough with the current default timers when more than 1 prefix is advertised.

The kernel should at least differentiate between the two cases of reaching max_addresses and being unable to create new addresses, due to DAD conflicts for example.

And here’s the second, more severe report about the corruption of the IPv6 stack:

I had previously informed this list about the issue of the linux kernel losing IPv6 privacy extensions by a local LAN attacker. Recently I’ve found that there’s actually another, more serious in my
opinion, issue that follows the previous one. If the user tries to disconnect/reconnect the network device/connection for whatever reason (e.g. thinking he might gain back privacy extensions), then the device gets IPs from SLAAC that have the “tentative” flag and never loses that. That means that IPv6 functionality for that device is from then on completely lost. I haven’t been able to bring back the kernel to a working IPv6 state without a reboot.

This is definitely a DoS situation and it needs fixing.

Here are the steps to reproduce:


== Step 1. Boot Ubuntu 12.10 (kernel 3.5.0-17-generic) ==
ubuntu@ubuntu:~$ ip a ls dev eth0
2: eth0: <BROADCAST,MULTICAST,UP,LOWER_UP> mtu 1500 qdisc pfifo_fast state UP qlen 1000
    link/ether 52:54:00:8b:99:5d brd ff:ff:ff:ff:ff:ff
    inet 192.168.1.96/24 brd 192.168.1.255 scope global eth0
    inet6 2001:db8:f00:f00:ad1f:9166:93d4:fd6d/64 scope global temporary dynamic 
       valid_lft 86379sec preferred_lft 3579sec
    inet6 2001:db8:f00:f00:5054:ff:fe8b:995d/64 scope global dynamic 
       valid_lft 86379sec preferred_lft 3579sec
    inet6 fdbb:aaaa:bbbb:cccc:ad1f:9166:93d4:fd6d/64 scope global temporary dynamic 
       valid_lft 86379sec preferred_lft 3579sec
    inet6 fdbb:aaaa:bbbb:cccc:5054:ff:fe8b:995d/64 scope global dynamic 
       valid_lft 86379sec preferred_lft 3579sec
    inet6 fe80::5054:ff:fe8b:995d/64 scope link 
       valid_lft forever preferred_lft forever

ubuntu@ubuntu:~$ sysctl -a | grep use_tempaddr
net.ipv6.conf.all.use_tempaddr = 2
net.ipv6.conf.default.use_tempaddr = 2
net.ipv6.conf.eth0.use_tempaddr = 2
net.ipv6.conf.lo.use_tempaddr = 2

ubuntu@ubuntu:~$ nmcli con status
NAME                      UUID                                   DEVICES    DEFAULT  VPN   MASTER-PATH
Wired connection 1        923e6729-74a7-4389-9dbd-43ed7db3d1b8   eth0       yes      no    --
ubuntu@ubuntu:~$ nmcli dev status
DEVICE     TYPE              STATE
eth0       802-3-ethernet    connected

//ping6 2a00:1450:4002:800::100e  while in another terminal: tcpdump -ni eth0 ip6

ubuntu@ubuntu:~$ ping6 2a00:1450:4002:800::100e -c1
PING 2a00:1450:4002:800::100e(2a00:1450:4002:800::100e) 56 data bytes
64 bytes from 2a00:1450:4002:800::100e: icmp_seq=1 ttl=53 time=70.9 ms

--- 2a00:1450:4002:800::100e ping statistics ---
1 packets transmitted, 1 received, 0% packet loss, time 0ms
rtt min/avg/max/mdev = 70.994/70.994/70.994/0.000 ms

# tcpdump -ni eth0 host 2a00:1450:4002:800::100e
17:57:37.784658 IP6 2001:db8:f00:f00:ad1f:9166:93d4:fd6d > 2a00:1450:4002:800::100e: ICMP6, echo request, seq 1, length 64
17:57:37.855257 IP6 2a00:1450:4002:800::100e > 2001:db8:f00:f00:ad1f:9166:93d4:fd6d: ICMP6, echo reply, seq 1, length 64

== Step 2. flood RAs on the LAN ==

$ dmesg | tail
[ 1093.642053] IPv6: ipv6_create_tempaddr: retry temporary address regeneration
[ 1093.642062] IPv6: ipv6_create_tempaddr: retry temporary address regeneration
[ 1093.642065] IPv6: ipv6_create_tempaddr: retry temporary address regeneration
[ 1093.642067] IPv6: ipv6_create_tempaddr: regeneration time exceeded - disabled temporary address support

ubuntu@ubuntu:~$ sysctl -a | grep use_tempaddr
net.ipv6.conf.all.use_tempaddr = 2
net.ipv6.conf.default.use_tempaddr = 2
net.ipv6.conf.eth0.use_tempaddr = -1
net.ipv6.conf.lo.use_tempaddr = 2

//ping6 2a00:1450:4002:800::100e  while in another terminal: tcpdump -ni eth0 ip6

ubuntu@ubuntu:~$ ping6 2a00:1450:4002:800::100e -c1
PING 2a00:1450:4002:800::100e(2a00:1450:4002:800::100e) 56 data bytes
64 bytes from 2a00:1450:4002:800::100e: icmp_seq=1 ttl=53 time=77.5 ms

--- 2a00:1450:4002:800::100e ping statistics ---
1 packets transmitted, 1 received, 0% packet loss, time 0ms
rtt min/avg/max/mdev = 77.568/77.568/77.568/0.000 ms

# tcpdump -ni eth0 host 2a00:1450:4002:800::100e
17:59:38.204173 IP6 2001:db8:f00:f00:5054:ff:fe8b:995d > 2a00:1450:4002:800::100e: ICMP6, echo request, seq 1, length 64
17:59:38.281437 IP6 2a00:1450:4002:800::100e > 2001:db8:f00:f00:5054:ff:fe8b:995d: ICMP6, echo reply, seq 1, length 64

//notice the change of IPv6 address to the one not using privacy extensions even after the flooding has finished long ago.

== Step 3. Disconnect/Reconnect connection  ==
// restoring net.ipv6.conf.eth0.use_tempaddr to value '2' makes no difference at all for the rest of the process

# nmcli dev disconnect iface eth0
# nmcli con up uuid 923e6729-74a7-4389-9dbd-43ed7db3d1b8

ubuntu@ubuntu:~$ ip a ls dev eth0
2: eth0: <BROADCAST,MULTICAST,UP,LOWER_UP> mtu 1500 qdisc pfifo_fast state UP qlen 1000
    link/ether 52:54:00:8b:99:5d brd ff:ff:ff:ff:ff:ff
    inet 192.168.1.96/24 brd 192.168.1.255 scope global eth0
    inet6 2001:db8:f00:f00:5054:ff:fe8b:995d/64 scope global tentative dynamic 
       valid_lft 86400sec preferred_lft 3600sec
    inet6 fdbb:aaaa:bbbb:cccc:5054:ff:fe8b:995d/64 scope global tentative dynamic 
       valid_lft 86400sec preferred_lft 3600sec
    inet6 fe80::5054:ff:fe8b:995d/64 scope link tentative 
       valid_lft forever preferred_lft forever

//Notice the "tentative" flag of the IPs on the device

//ping6 2a00:1450:4002:800::100e  while in another terminal: tcpdump -ni eth0 ip6

ubuntu@ubuntu:~$ ping6 2a00:1450:4002:800::100e -c1
PING 2a00:1450:4002:800::100e(2a00:1450:4002:800::100e) 56 data bytes
^C
--- 2a00:1450:4002:800::100e ping statistics ---
1 packets transmitted, 0 received, 100% packet loss, time 0ms

# tcpdump -ni eth0 host 2a00:1450:4002:800::100e
18:01:45.264194 IP6 ::1 > 2a00:1450:4002:800::100e: ICMP6, echo request, seq 1, length 64

Summary:
Before flooding it uses IP: 2001:db8:f00:f00:ad1f:9166:93d4:fd6d
After flooding it uses IP: 2001:db8:f00:f00:5054:ff:fe8b:995d –> it has lost privacy extensions
After disconnect/reconnect it tries to use IP: ::1 –> it has lost IPv6 connectivity

The problem currently affects all Linux kernels (including the latest 3.8), that have IPv6 Privacy Extensions enabled. The only distribution that has IPv6 Privacy Extensions enabled by default is Ubuntu starting from version 12.04. So Ubuntu 12.04 and 12.10 are currently vulnerable to this attack and can have their IPv6 stack corrupted/disabled by a remote attacker in an untrusted network.

Kernel developers and people from RedHat Security Team are trying to fix the issue which in my opinion involves changing parts of the logic of IPv6 addressing algorithms in the Linux kernel.

No mitigation currently exists apart from disabling IPv6 Privacy Extensions.

You can play with this bug using flood_router26 tool from THC-IPv6 toolkit v2.1.
Usage: # ./flood_router26 -A iface

P.S. I can’t tell if the stack corruption could also lead to other kernel problems, that would probably need some professional security researchers to look into it.

Review of the first Athens CryptoParty

On Sunday the 11th of November we finally had our first CryptoParty in Athens, Greece. We hosted it at the Athens Hackerspace.

Organizing
We organized our first CryptoParty in a very ad-hoc way. A pad was set up and advertised on Twitter/Facebook. Almost immediately people started writing their thoughts, views and interests there. We soon had a list of topics that people were interested in and another list of people willing to give presentations/workshops. Later on we set up a doodle so people would choose the most convenient dates for them. From the group of 50 people that originally expressed their interest to attend the CryptoParty, at least 20 voted on the doodle. That’s how the final date of November the 11th was chosen.

It was surprising/refreshing that even though everything was organized through an anonymously editable pad, nobody tried to vandalize it.

The actual event
Through the pad, we chose 3 topics for the first meeting. “Using SSL/TLS for your Internet communications”, an “introduction to Tor” and another “introduction to I2P”.
The time for the event was set for 12:00 in the morning, probably a very bad choice. The next one should definitely be later in the afternoon or even night. We learn by our mistakes though…People started showing up at around 11:30, but the event didn’t start until 12:30 when someone from hackerspace.gr gave a 5′ intro talk about what the hackerspace is to people who had never been there before. People kept coming even until 13:00 and the audience had grown to more than 30 people.
After the three workshops/presentations around 10-15 people stayed and we ordered pizza.

All in all I’d say it was fairly successful since more than 30 people came and actually did things to improve their security.

The presentations/workshops
Using SSL/TLS for your Internet communications” (in English) was my effort to show people how cleartext data travels through the Internet and how any intermediate “bad guy”/LEA can easily read or manipulate your data. People were instructed to install wireshark so they could actually see for themselves what the actual problem is. It was very “nice” to see their surprise upon watching cleartext packets flowing through their network cards. It was even nicer to see their surprise when I used tcpdump on hackerspace’s router to redirect traffic to wireshark running on a Debian laptop to display their data, without having “direct” access to their computer. Then people were introduced to the idea of Transport Layer Security (SSL/TLS), and how HTTPS protects their web data from prying eyes. After this tiny “privacy apocalypse” it was very easy to convince users to install HTTPS-Everywhere. And so they did. Afterwards they got instructions on how they should change SSL/TLS settings for their E-email and IM clients.
My original intention was to “scare” people a bit. It was funny to see their faces when they logged in to yahoo mail and they could see their emails cleartext on wireshark. People don’t understand how data travels through the Internet unless they experience it for themselves. I’m glad that people who had absolutely no idea about HTTPS are now using HTTPS-Everywhere to protect themselves. Hopefully they’ll show that to their friends as well.

Introduction to Tor” (in Greek) gave people an idea at what anonymity is, how it differs from security and how users should be combining both TLS and Tor usage for security and anonymity at the same time. A brief explanation of what hidden services are was given as well. Even though George asked people to download and install Tor Browser Bundle and use it, we’ll definitely need more “hands on” Tor workshops in the future. It will be interesting to convince more people to actually use it and why not, even set up their own hidden services.

Invisible Internet Project a.k.a. I2P” (in English) by @alafroiskiotos was probably the hardest of the three presentations to keep up for people that had no previous idea about anonymity networks. It’s unique architecture and some difficulties in it’s usage raised a lot of interesting questions by attendees.

Thoughts on future CryptoParties
After the end of the workshops/presentations we had a lengthy discussion with the attendees as to what they would like to see/experience in the future CryptoParties. Unfortunately people were not very vocal. Very few participated and openly expressed their thoughts/opinions. A great part of the discussion was spent trying to figure out whom should CryptoParty presentations/workshops target at, users? developers? geeks? It’s obviously very hard to target all groups of people at the same time.

So here are my thoughts on what future CryptoParties should be. CryptoParties should be about changing user habits, they should be closer to workshops than presentations. They should be focused mainly on users not developers nor computer science students. Just simple users. People don’t want theoretical talks about cryptography, they need advice they can use in their daily lives. It’s already very hard to talk about modern crypto to people who haven’t got a strong mathematical background, you have to oversimplify things. Oversimplifying things then makes geeks/nerds unhappy and still doesn’t “teach” people about proper crypto. Even a fairly “simple” HTTPS negotiation contains key crypto concepts that are very difficult for a “crypto-newbie” to grasp. So it’s a lose-lose situation.

We need to teach, or better convince, users on using good, secure, audited tools and not just tell them about technologies and concepts. We, weirdos, might like that, but most users don’t. People need our help to learn how to avoid “fancy” tools and false security prophets. We need to show them how security should be applied in a layered approach. Getting people to care about their own privacy is key to the success of CryptoParties in the way I see them. To achieve that, we, people that know a few things more than the average Joe, should all become volunteers to such efforts. We should be joining CryptoParties in order to help others and not in order to improve ourselves and our knowledge. (Actually when you study in order to make a good workshop/presentation you improve your own knowledge as well, but let’s leave that beside for now.) We can have our separate geeky/nerdy events to present fancy tech and cool crypto stuff, but let’s keep CryptoParties simple and practical. Oh and we’ll need to repeat things again and again and again. That’s the only way people might change their habits.

If you want to find out more about the next Athens CryptoParty keep an eye at Hackerspace’s events and the athens cryptoparty pad. Join us!

Good luck to all the CryptoParties worldwide!

Bypassing censorship devices by obfuscating your traffic using obfsproxy

*WARNING* 14/01/2014 This post is quite deprecated. For example obfsproxy has been completely rewritten in python and there is a newer and more secure replacement of obfs2, named obfs3. Please read this obfsproxy-debian-instructions for any updates.

Some countries like China, Iran, Ethiopia, Kazakhstan and others, like installing some nasty little boxes at the edges of their country’s “internet feed” to monitor and filter traffic. These little boxes are called DPI (Deep Packet Inspection) boxes and what they do, is sniff out every little packet flowing through them to find specific patterns and then they provide their administrator with the option to block traffic that matches these patterns. These boxes are very sophisticated and they don’t just filter traffic by src, dst or port, they filter traffic by the content (payload) the packets carry.
Unfortunately, it’s not just these countries that deploy DPI technologies, but some private companies also use such devices in order to monitor their employees.

The 10 thousand feet view
Tor is a nice way to avoid basic censorship technologies, but sometimes DPI technology is so good that it can fingerprint Tor traffic, which is already encrypted, and block it. In response to that, Tor people devised a technology called Pluggable Transports whose job is to obfuscate traffic in various ways so that it looks like something different than it actually is. For example it can make Tor traffic look like a skype call using SkypeMorph or one can use Obfsproxy to obfuscate traffic to look like…nothing, or at least nothing easily recognizable. What’s cool about obfsproxy though is that one can even use it separately from Tor, to obfuscate any connection he needs to.

A warning
Even though obfsproxy encrypts traffic and makes it look completely random, it’s not a fool proof solution for everything. It’s basic job is to defend against DPI that can recognize/fingerprint TLS connections. If someone has the resources he could potentially train his DPI box to “speak” the obfsproxy protocol and eventually decrypt the obfuscated traffic. What this means is that obfsproxy should not be used as a single means of protection and it should just be used as a wrapper _around_ already encrypted SSL traffic.
If you’re still in doubt about what can obfsproxy protect you from and from what it can’t, please read the Obfsproxy Threat Model document.

Two use cases
Obfuscate an SSH and an OpenVPN connection.
Obviously one needs a server outside the censorship perimeter that he or someone else will run the obfsproxy server part. Instructions on installing obfsproxy on Debian/Ubuntu are given in my previous blog post setting up tor + obfsproxy + brdgrd to fight censhorship. Installing netcat, the openbsd version; package name is netcat-openbsd on Debian/Ubuntu, is also needed for the SSH example.

What both examples do is obfuscate a TLS connection through an obfsproxy server so that it looks innocent. Assuming that the most innocent looking traffic is HTTP, try running the obfsproxy server part on port 80.

SSH connection
Scenario:
USER: running ssh client
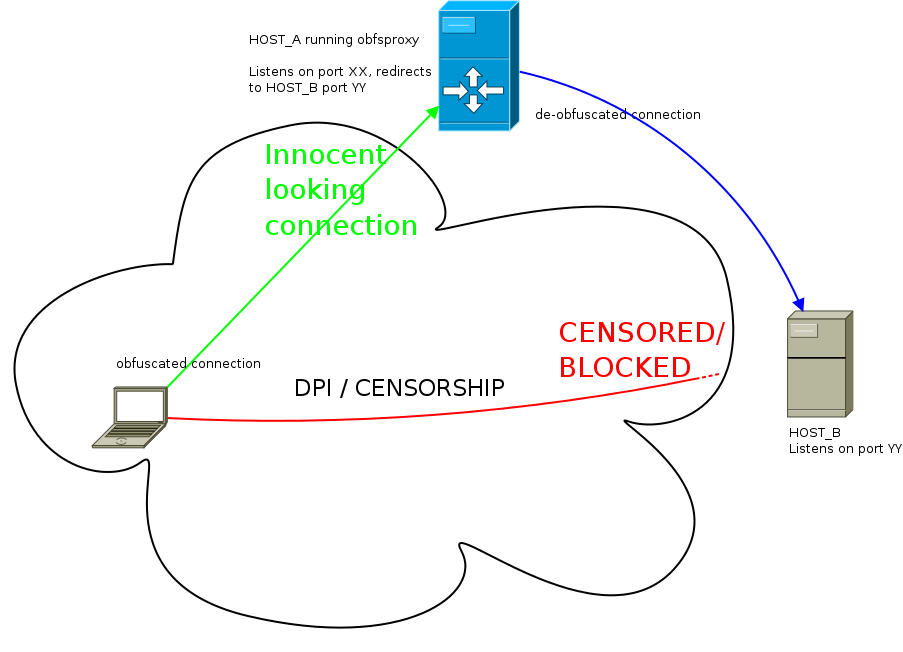
HOST_A (obfsproxy): running obfsproxy on port 80 and redirecting to HOST_B port 22
HOST_B (dst): Running SSH server on port 22

What one needs to do is setup the following “tunneling”:
ssh client —> [NC SOCKS PROXY] —> obfsproxy client (USER)—> obfsproxy server (HOST_A) —> ssh server (HOST_B)

Steps:
1. on HOST_A setup obfsproxy server to listen for connection and redirect to HOST_B:
# screen obfsproxy --log-min-severity=info obfs2 --dest=HOST_B:22 server 0.0.0.0:80

2. on USER’s box, then configure obfsproxy client to setup a local socks proxy that will obfuscate all traffic passing through it:
$ screen obfsproxy --log-min-severity=info obfs2 socks 127.0.0.1:9999
Then instead of SSH-ing directly to HOST_B, the user has to ssh to HOST_A port 80 (where obfsproxy server is listening).

3. on USER’s box again, edit ~/.ssh/config and add something along the following lines:

Host HOST_A
    ProxyCommand /bin/nc.openbsd -x 127.0.0.1:9999 %h %p

This will force all SSH connections to HOST_A to pass through the local (obfsproxy) socks server listening on 127.0.0.1:9999

4. Finally run the ssh command:
$ ssh -p 80 username@HOST_A

That’s it. The connection will now pass get obfuscated locally, pass through obfsproxy server at HOST_A and then finally reach it’s destination at HOST_B.

OpenVPN connection
Scenario:
USER: running OpenVPN client
HOST_A (obfsproxy): running obfsproxy on port 80 and redirecting to HOST_B TCP port 443
HOST_B (dst): Running OpenVPN server on port 443

What one needs to do is setup the following “tunneling”:
openvpn client —> obfsproxy client (USER)—> obfsproxy server (HOST_A) —> OpenVPN server (HOST_B)

Steps:
1. on HOST_A setup obfsproxy server to listen for connection and redirect to HOST_B:
# screen obfsproxy --log-min-severity=info obfs2 --dest=HOST_B:443 server 0.0.0.0:80

2. on USER’s box, then configure obfsproxy client to setup a local socks proxy that will obfuscate all traffic passing through it:
$ screen obfsproxy --log-min-severity=info obfs2 socks 127.0.0.1:9999
Then instead of connecting the OpenVPN client directly to HOST_B, the user has edit OpenVPN config file to connect to HOST_A port 80 (where obfsproxy server is listening).

3. on USER’s box again, edit your openvpn config file, change the ‘port’ and ‘remote’ lines and add a ‘socks-proxy’ one:

port 80
remote HOST_A
socks-proxy 127.0.0.1 9999

This will instruct the OpenVPN client to connect to HOST_A passing through the local (obfsproxy) socks server listening on 127.0.0.1:9999

4. Finally run the openvpn client command:
$ openvpn client.config

That’s it.

Security Enhancement
You can “enhance” obfproxy’s security by adding a shared secret parameter to command line, so anyone who doesn’t have this secret key won’t be able to use the obfsproxy server, decryption of packets will fail:
# screen obfsproxy --log-min-severity=info obfs2 --shared-secret="foobarfoo" --dest=HOST_B:443 server 0.0.0.0:80
$ screen obfsproxy --log-min-severity=info obfs2 --shared-secret="foobarfoo" socks 127.0.0.1:9999

Documentation
Or at least…some documentation.

Your best chance to understand the internals of obfsproxy is to read the protocol specification

For more info about obfsproxy client part, read the documentation here: obfsproxy client external
For more info about obfsproxy server part, read the documentation here: obfsproxy server external

Screenshots
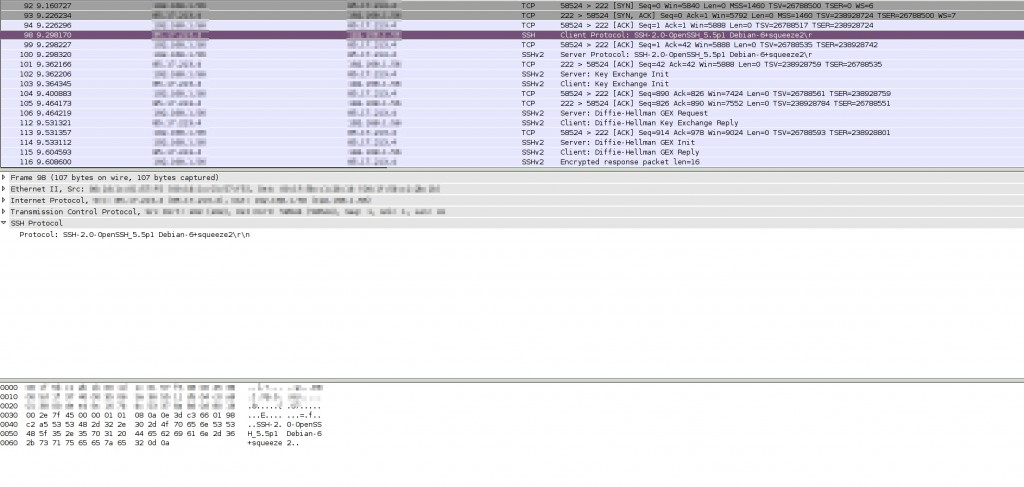
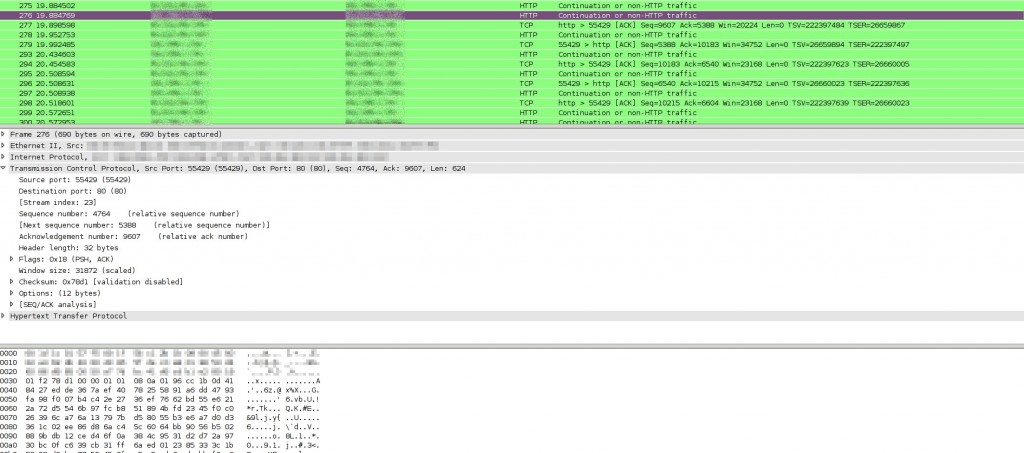
For those who like meaningless screenshots, here’s what wireshark (which is certainly NOT a DPI) can tell about a connection without and with obfsproxy:

Without obfsproxy

With obfsproxy

*Update*
one can find openvpn configuration files for use with obfsproxy here:
Linux Client
Windows Client

Greek rules for HTTPS Everywhere

HTTPS Everywhere is a browser addon by EFF whose job is to redirect you to the HTTPS versions of certain, whitelisted, web sites. What this means is that HTTPS Everywhere protects your communication with those websites by forcing them to be encrypted.

The current HTTPS Everywhere ruleset lacks any Greek websites, so I started yet-another-list to create rules for Greek websites. This is the fourth list I’m maintaing after GrRBL, Greek Spammers Blacklist and Greek AdblockPlus Filter rules and it is the only one where being included is actually a good thing.

You can find some more info about Greek rules for HTTPS Everywhere on my github page.

Until the rules get adopted upstream by HTTPS Everywhere team, in order to use them you should download the rules and place them inside your Firefox profile directory. But first of all you need to install the plugin/extension/addon/call-me-whatever-you-want by going to HTTPS Everywhere page.

Step 1: Instructions for Linux users
Go to the HTTPSEverywhereUserRules directory inside your firefox profile directory:

$ cd .mozilla/firefox/XYZXYZXYZ.default/HTTPSEverywhereUserRules/
(XYZXYZXYZ will be different in your machine)

and download the current Greek ruleset:
$ wget https://raw.github.com/kargig/https-everywhere-greek-rules/master/Greek.xml

Step 1: Instructions for Windows users
Download https://raw.github.com/kargig/https-everywhere-greek-rules/master/Greek.xml with your favorite browser.
Then, according to this Mozilla support page, open Fifefox, go to Help->Troubleshooting Information and under the Application Basics section, click on Open Containing Folder. There a window will appear and you should copy the previously downloaded Greek.xml file inside the HTTPSEverywhereUserRules folder.

Step 2: Instructions for any OS
Either restart your browser to load the new rules or click the HTTPS Everywhere icon beside the url bar, select “Disable HTTPS Everywhere”, then click it again and select “Enable HTTPS Everywhere”. The new rules should now be loaded, you can test by going to http://void.gr and it should immediately redirect you to https://void.gr

Some notes
The ruleset is experimental. If you find any problems please report them as issues to github.
If you want a Greek website added to the list, either report it as a new issue on github or fork the repository, add your own rules and open a pull request.

A small rant
I found some webmails in Greece that don’t even offer HTTPS as an option to the user. They ‘POST’ user details, including passwords of course, over unencrypted HTTP connections. I will be updating a text file called hallofshame.txt inside the github reposity of Greek rules for HTTPS Everywhere with such websites. I am planning to inform the operators of such websites every now and then, so if you know any other cases please open up new issues so we can help protect innocent users.

A big rant on current HTTPS status of top Greek websites
The status of HTTPS support on top 100 Greek websites (according to Alexa) is SAD. No wait, it is EXTEMELY SAD. Out of these 100 websites, taking into account only the ones that are actually run by Greeks, that means excluding Google, Facebook, Youtube, LinkedIn, etc, only 2, yes you read correctly, just two websites offer HTTPS support.
The reason 95% the others don’t is probably because they are based on Akamai-zed services and either don’t have the money to buy Akamai’s HTTPS products or don’t have the technical skills to do it properly.

If you don’t run an Akamai-zed website and want a completely free 1-year SSL certificate please visit https://www.startssl.com/. If you need professional help with your setup please don’t hesitate to contact.

There’s a very good (financial) explanation why these high traffic Greek sites have prefered Akamai’s services and haven’t deployed their own servers in Greece but this will be the content of another blog post coming soon.

Η πρώτη απόφαση λήψης τεχνολογικών μέτρων παρεμπόδισης της πρόσβασης χρηστών σε ιστοσελίδες

Από δελτίο τύπου του Οργανισμού Πνευματικής Ιδιοκτησίας:

…στις 16 Μαΐου 2012 δημοσιεύθηκε η απόφαση 4658/2012 του Μονομελούς Πρωτοδικείου Αθηνών, η οποία έκανε δεκτό αίτημα οργανισμών συλλογικής διαχείρισης δικαιωμάτων επί μουσικών και οπτικοακουστικών έργων να υποχρεωθούν εκτός άλλων οι ελληνικές εταιρίες παροχής υπηρεσιών σύνδεσης στο διαδίκτυο να λάβουν τεχνολογικά μέτρα προκειμένου να καταστεί αδύνατη η πρόσβαση των συνδρομητών τους σε διαδικτυακές τοποθεσίες μέσω των οποίων πραγματοποιείται παράνομη παρουσίαση και ανταλλαγή έργων. Η απόφαση εφαρμόζει ουσιαστικά για πρώτη το άρθρο 64 Α του ν. 2121/1993 που ενσωματώνει πρόβλεψη Οδηγίας της Ευρωπαϊκής Ένωσης για τη δυνατότητα λήψης ασφαλιστικών μέτρων κατά των διαμεσολαβητών (παρόχων υπηρεσιών διαδικτύου), οι υπηρεσίες των οποίων χρησιμοποιούνται από τρίτο για την προσβολή του δικαιώματος του δημιουργού ή συγγενικού δικαιώματος. Παρόμοιες αποφάσεις έχουν ήδη εκδοθεί σε άλλα κράτη μέλη της Ευρωπαϊκής Ένωσης και αποσκοπούν στην προστασία της πνευματικής ιδιοκτησίας στο διαδίκτυο χωρίς να θίγονται τα δικαιώματα των χρηστών….

Την πλήρη απόφαση μπορείτε να την διαβάσετε εδώ: 4658/2012
*Update*
Επειδή το site του ΟΠΙ δεν παρέχει πια την απόφαση, την έχω ανεβάσει εδώ: Απόφαση-του-Πρωτοδικείου-Αθηνών-για-την-αντιμετώπιση-της-διαδικτυακής-πειρατείας

Γιατί είναι σημαντική αυτή η απόφαση για τους χρήστες
Για πρώτη φορά στην Ελλάδα δικαστήριο επιβάλλει συγκεκριμένα τεχνικά/τεχνολογικά μέτρα παρεμπόδισης της πρόσβασης χρηστών σε ιστοσελίδες/servers. Σήμερα μπορεί να είναι μια ιστοσελίδα που παρέχει “πειρατικό” περιεχόμενο και ο ιδιοκτήτης της βγάζει χρήματα μέσω των διαφημίσεων, αύριο μπορεί να είναι ένα site που ο ιδιοκτήτης του δεν βγάζει χρήματα και μεθαύριο ένα πολιτικό site, ένα θρησκευτικό site, ένα blog που διαφωνεί με τις μεθόδους μιας εταιρίας, μιας κυβέρνησης, κτλ. Οπότε πρέπει ως χρήστες να ξέρουμε τι επιβάλλει το δικαστήριο και να δούμε πως εμείς, ως μέλη της κοινωνίας του Internet, μπορούμε να κάνουμε κάτι για να ακυρώσουμε στην πράξη μια τέτοια απόφαση αν πιστεύουμε πως αυτή είναι λανθασμένη.

Τι περιγράφει η απόφαση
Η απόφαση περιέχει μια λεπτομερή τεχνική έκθεση που εξηγεί πως δουλεύει ένα site, ποια πρωτόκολλα χρησιμοποιούνται από τα μηχανήματα των χρηστών/πελατών για να αποκτήσουν πρόσβαση στο site και έπειτα περιγράφει τρόπους να διακοπεί η σύνδεση των χρηστών με ένα site. Οι τρόποι που παρουσιάζονται είναι οι εξής 2:
Ι) Εφαρμογή κατάλληλων φίλτρων στους δρομολογητές (routers) των ISPs ώστε να αποκλειστεί οποιαδήποτε κίνηση καταλήγει σε συγκεκριμένη IP.
ΙΙ) Εφαρμογή κατάλληλης ανακατεύθυνσης, μέσω τροποποίησης των DNS εγγραφών στους nameservers του κάθε ISP ώστε, ώστε τα αιτήματα προς συγκεκριμένα domains να καταλήγουν σε διαφορετικούς ιστοτόπους. Αυτοί οι ιστότοποι θα μπορούσαν να περιέχουν και ένα προειδοποιητικό μύνημα ώστε να καταλαβαίνουν οι χρήστες γιατί δεν έχουν πρόσβαση στο κανονικό site, όπως αναφέρει το η έκθεση.

Από αυτούς τους 2 τρόπους, στην απόφαση επιβάλλεται η χρήση μόνο του τρόπου (I) ως τεχνολογικό μέτρο διακοπής της πρόσβασης στις “παραβατικές” ιστοσελίδες.

Τα προβλήματα της απόφασης
Τα προβλήματα της απόφασης για μένα είναι αρκετά. Κάποια αναφέρονται και στην ίδια την τεχνική έκθεση που περιέχεται στην απόφαση.
Συγκεκριμένα αναφέρει:

Αν και υπάρχουν δυνατότητες παράκαμψης των συγκεκριμένων τεχνικών μέσων από την μεριά των χρηστών του διαδυκτύου, οι τεχνικές αυτές είναι άγνωστες στη μεγάλη πλειονότητα των πελατών (συνδρομητών) των ISP, που είναι οι δυνητικοί επισκέπτες των ιστοτόπων στους οποίους έχει διακοπεί η πρόσβαση.

Θα αναφερθώ μόνο στα πολύ βασικά όμως…
α) Καταρχήν τα sites έχουν αλλάξει IPs. Το www.ellinadiko.com πλέον δεν δείχνει στην IP που αναφέρεται στην απόφαση, για την ακρίβεια δεν δείχνει πουθενά αυτή τη στιγμή, ενώ το www.music-bazaar.com λειτουργεί αλλά δείχνει σε διαφορετική IP. Άρα η εφαρμογή της οδηγίας (Ι) είναι πρακτικά άχρηστη ως προς τους σκοπούς της απόφασης χωρίς πολλά πολλά. Από την άλλη όμως μπορεί να δημιουργήσει προβλήματα πρόσβασης σε άλλα sites που μπορεί αυτή τη στιγμή να φιλοξενούνται σε εκείνες τις IP για τις οποίες πρέπει να μπουν φίλτρα. Άρα αν εφαρμοστεί η απόφαση ως έχει κινδυνεύει να διακοπεί η πρόσβαση στο site μιας ελληνικής ή ξένης εταιρίας ή προσώπου χωρίς να φταίει σε τίποτα! Ακόμα να μην είχαν αλλάξει IPs τα sites αυτά όμως, πάλι προκύπτει πρόβλημα. Η σύγχρονη τεχνολογία, των τελευταίων 15+ ετών, επιτρέπει την φιλοξενία πολλαπλών ιστοτόπων στην ίδια IP μέσω της τεχνολογίας virtual hosting, κάτι που εφαρμόζεται κατά κόρον ώστε να εξοικονομηθούν IPs. Αυτό έχει σαν αποτέλεσμα πως αν αποτραπεί η κίνηση προς μία συγκεκριμένη IP από ένα φίλτρο ενός ISP, τότε παρεμποδίζεται και η κίνηση προς όλα τα υπόλοιπα sites που φιλοξενούνται στην ίδια IP. Άρα υπάρχει πιθανότητα “τιμωρίας” αθώων ανθρώπων που δεν έχουν κάνει απολύτως τίποτα.

β) Η τεχνική έκθεση και η απόφαση περιέχει συγκεκριμένα domains που θα πρέπει να εφαρμοστεί το (II). Αυτό όμως δεν εμποδίζει σε τίποτα τον διαχειριστή της “προβληματικής” ιστοσελίδας να αλλάξει αύριο domain κρατώντας ακριβώς το ίδιο περιεχόμενο. Οπότε εμποδίζοντας την πρόσβαση στους πελάτες πίσω από ένα ISP σε ένα συγκεκριμένο domain δεν καταφέρνεις και πολλά. Ακόμα όμως και να μην αλλάξει domain ο διαχειριστής μιας και υπάρχουν ελέυθεροι nameservers (Google Public DNS, OpenDNS, κ.α) στο Internet, το μόνο που θα είχε να κάνει ο χρήστης θα ήταν να χρησιμοποιήσει αυτούς έναντι των nameservers του ISP του. Άρα πάλι τα τεχνικά μέτρα είναι εντελώς ανεπαρκή ως προς τον σκοπό της απόφασης. Πέραν αυτού και λόγω της προτεινόμενης ανακατεύθυνσης που προτείνει η τεχνική έκθεση τίθεται και ένα θέμα ιδιωτικότητας σε περίπτωση που εφαρμοζόταν το μέτρο (ΙΙ). Λόγω της ανακατεύθυνσης όλοι οι πελάτες θα “πήγαιναν” σε μία νέα ιστοσελίδα που θα ήταν υπό τη διαχείριση (μάλλον?) του ISP, άρα ο ISP αποκτάει πολύ εύκολα πρόσβαση στο ποιός θέλει να επισκεφτεί τον ιστότοπο αυτό. Τίθεται λοιπόν ζήτημα παρακολούθησης της κίνησης των πελατών. Προσωπικά το θεωρώ απαράδεκτο, όπως απαράδεκτο είναι να προσπαθείς να αλλάξεις τον τρόπο που λειτουργεί το internet. Άλλωστε όπως έχει πει ο John Gilmore:

The Net interprets censorship as damage and routes around it

Μετάφραση:

Το Δίκτυο ερμηνέυει τη λογοκρισία ως ζημιά και δρομολογεί (την κίνηση) γύρω από αυτό (ξεπερνώντας την ζημιά)

Τι θα μπορούσαν να κάνουν οι χρήστες για να παρακάμψουν το “πρόβλημα” αν τους επηρέαζε
Σε περίπτωση εφαρμογής του (II), όπως αναφέρθηκε παραπάνω το μόνο που θα είχαν να κάνουν οι χρήστες θα ήταν να αλλάξουν nameservers στο PC/δίκτυο τους. Αυτό εξηγείται αναλύτικά στις σελίδες της Google Public DNS αλλά και του OpenDNS. Τόσο απλά. Είναι υπόθεση 1 λεπτού αν έχει ο οποιοσδήποτε τις οδηγίες μπροστά του.

Σε περίπτωση εφαρμογής της τεχνικής (Ι) και την στιγμή που το site δεν μπορεί για τους Χ λόγους να αλλάξει IP, αυτό που πρέπει να κάνουν οι χρήστες είναι να χρησιμοποιήσουν κάποιον proxy server, ένα VPN ή κάποιο άλλο δίκτυο που δρομολογεί διαφορετικά τις συνδέσεις τους, για παράδειγμα το Tor. Ο ευκολότερος τρόπος να βρει κάποιος δωρεάν proxies στο δίκτυο είναι να ψάξει στο Google, ενώ η αγορά ενός VPN ξεκινά από τα 3€. Η χρήση του tor είναι πλεόν αρκετά απλή και το μόνο που απαιτείται είναι να κατεβάσει κανείς το Tor Browser Bundle και να τρέξει το Vidalia. Όταν κάποιος τρέξει το Vidalia θα ανοίξει ένας νέος browser (Firefox) και έπειτα η δρομολόγηση των πακέτων προς το site που θέλει να επισκευτεί κανείς γίνεται μέσω του Tor δικτύου το οποίο είναι αρκετά δύσκολο να το σταματήσουν οι ISPs. Σίγουρα πάντως η απόφαση ασφαλιστικών μέτρων 4658/2012 δεν είναι ικανή να σταματήσει το Tor ή οποιονδήποτε άλλο από τους παραπάνω τρόπους παράκαμψης του “προβλήματος”.

Τι πρέπει να γνωρίζουν οι χρήστες του Internet
Οι χρήστες του internet πρέπει να γνωρίζουν πως ανά πάσα στιγμή μια τέτοια απόφαση μπορεί να τους αλλάξει τις συνήθειές τους αλλά και να τους κόψει την πρόσβαση από πηγές πληροφορίας που μέχρι τώρα είχαν ελεύθερη πρόσβαση. Για να μην βρεθούν τελευταία στιγμή να αναρωτιούνται τί και πώς πρέπει να φροντίζουν να ενημερώνονται για τους κινδύνους και τα προβλήματα. Είναι μάλιστα επιτακτικό ο ένας χρήστης να ενημερώνει τους άλλους. Γι αυτούς ακριβώς τους λόγους τους τελευταίους 2-3 μήνες έχει ξεκινήσει μια προσπάθεια ενημέρωσης των Ελλήνων χρηστών για τα ψηφιακά τους δικαιώματα, τους κινδύνους που υπάρχουν στο διαδίκτυο, πως προστατεύει κανείς τα προσωπικά του δεδομένα και πως αποφεύγει προσπάθειες εταιρικής ή κρατικής λογοκρισίας μέσω κάποιων παρουσιάσεων που γίνονται στο hackerspace της Αθήνας. Η επόμενη παρουσίαση γίνεται στις 30/05/2012 και αφορά την χρήση του δικτύου Tor. Όσοι ενδιαφέρονται είναι ευπρόσδεκτοι να έρθουν να ακούσουν και φυσικά να ρωτήσουν για τυχόν απορίες που ίσως έχουν σχετικά με την ψηφιακή τους ζωή.

Οργανωθείτε!
Αν σας ενδιαφέρει να παλέψετε και εσείς για τα ψηφιακά δικαιώματα και τις ελευθερίες στην Ελλάδα καλό θα ήταν να διαβάσετε το κείμενο θέσεων του Δικτύου για την Ψηφιακή Απελευθέρωση (Digital Liberation Network) και αν συμφωνείτε να εγγραφείτε στην mailing list του DLN.

my past 2 articles for LinuxInside

Following my first article on the Greek Linux Magazine called LinuxInside about IPv6, I uploaded my past 2 articles for it. Both articles are in Greek of course.

The first one is about debugging network connectivity issues using the command line on Linux. It was published on the 2nd issue of LinuxInside.
Εντοπίζοντας ένα πρόβλημα δικτύωσης

The other one is an introduction to Zsh. It was published on the 3rd issue of LinuxInside.
Κατακτήστε το Z shell

If you haven’t read the magazine already, feel free to download those pdfs and read them.
All my presentations/articles can be found at: Articles/Presentations

0x375 – 0x07 – Security Considerations for a brave new (IPv6) World

I finally had the chance to present something at the Thessaloniki Tech Talk Sessions also known as 0x375. The people over there have done a great job, and I truly mean that, bringing tech people together. Almost once a month 2 speakers can present a tech topic they like at an open auditorium inside the Aristotle University of Thessaloniki. On those events people from Thessaloniki, but also from nearby cities, gather and have a great time, not only during the presentations but afterwards as well. I won’t spoil the events that take place during the tech talks, because you should definitely go if you are curious, but I can tell you that it’s not uncommon for as many as 15 to 20 people to go for beers after the talks!

So, the past Friday (25/11/2011), me and @apoikos traveled from Athens to Thessaloniki to present at 0x375. My presentation was about some security concepts on IPv6 networks, how old attacks of the IPv4 world transform to new ones on the IPv6 world and about some new ones that will appear on local networks sooner or later. I also had prepared some small live demos, but as always it’s very hard to succeed in a live demo if you don’t quite control the environment. At least some of the stuff I wanted to show were successful, and I’m happy with those. (Thanks to Nuclear for booting his OS X guinea pig)

Some apologies…When giving a presentation on IPv6, in an event that has no other introductory IPv6 presentations, I always face the same problem, most people are not very well aware of how different this protocol is from IPv4. When I ask the audience how well do they know IPv6, most people are embarrassed to say they have never actually used it, so the audience stays very, VERY silent. This means that I have to put around 15-20 slides to make a “quick introduction to IPv6”, and this unfortunately takes usually over 30′ of presentation time. Some techy/advanced people might be bored with this, but there’s no other way to overcome this “issue”. If you go straight to the point and start discussing about ND ICMPv6 messages most people won’t be able to keep up…so I’m sorry if I made some of the audience get bored by my first slides. I promise that my next talk on 0x375, cause there will surely be a next one, will be less boring for you 🙂

Thank you all for coming there, I hope you enjoyed it as much as I did!

You can find the slides and my live demo notes here:
0x375 – 0x07 – kargig – Security Considerations for a brave new (IPv6) World (pdf)
0x375 – 0x07 – kargig – Security Considerations for a brave new (IPv6) World – live demo notes (txt)

P.S. I’ve started collecting some interesting (for me) presentations regarding IPv6 topics at void.gr/kargig/ipv6/. Check them out if you like.

Fosswar 2011 – How we did it

Intro
As said in my previous post about Fosscomm 2011, during the conference there was a wargame consisting of 5 challenges. We played in a team consisting mainly of the following members: manji/manjiki, trelo_mpifteki, mickflemm and me. Along with us was maisk mainly acting as our manager (!!) shouting at us when we did something he did not like. He was of course a great help (sometimes :P).

Few words about the team
As most people who regularly read this blog already know, I consider myself a sysadmin even though I currently work at a company that produces Linux based xDSL routers where I do most of the things required about networking and system interaction like QoS, VoIP, IPv6, firewall, etc. My coding is confined among the realms of scripting languages. Manji is also a sysadmin who has lately started to mess with VoIP. Trelo_mpifteki is mostly a java developer and so is maisk. mickflemm is a coder and a very good one, frequently messing with Linux kernel’s wireless driver support. Obviously, we are certainly not the typical wargame players…

The challenges
Be sure to download the challenges from: http://patras.fosscomm.gr/fosswar/

As soon as the wargame was on we split the challenges among us. Since mickflemm was the only coder he started to mess with challenge number 5 (reverse engineering). Me and trelo_mpifteki started to look at challenge number 1 (networking) while manji started poking at challenge number 3 (networking).

Challenge 1:
Type: Networking
Players: kargig, trelo_mpifteki
The first challenge said just this:

Connect to the elite port and find the secret message.

Everyone knows that elite = 31337
So we just did a nc X.Y.Z.W 31337 (where X.Y.Z.W is the IP address of the server) and the following message appeared:

IP protocol = 1
Timestamp
id = 1337
seq = 0xCAFE
orig = 0xDEAD

As it is easily understood one must create a packet, the problem is what kind of packet. And then was when I did a huge mistake stalling my team for more than 10 mins by insisting that Protocol 1 is IP. So we started trying to create an IP packet using scapy. Obviously we hit lots of problems because IP’s header clearly misses most of the above options, especially timestamp. Our next idea was to create a TCP packet in order to embed some of the options. This also lead to a dead end. The I looked again at my /etc/protocols file and I saw that Protocol 1 is ICMP. Timestamp is type 13, code 0 and the rest are just options. So our solution was this:

>>> packet_2= IP(dst='X.Y.Z.W')/ICMP(type=13, id=1337, seq=0xcafe, ts_ori=0xdead)
>>> send(packet_2)

Using Wireshark we captured the response packet which looked like this (this setup is on my box atm):

One can see the message: feedadeadface in it.

Hint:
If you need to compile listenicmp.c yourself you have to do something like this:

 # aptitude install libpcap-dev
# gcc -o listenicmp listenicmp.c -lpcap

Challenge 2:
Type: Steganography
Players: kargig,trelo_mpifteki,maisk
For this challenge the organizers gave us a hint what we needed to find was close to the end of the image.jpg and after “BAADF00D”.

# hd image.jpg | tail -n 4
000152a0  d4 4d 77 22 b9 9a 68 ba  ad f0 0d 78 9c 0b c9 c8  |.Mw"..h....x....|
000152b0  2c 56 00 a2 44 85 e2 d4  e4 a2 d4 12 85 dc d4 e2  |,V..D...........|
000152c0  e2 c4 f4 54 3d 00 72 da  08 ef                    |...T=.r...|
000152ca

so we found “ba ad f0 0d” and the next characters were “78 9c”. We googled those and came up with the result that it was the magic of zlib compression. So what we had to do was get the rest of the file after “ba ad f0 0d” and then uncompress that. To get the rest of the file we found the size of the file and subtracted the bytes (31) that were of interest to us:

# du -b image.jpg
86730  image.jpg
# split -b 86699 image.jpg koko
# mv kokoab final

Then we run python to decompress “final” file.

>>> import zlib
>>> ourfile=file('final')
>>> ourfile
<open file 'final', mode 'r' at 0xb7473020>
>>> chunk=ourfile.read()
>>> chunk
'x\x9c\x0b\xc9\xc8,V\x00\xa2D\x85\xe2\xd4\xe4\xa2\xd4\x12\x85\xdc\xd4\xe2\xe2\xc4\xf4T=\x00r\xda\x08\xef'
>>> zlib.decompress(chunk)
'This is a secret message.'

Challenge 3:
Type: Networking
Players: manji,maisk,kargig

While me and trelo_mpifteki were trying to solve challenges 1 and 2, manji was looking into challenge 3 pcap file for weird things. Once again we were given a hint that we needed to look at strange headers. Finding strange headers in a 800+ kb pcap file is not an easy task though. At a point manji was looking for very big sequence numbers…and then we got another hint, that we shouldn’t look at those big numbers at all. When me and trelo_mpifteki finished the other two challenges we started looking at Wireshark.
We applied the following filter:
(ip.host == 64.22.109.100) && ((tcp.seq == 0) || (tcp.seq ==1))
And the we had the following results in front of us:

Since we knew that the message was sent to “64.22.109.100” we needed to look at packets originating from “192.168.1.3”. The first thing I noticed were packets with strange TTLs, they were going up and down..so I made a guess that the secret message could be hidden there. Transforming those TTL values to ASCII was a dead end. Then we started to look closer at every packet that 192.168.1.3 sent to 64.22.109.100 and we grouped them by destination port. There was clearly something going on with destination port 58900. A careful eye will also notice that packets towards port 58900 don’t have an MSS set while others mostly do. So, we expanded our filter with packets that also had destination port 58900:
((ip.host == 64.22.109.100) && ((tcp.seq == 0) || (tcp.seq ==1))) && (tcp.dstport == 58900)
and came up with this:

If you look closely at the selected packet from Wireshark, you’ll see that the sequence number while set to 0 (zero) contains the letter ‘r’ inside it. The next packet contained the letter ‘o’ and the next one the letter ‘t’. Writing all these letters down we had this sequence:

r
o
t

q
r
n
q
o
r
r
s

That was a rot13 encrypted message! with google’s help we found a rot13 decryptor. The decrypted message was:
D E A D B E E F

That’s it! we had 3 out of 5 while no other team had more than 2. So we had wooooon! Congrats to everyone on our team!

void.gr on native IPv6

Some months ago (exactly 4 actually) I had posted that void.gr was then accessible over IPv6. Today void.gr is accessible over native IPv6 thanks to my hosting provider, Leaseweb.

About a year ago I had asked Leaseweb for IPv6 support and their reply wasn’t very promising. It seemed that they weren’t really looking forward to providing IPv6 for their dedicated server clients yet. Today though I thought I should ask again, even if IPv6 support for their dedicated servers is still not referenced anywhere. And I got lucky! They offered me a /64.

So void.gr is from now accessible over IPv6 at 2001:1af8:4100:a000:4::131.

Accessing my server over IPv6 from my home’s native IPv6 connection, thanks to OTE providing beta IPv6 access to subscribers, seems a bit faster than accessing it via IPv4. Ping times are usually 4-5ms better. Looks like IPv6 connections are not that crowded as IPv4 are 🙂

The setup is pretty straightforward. Even if Debian Wiki is not very clear about how to setup IPv6, here’s what you have to do if you, like me, have a server with a native IPv6 connection.

# vi /etc/network/interfaces
auto eth0
iface eth0 inet static
    address 85.17.162.131
    netmask 255.255.255.0
    gateway 85.17.162.254
    network 85.17.162.0
    broadcast 85.17.162.255
iface eth0 inet6 static
    address 2001:1af8:4100:a000:4::131
    netmask 64
    gateway 2001:1AF8:4100:A000::1

Then of course you need to edit your Apache configuration to add the IPv6 vhosts.

P.S. I am still waiting an answer as to whether I can manage the reverse delegation of the IPv6 address space Leasweb gave me since I can’t do that from the control panel. I’ll post any updates on the ticket when I have some news…

Article on IPv6 for Linux Inside

For the past 1,5 years I’ve been messing (again) a lot with IPv6. The first time I started looking at the protocol was back in 2002-2003 when I was working at the Network Operations Center of my university. I had set up a couple of links between routers and tried various connectivity experiments mainly using some Cisco routers and Linux boxes. This time I started looking at it more seriously, mainly because I wanted to add support for it on the xDSL Linux-based routers/CPEs the company I currently work for produces. (GENNET, yes I know that the company’s website is UGLY…or worse than that…).

The task wasn’t easy, lots of backporting and fixing on both kernel-space and user-space had to be done. Luckily my colleagues were very helpful when I needed them. I have to say though that the main obstacle on working on it were not the technical difficulties but trying to convince our management that they had to give me time to work on it. It took a while (months…) to convince them but the end result is that all our models are now IPv6 capable. I am pretty glad that our product is referenced at the website of the first Greek ISP to start experimenting with IPv6 (Gennet OxyGen on ipv6.ote.gr). Being presented on the same page as the Cisco and the AVM CPEs is not bad at all!

Out of this process I learned quite a lot on IPv6, so when Dimitris Kalamaras, the editor of the new Greek Linux magazine Linux Inside, asked me to write an article for the first issue of the new magazine, there wasn’t actually a choice. I would write about IPv6, and so I did. I had written articles in the past for another Greek Linux Magazine called LinuxFormat, which was an adaptation of the English one. I’ve put the pdfs of my previous articles at my blog under Presentations/Articles.

My article is about the history if Internet Protocols (IPv4, IPv6), which were the needs that drove IPv6 development and a small intro to some of the changes that the new protocol brings to our life. There is also some information on how to connect using tunnels and so on. The article serves just as an introduction to IPv6, if there’s feedback I will write something more extended and maybe more technical. The timing of the article couldn’t be any better, magazine was out in the streets on 02 February 2011 and IANA pool run out of IPv4 addresses on 03 February 2011. Just perfect!

I will publish the pdf of the article along with my other articles on magazines/newspapers after a couple of months have passed, just to be fair with the magazine’s publishing company. Until then, go buy the magazine, there are many interesting and original articles inside it.